How to use the Production Dashboard
The Production Dashboard gives reps a snapshot of POs in their pipeline, highlights POs that require their attention, and provides an interactive calendar view of what is currently in production.
The Production Dashboard is a production rep's best tool when it comes to tracking purchase orders through the production pipeline, managing alerts for purchase orders or proofs that require attention, and staying on top of developing data with regards to the promostandards endpoints.
The Production Dashboard will help answer questions like:
- Are my PromoStandards purchase orders up-to-date?
- How many POs do I have in each stage?
- How many proofs do I have in each status?
- Are there any overdue POs?
- What POs need my attention?
- What orders are coming down the pipeline?
- Where should I focus my time today?
This article explains how production reps can use their Production Dashboard to track their team's tasks.
Users need permission to "View Production Menu" to use the Production Dashboard.
On this page:
How to use your Dashboard's smart-tiles
How to use the report and report tiles
How to manage your tasks and POs
How to submit suggestions to make the Production Dashboard more useful
Key Terms
Booked order: A project that has a sales order and purchase orders. A sales order is "booked" when the client approves the sale, and the rep creates supplier POs.
Budget: A project's estimated revenue, entered on the project overview.
Client rep: The salesperson who manages the client's account, usually known as the account manager or account executive.
Closed: A canceled sale or a sales form that did not result in business (the client did not place an order).
Converted: A sales form that has moved to the next sales stage. For example, a sales rep may convert a presentation to an estimate or sales order.
In production: A project that has a sales order and purchase orders. A sales order's status automatically changes to In Production when a rep creates the supplier purchase orders.
Open: A sales form is Open when the sales rep is still working on it. For example, a presentation is Open when a sales rep uses it to send product ideas to their client. If the client decides not to place an order, the sales rep should change the presentation's status to Closed. If the client chooses to place an order, the sales rep will convert the presentation to an estimate or sales order.
Pre-sale: A preliminary sales form, like a presentation or estimate, or any sales-related activity before creating an actual sales order, like a new sales opportunity.
Revenue: Total sales income, not including tax.
Sales forecast: Estimated revenue.
Value: An estimate, sales order, or invoices subtotal.
How to create a new project from your Production Dashboard:
- Click New Project in the top right corner.
- Select a pre-existing client from the drop-down list, or click + New Client at the bottom of the drop-down to add a new client to commonsku
- If you are adding a new client (optional):
- Type the client's name
- Select their industry from the drop-down menu
- Click Create Client
- If you are adding a new client (optional):
- Enter a Project Name
- Select an Event Type from the drop-down
- Select your Starting Stage
- Click Continue
-png-Aug-02-2022-06-54-52-42-PM.png?width=688&height=406&name=Production-Dashboard%20(1)-png-Aug-02-2022-06-54-52-42-PM.png)
How to use your Dashboard's smart-tiles
The Dashboard's smart-tiles increase efficiency by alerting reps to POs that need their attention and alleviating the burden of monitoring multiple reports.
Coming Soon: The Production Dashboard's smart-tiles will include pulse check tiles, like:
- POs with PromoStandards order status
- POs with PromoStandards shipping updates
These tiles appear just above your report tiles.
-png.png?width=688&height=614&name=Production-Dashboard%20(5)-png.png)
As well as actionable tiles, like:
- POs with overdue Next Action dates
- POs with overdue In Hands dates
- POs with overdue Projected Ship Dates
- POs in Problem status
- POs in Follow up status
- Sales Orders in Client approved
These tiles appear just below your reports.
-png-1.png?width=688&height=614&name=Production-Dashboard%20(5)-png-1.png)
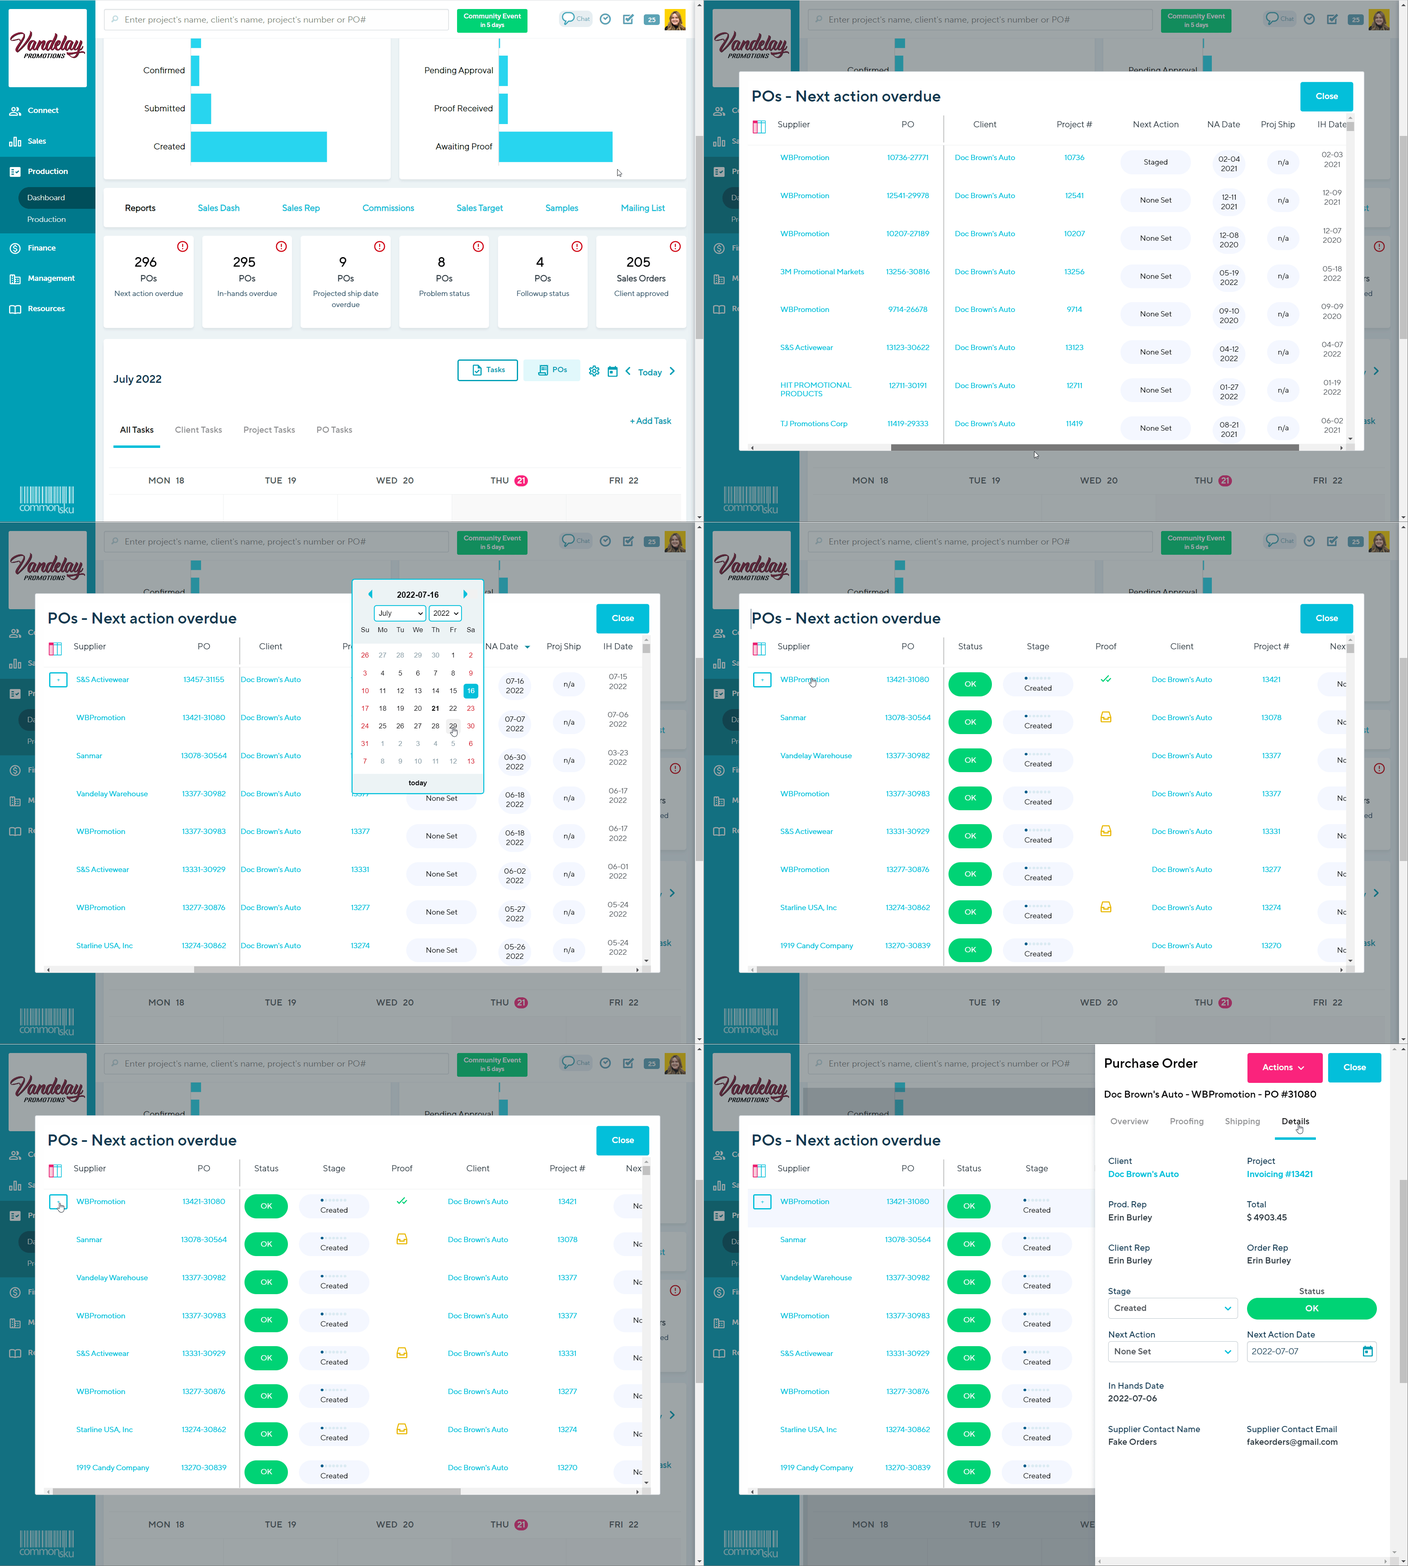
POs with overdue Next Action dates
The POs with overdue next action dates tile alerts reps to open purchase orders with overdue next action dates. The number of purchase orders with an overdue Next Action date will be indicated on the tile along with a red icon in the right-hand corner.
Next action dates help reps keep track of when certain actions need to be taken with a purchase order.
How to use the POs with overdue Next Action dates tile:
- Click into the tile to open a list of POs with an overdue Next Action date
- Filter the POs by selecting different column titles (for example, click on the "Stage" column to filter the results by stage) and update the next action date
- Click on the hyperlinked PO number to see a preview of the PO
- Click on the hyperlinked Supplier name to be redirected to the supplier page
- Click on the hyperlinked Project number to be redirected to the project
- Update the stage, status, next action type and date, or projected ship date of the PO
- Click on the proofing icon (if applicable) and manage/update any existing proof information
- Hover over a PO and click the "+" sign to access the slide-out menu from your Production report
POs with overdue In Hands dates
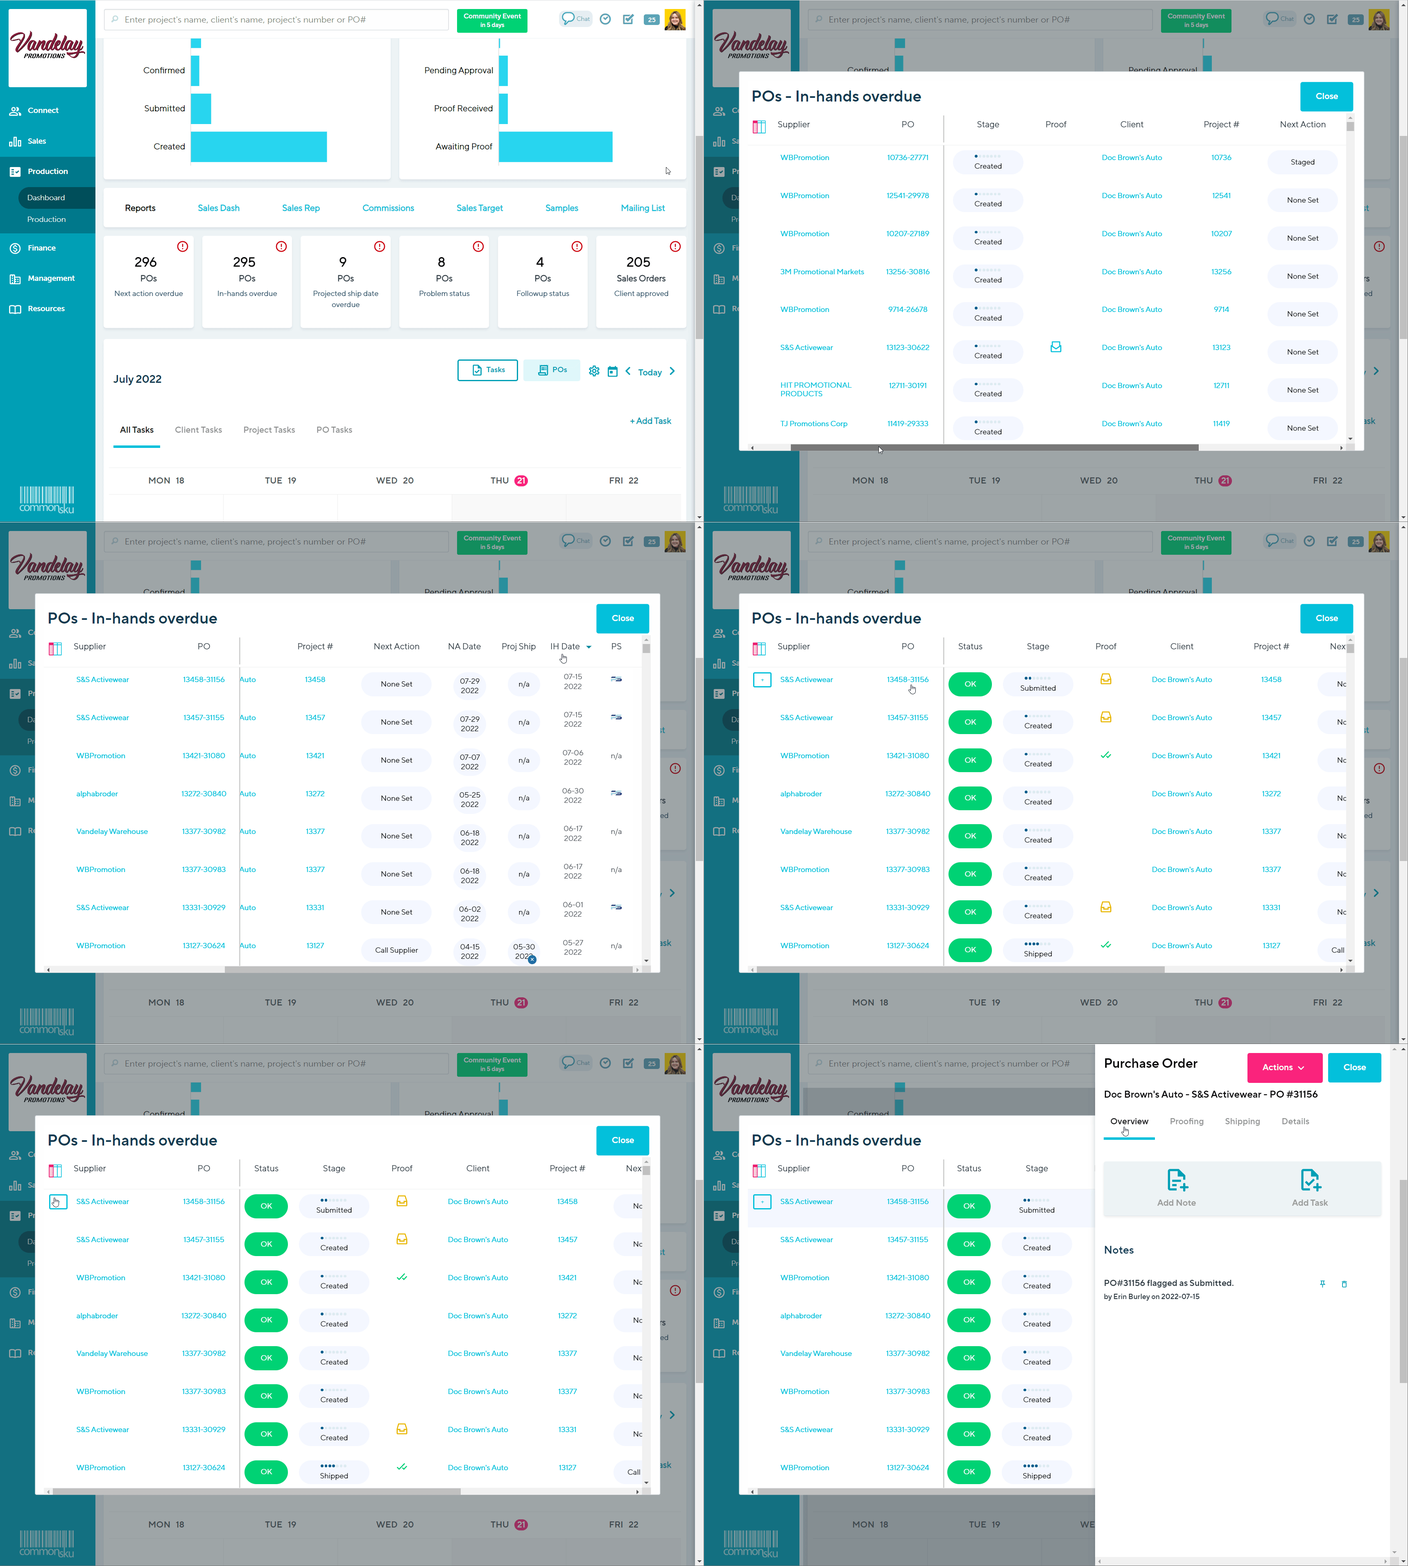
The POs with overdue In Hands dates tile alerts reps to open purchase orders with overdue In Hands dates. The number of purchase orders with an overdue In Hands date will be indicated on the tile along with a red icon in the right-hand corner.
In Hands date of a PO indicates when products are supposed to land in the clients hands. This tile will help reps keep track of their orders and ensure everything arrives when its supposed to.
How to use the POs with overdue In-Hands dates tile:
- Click into the tile to open a list of POs with an overdue In-Hands date
- Filter the POs by selecting different column titles (for example, click on the "Stage" column to filter the results by stage)
- Click on the hyperlinked PO number to see a preview of the PO
- Click on the hyperlinked Supplier name to be redirected to the supplier page
- Click on the hyperlinked Sales Order number to be redirected to the project
The in-hands date of a PO cannot be adjusted from this tile. If you need to update the in-hands date for a PO, you'll need to navigate to the project > update the in-hands date for the relevant product in the shipping tab > Regenerate the PO from the POs tab.
From the pop-up menu, you can:
- Update the stage, status, next action type and date, or projected ship date of the PO
- Click on the proofing icon (if applicable) and manage/update any existing proof information
- Hover over a PO and click the "+" sign to access the slide-out menu from your Production report
POs with overdue Projected Ship Dates
The POs with overdue Projected ship dates tile alerts reps to open purchase orders with overdue projected ship dates. The number of purchase orders with an overdue projected ship date will be indicated on the tile along with a red icon in the right-hand corner.
Projected ship dates help reps anticipate when their orders are expected to ship to their clients, and can be compared to the POs in-hands date to ensure timely arrival.
How to use the POs with overdue Projected ship dates tile:
- Click into the tile to open a list of POs with an overdue Projected ship date
- Filter the POs by selecting different column titles (for example, click on the "Stage" column to filter the results by stage) and update the projected ship date
- Click on the hyperlinked PO number to see a preview of the PO
- Click on the hyperlinked Supplier name to be redirected to the supplier page
- Click on the hyperlinked Sales Order number to be redirected to the project
From the pop-up menu, you can:
- Update the stage, status, next action type and date, or projected ship date of the PO
- Click on the proofing icon (if applicable) and manage/update any existing proof information
- Hover over a PO and click the "+" sign to access the slide-out menu from your Production report

POs in Problem status
The POs in Problem status tile alerts reps to open purchase orders that have been set to Problem status.
A purchase order can be moved to Problem status manually by a rep, or automatically if the supplier has selected to request a change on the PO.The number of purchase orders in Problem status will be indicated on the tile along with a red icon in the right-hand corner.
Reps can use this tile to stay on top of supplier requested changes and PO issues that require attention before continuing through production.
How to use the POs in Problem status tile:
- Click into the tile to open a list of POs in Problem status
- Filter the POs by selecting different column titles (for example, click on the "Stage" column to filter the results by stage)
- Click on the hyperlinked PO number to see a preview of the PO
- Click on the hyperlinked Supplier name to be redirected to the supplier page
- Click on the hyperlinked Sales Order number to be redirected to the project
From the pop-up menu, you can:
- Update the stage, status, next action type and date, or projected ship date of the PO
- Click on the proofing icon (if applicable) and manage/update any existing proof information
- Hover over a PO and click the "+" sign to access the slide-out menu from your Production report
POs in Follow up status
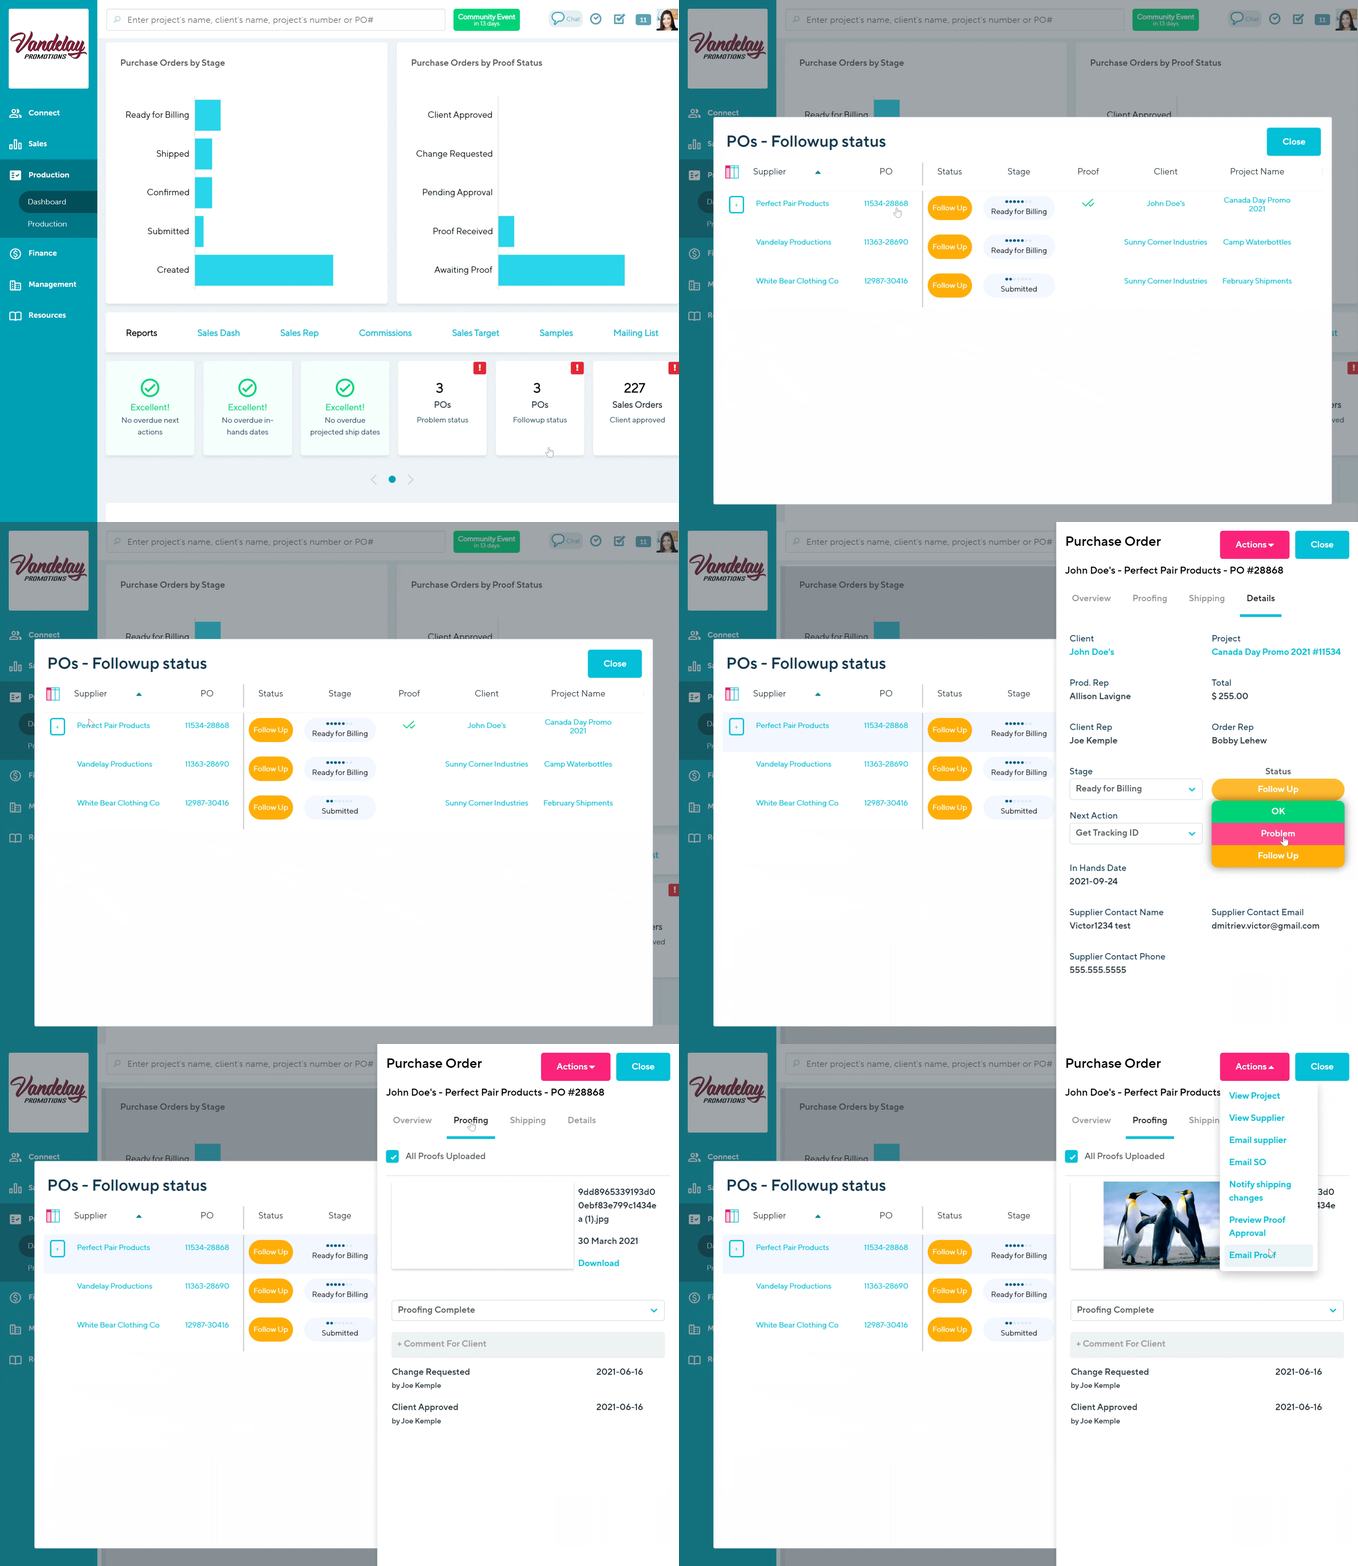
The POs in Follow up status tile alerts reps to open purchase orders that have been set to Follow up status.
A purchase order is moved into Follow up status manually by a rep to indicate that there is something that needs to be done with the PO before it can continue through production. The number of purchase orders in Follow up status will be indicated on the tile along with a red icon in the right-hand corner.
How to use the POs in Follow up status tile:
- Click into the tile to open a list of POs in Follow up status
- Filter the POs by selecting different column titles (for example, click on the "Stage" column to filter the results by stage) and update the projected ship date
- Click on the hyperlinked PO number to see a preview of the PO
- Click on the hyperlinked Supplier name to be redirected to the supplier page
- Click on the hyperlinked Sales Order number to be redirected to the project
From the pop-up menu, you can:
- Update the stage, status, next action type and date, or projected ship date of the PO
- Click on the proofing icon (if applicable) and manage/update any existing proof information
- Hover over a PO and click the "+" sign to access the slide-out menu from your Production report
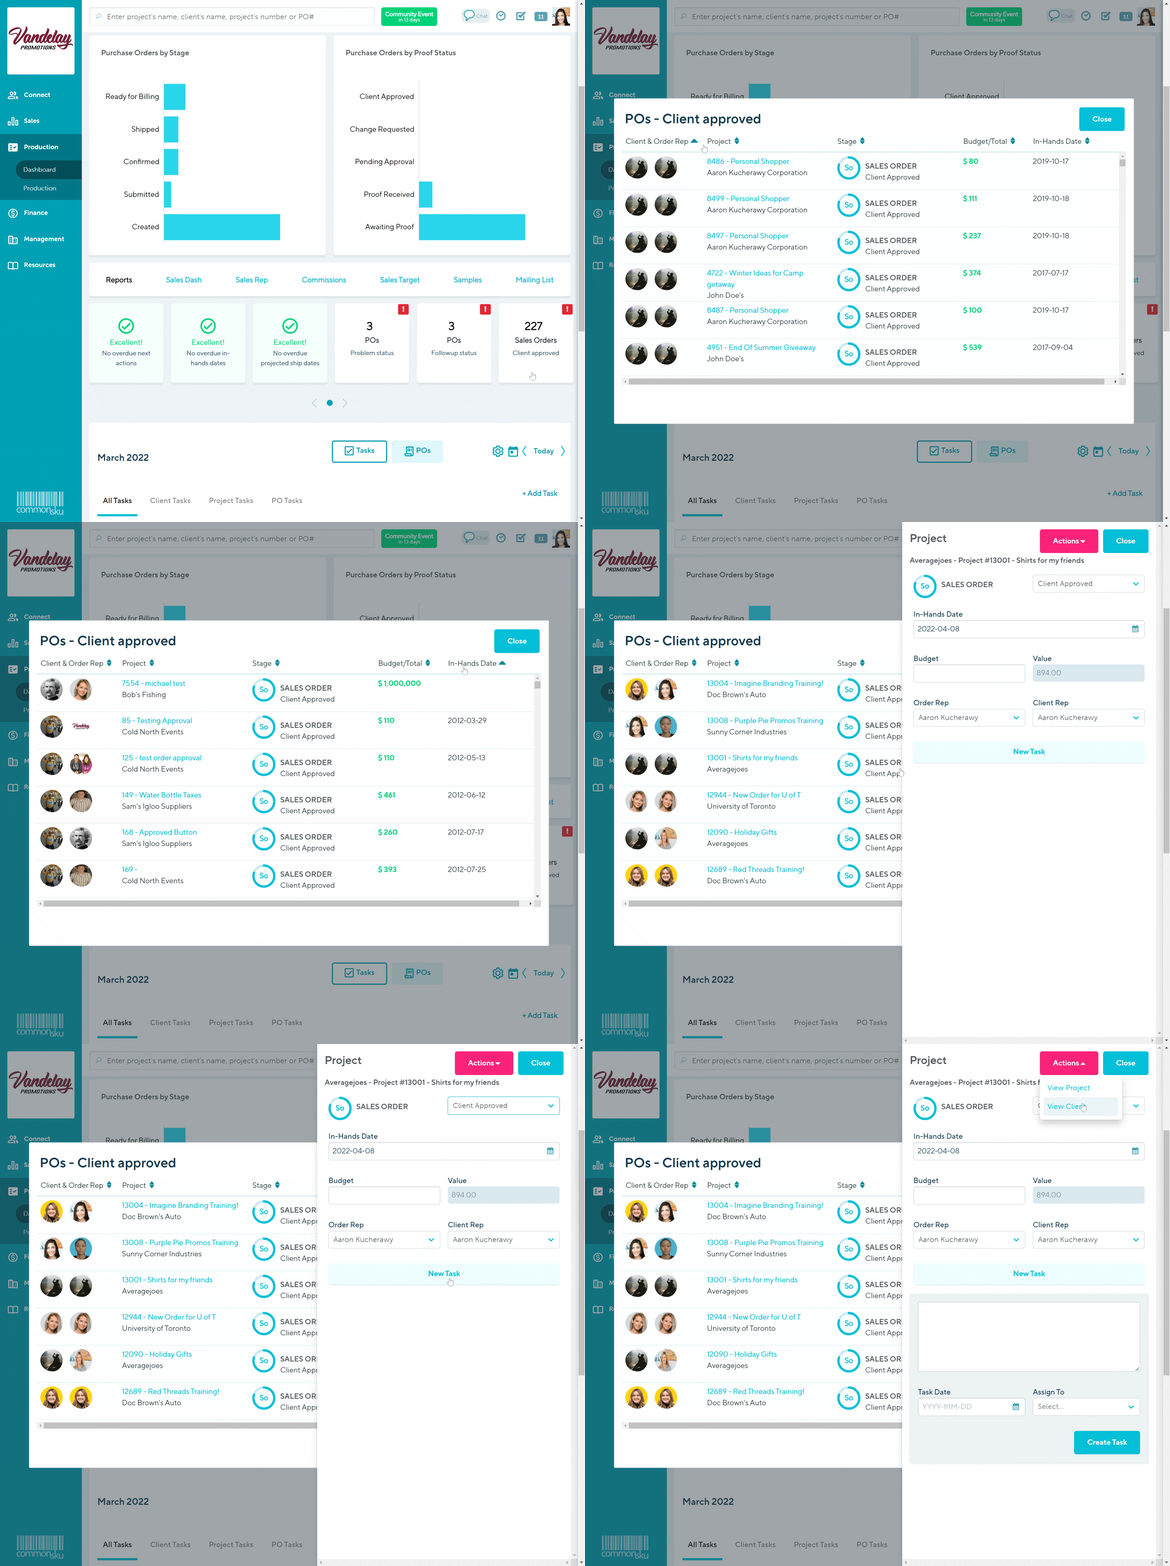
Sales Orders in Client approved
The Sales Orders in Client approved tile shows Sales Orders that have been approved by the client and are awaiting purchase orders.
Sales reps can use this tile to ensure that orders are being put into production promptly to ensure the client receives their order on time.
The number of Sales Orders in Client Approved status that require POs will be indicated on the tile along with a red icon in the right-hand corner.
How to use the Sales Orders in Client approved tile:
- Click into the tile to open a list of Sales Orders in Client Approved status
- Filter the Sales Orders by selecting different column titles (for example, click on the "In-Hands Date" column to filter the results by in-hands date)
- Click on the hyperlinked project name or number to be redirected to the project
- Select any project to open a slide-out menu with more details and action items, like completed or pending action items (tasks). From the slide-out menu, you can:
- Update the sales order's status, the project's in-hands date, budget, and assigned reps
- Create and manage any related tasks
- Click the Actions button to view either the project or the client's page.
How to use the reports and report tiles
The Production Dashboard provides quick links to the following reports:
- Sales Dashboard Report
- Sales Rep Report
- Commission Report
- Sales Target Report
- Sample Report
- Mailing List Report
The Dashboard also features two additional report tiles that track:
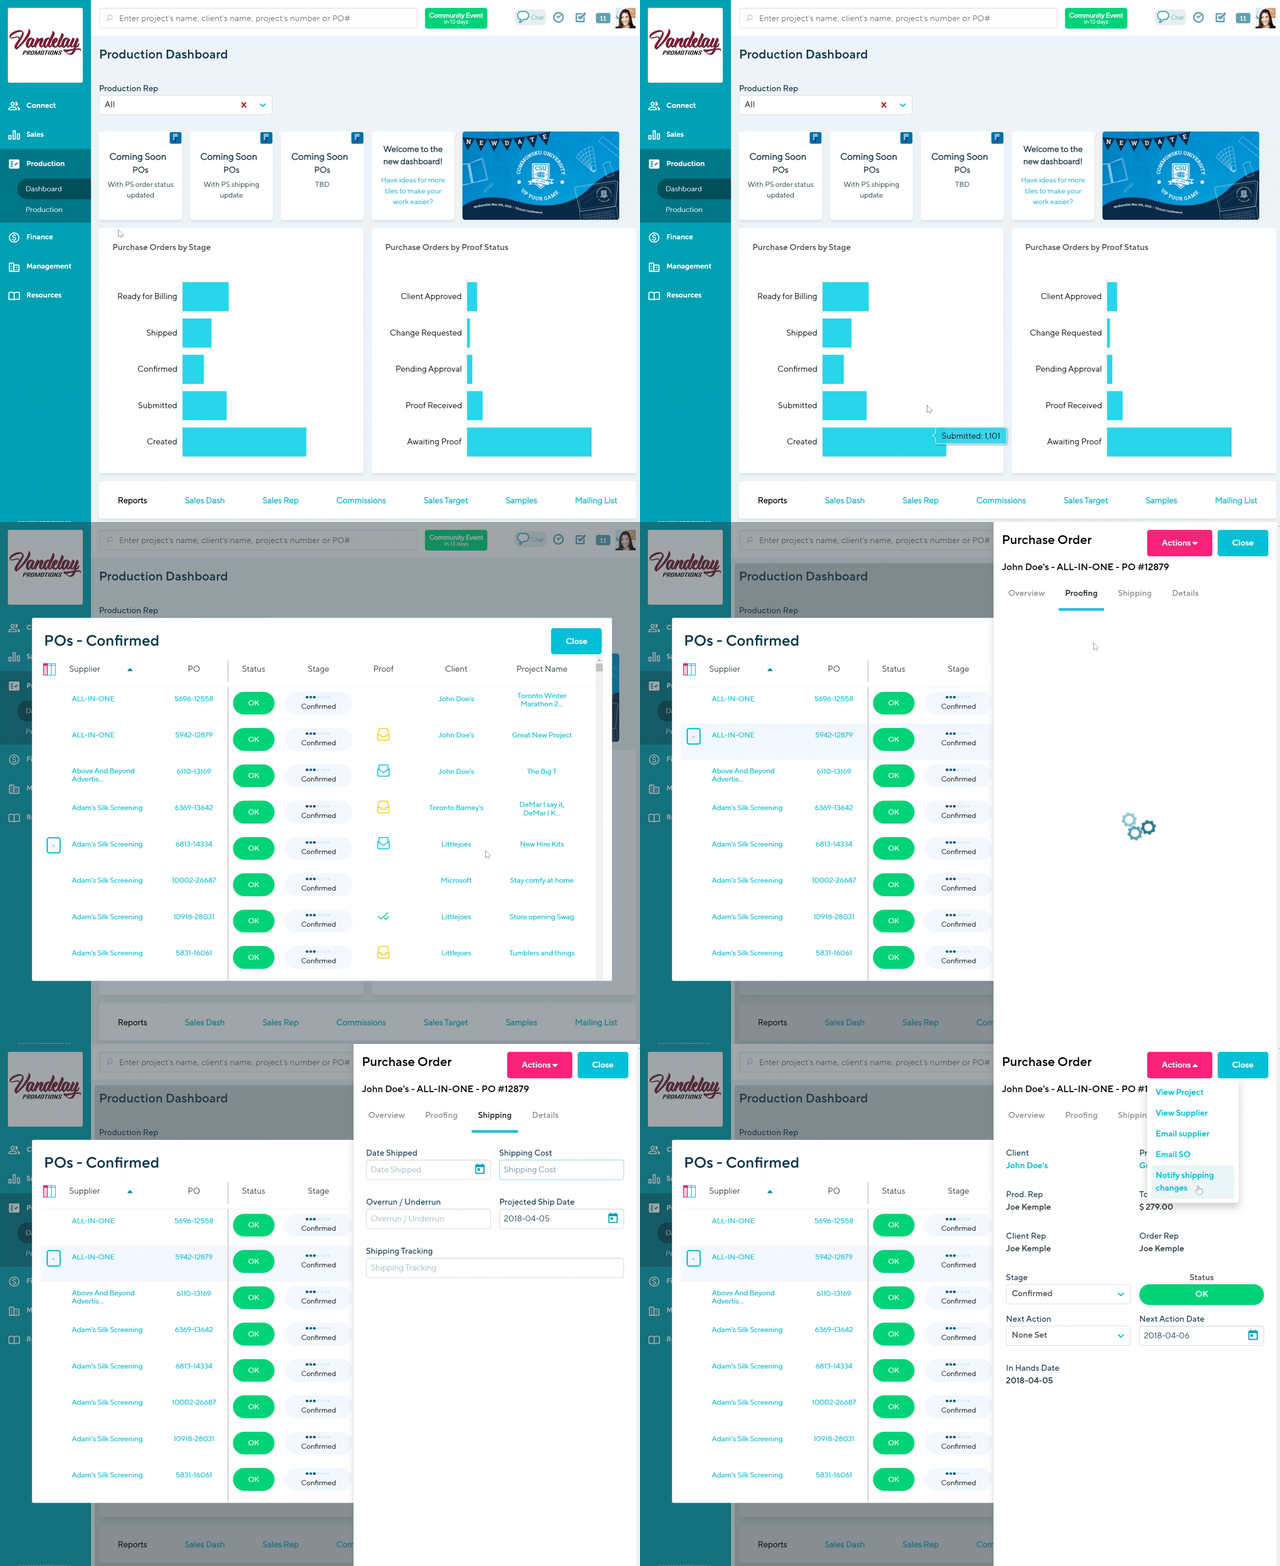
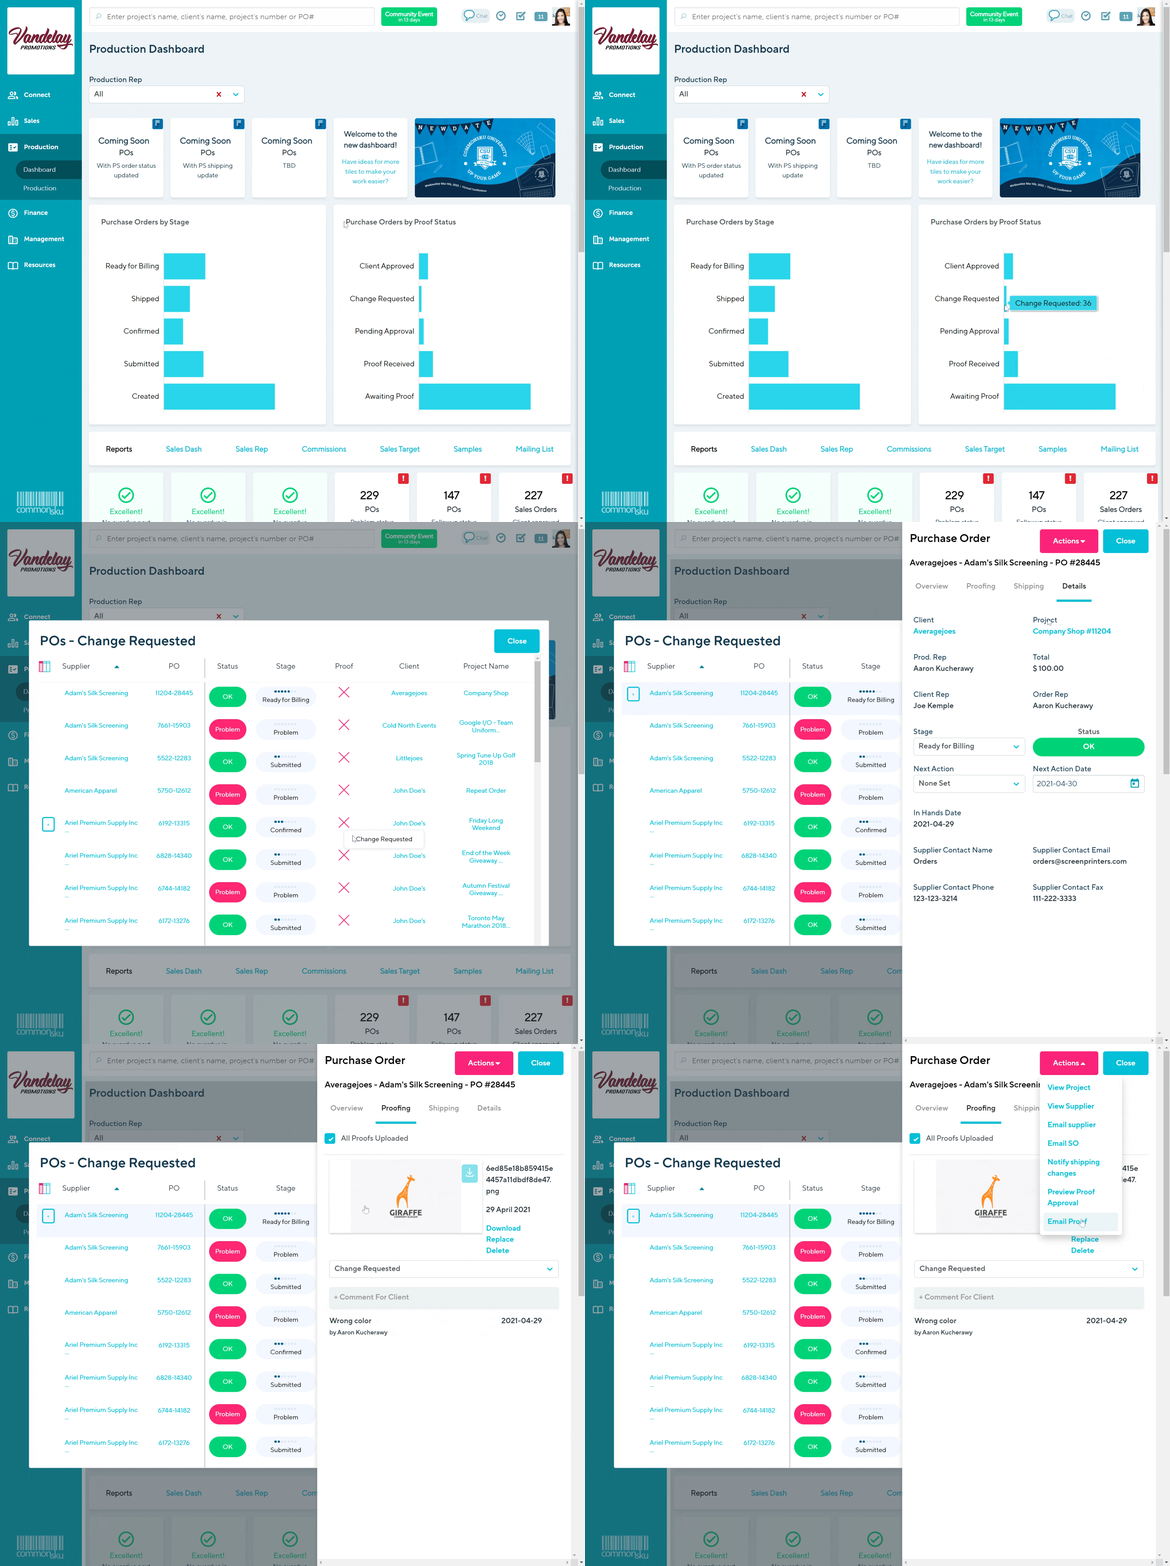
The Purchase Orders by Stage and Purchase Orders by Proof Status reports refine purchase orders and proofs by their stages, providing access to a simplified Production Report where reps can change their PO details without ever leaving the Dashboard.
Purchase Orders by Stage
The Purchase Orders by Stage tile shows all open Purchase Orders in their various stages. This tile does not include purchase orders that are in Closed or Billed status.
Reps can use this tile to track the progress of their orders and stay on top of purchase orders that are awaiting supplier approval or supplier requested changes, or are ready to be billed to the client.
How to use the Purchase Orders by Stage tile:
- Hover over each status bar for a count of how many purchase orders are in that stage
- Click on the bar for a list of the relevant purchase orders
- Filter the Purchase Orders by selecting different column titles (for example, click on the "In-Hands Date" column to filter the results by in-hands date)
- Click on the purchase order number for a preview of the PO
- Click on the hyperlinked Supplier name to be redirected to the supplier page
- Click on the hyperlinked Sales Order number to be redirected to the project
From the pop-up menu, you can:
- Update the stage, status, next action type and date, or projected ship date of the PO
- Click on the proofing icon (if applicable) and manage/update any existing proof information
- Hover over a PO and click the "+" sign to access the slide-out menu from your Production report

Purchase Orders by Proof Status
The Purchase Orders by Proof status tile shows all open proof requests in their various statuses. This tile does not include proofs that are in Proofing Complete status.
Reps can use this tile to track the progress of their proofs and stay on top of purchase orders awaiting decorator proofs, proofs that are awaiting submission to the client, client approval or requested changes.
How to use the Purchase Orders by Proof Status tile:
- Hover over each status bar for a count of how many proofs are in that status
- Click on the bar for a list of the relevant purchase orders
- Filter the Purchase Orders by selecting different column titles (for example, click on the "In-Hands Date" column to filter the results by in-hands date)
- Click on the purchase order number for a preview of the PO
- Click on the hyperlinked Supplier name to be redirected to the supplier page
- Click on the hyperlinked Sales Order number to be redirected to the project
From the pop-up menu, you can:
- Update the stage, status, next action type and date, or projected ship date of the PO
- Click on the proofing icon (if applicable) and manage/update any existing proof information
- Hover over a PO and click the "+" sign to access the slide-out menu from your Production report
How to manage your tasks and POs
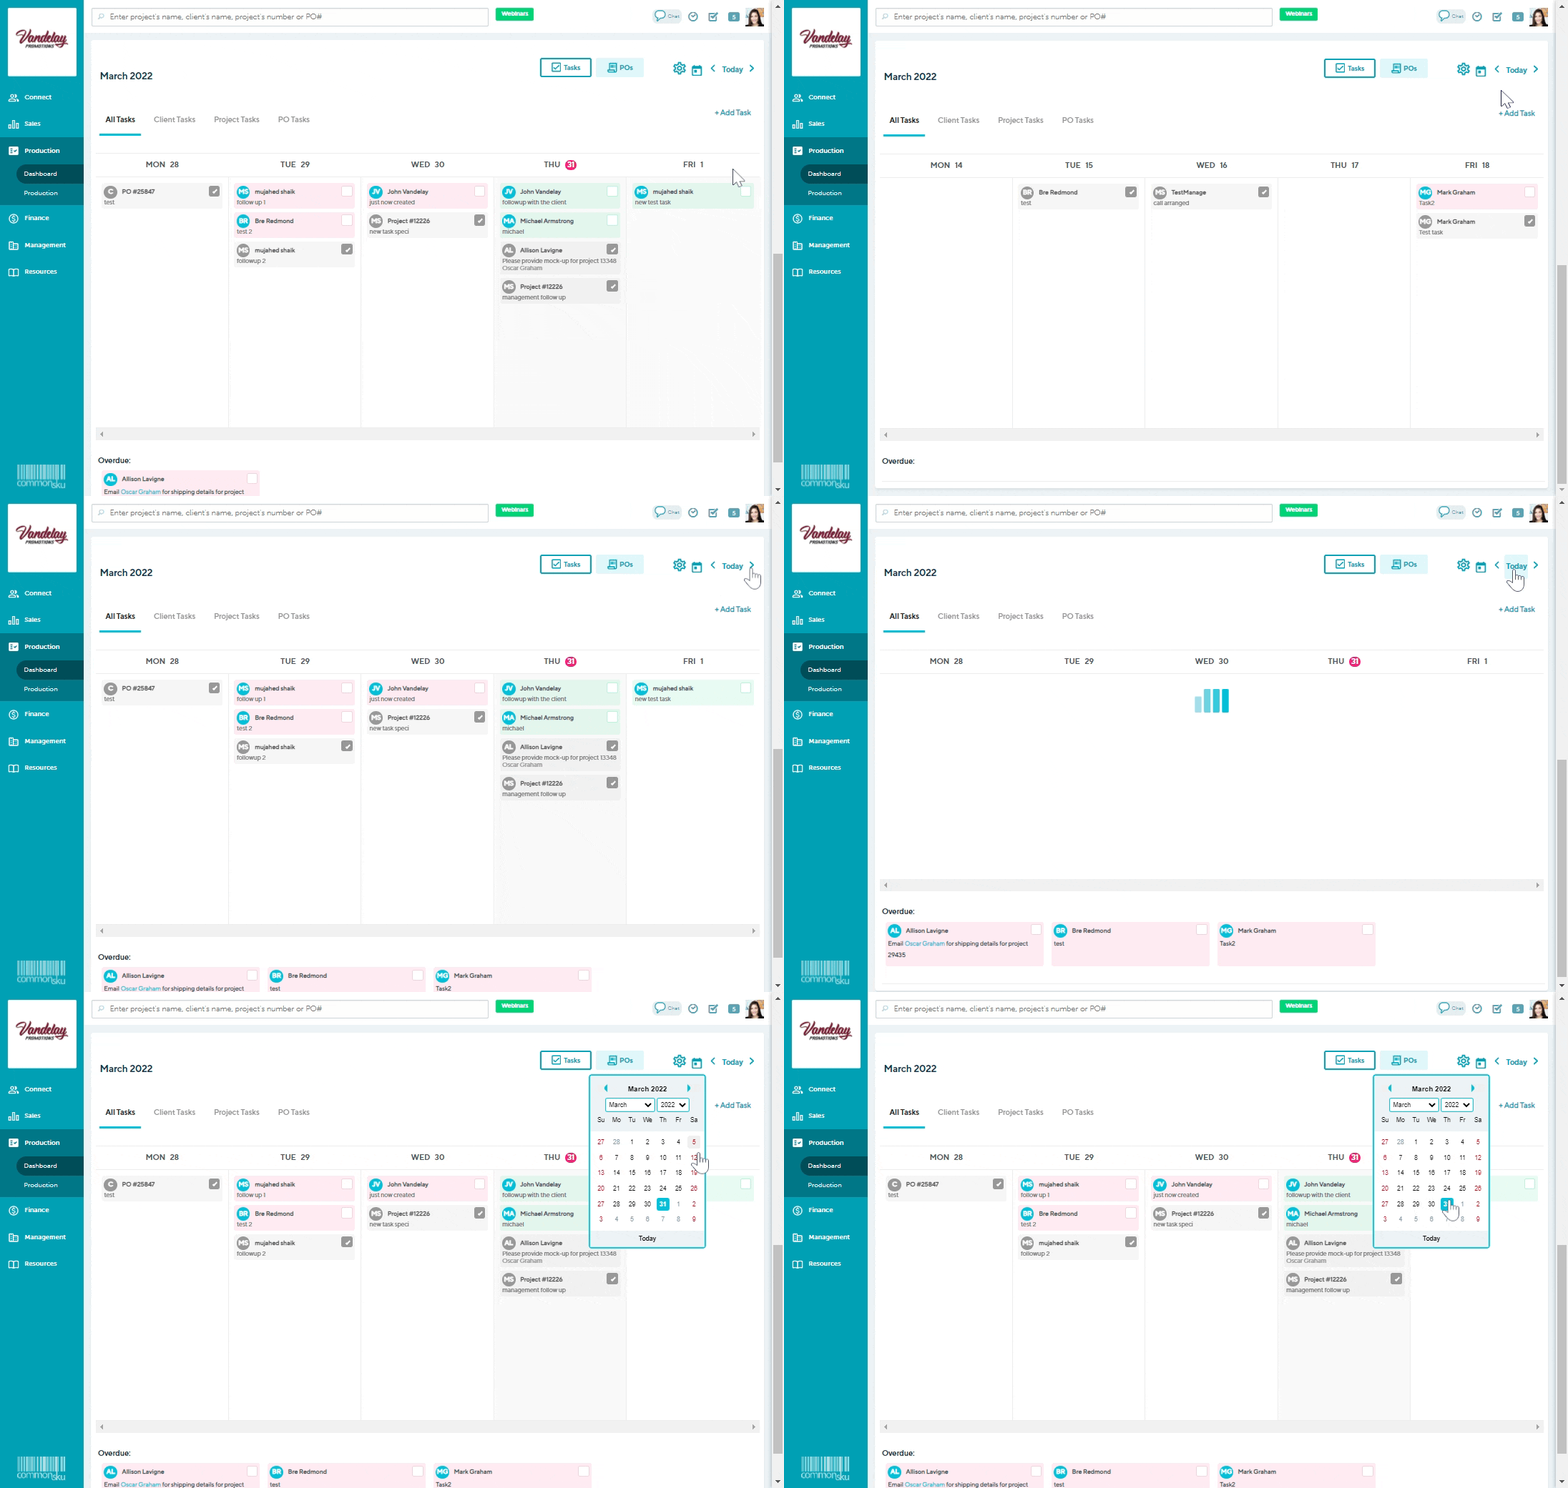
Production reps can use the Production Dashboard's date-driven task panel to visually manage their tasks and stay focused on what's most important.
The task panel is made up of two different tabs:
The tasks tab shows a weekly view of pending and completed tasks, separated into four categories:
- All tasks
- Clients tasks (tasks set on a client's page)
- Project tasks (tasks assigned in a project's overview)
- Overdue tasks (outstanding tasks with a due date prior to the current week)
Tasks are also separated into three colors:
- Green tasks show upcoming tasks that are due today or at a future date as well as tasks that were completed in the calendar week
- Red tasks show overdue tasks that have not been completed
- Grey tasks show completed tasks - completed tasks will automatically move to the bottom of the (daily) task list and fade from green or red to grey.
-png-4.png?width=688&height=450&name=Production-Dashboard%20(1)-png-4.png)
Learn how to:
- View a task
- Edit a task
- Comment on a task
- Mark a task as being completed
- Delete a task
- Add a new task
- Add weekends to your task panel
- View past and upcoming tasks by week
How to view a task
The task panel's overview displays tasks due within the present week (Mon-Sun). It shows when a task is due, who it is assigned to, and where it was created.
To view additional task details:
- Click into the task to open a slide-out menu to reveal the task's details and any comments
-png.png?width=688&height=341&name=Production-Dashboard%20(9)-png.png)
How to edit a task
To edit a task:
- Click into the task to open the slide-out menu
- Click into the current tasks text, date, or rep drop-down and update as needed
- Click the Close button (unless you are adjusting the text field, then click the Save button)
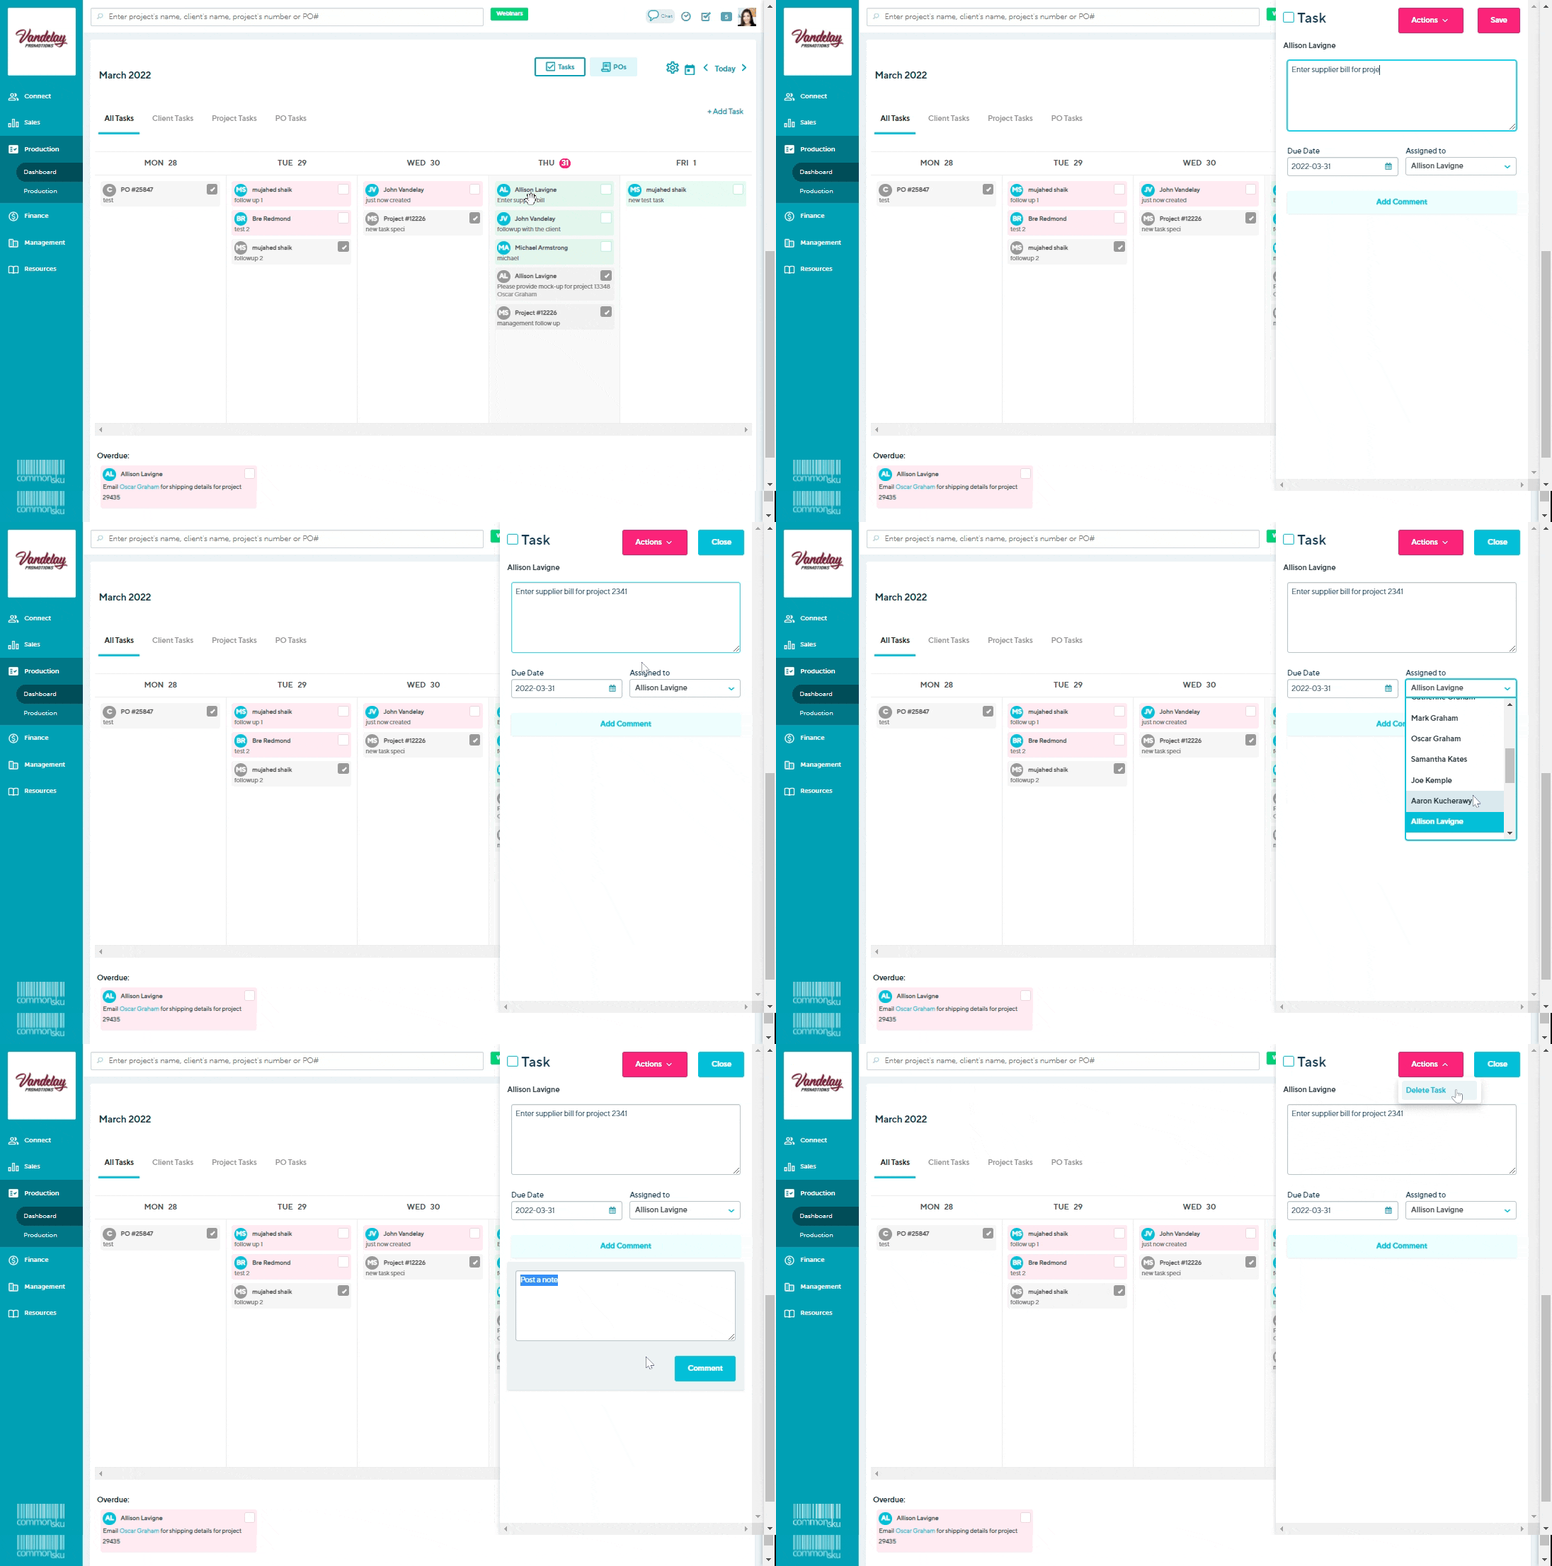
You can even drag-and-drop a task to change its due date!
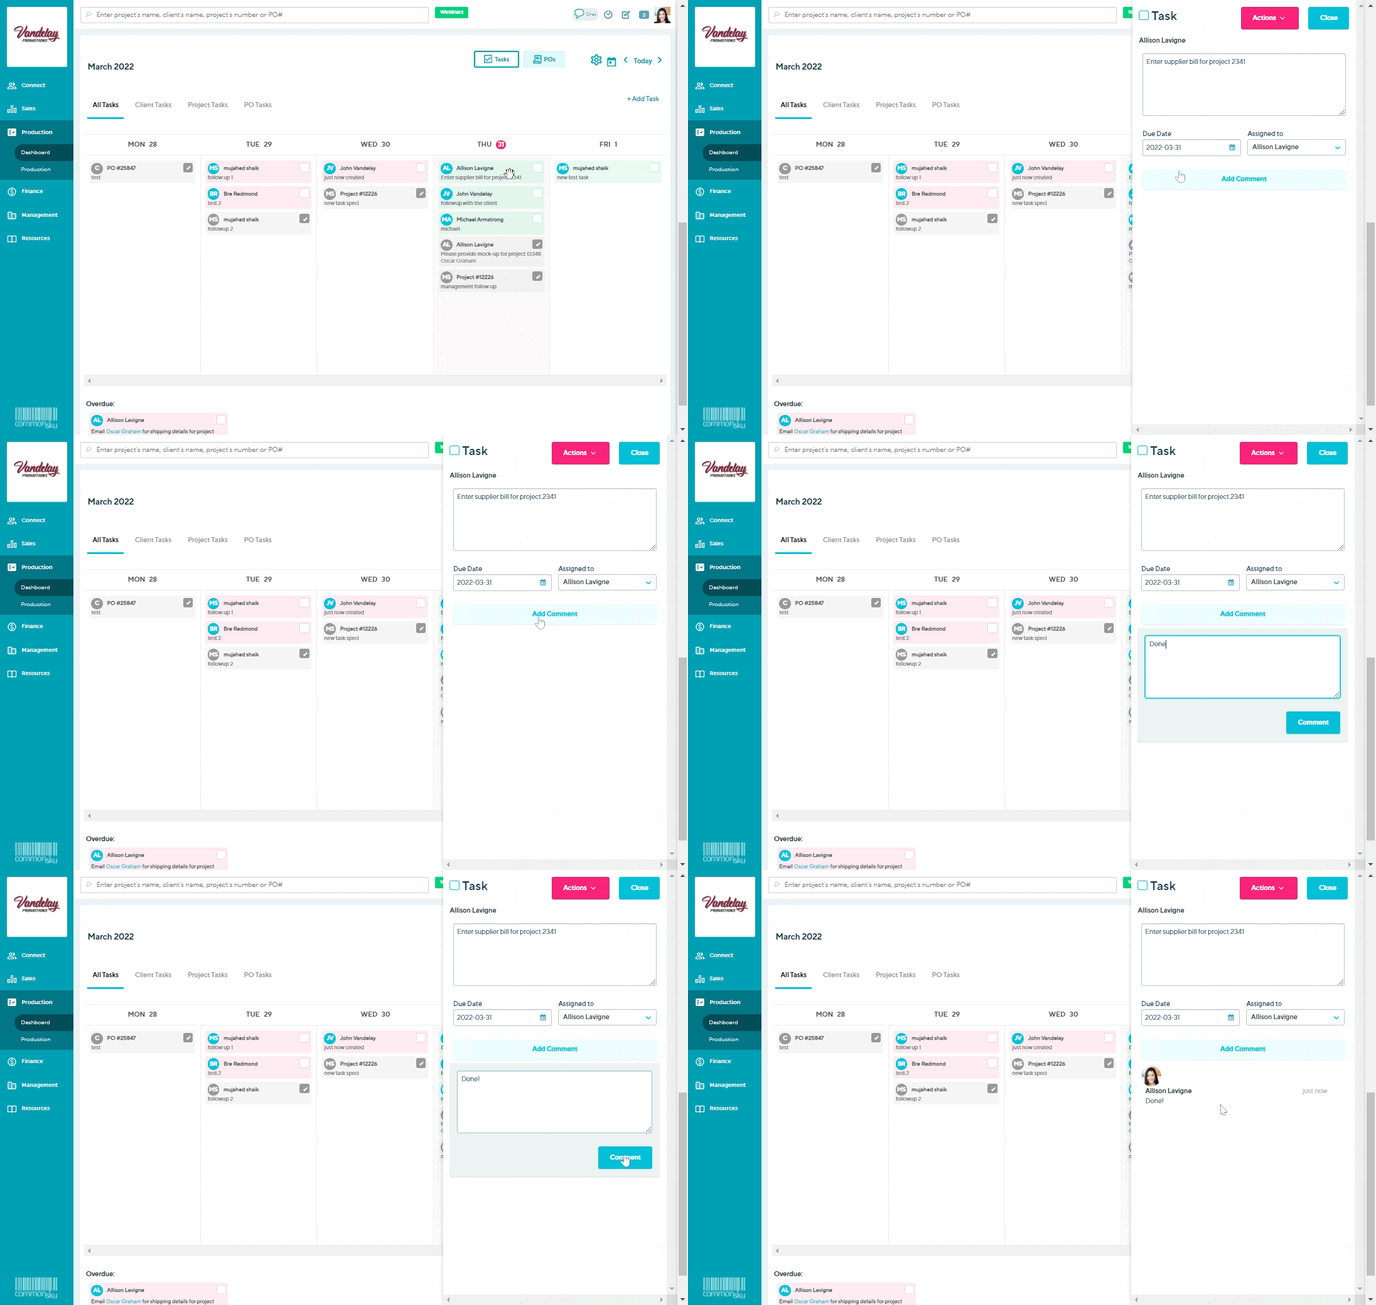
How to comment on a task
To comment on a task
- Click into the task to open the slide-out menu
- Click into the current tasks text, date, or rep drop-down and update as needed
- Click the Close button
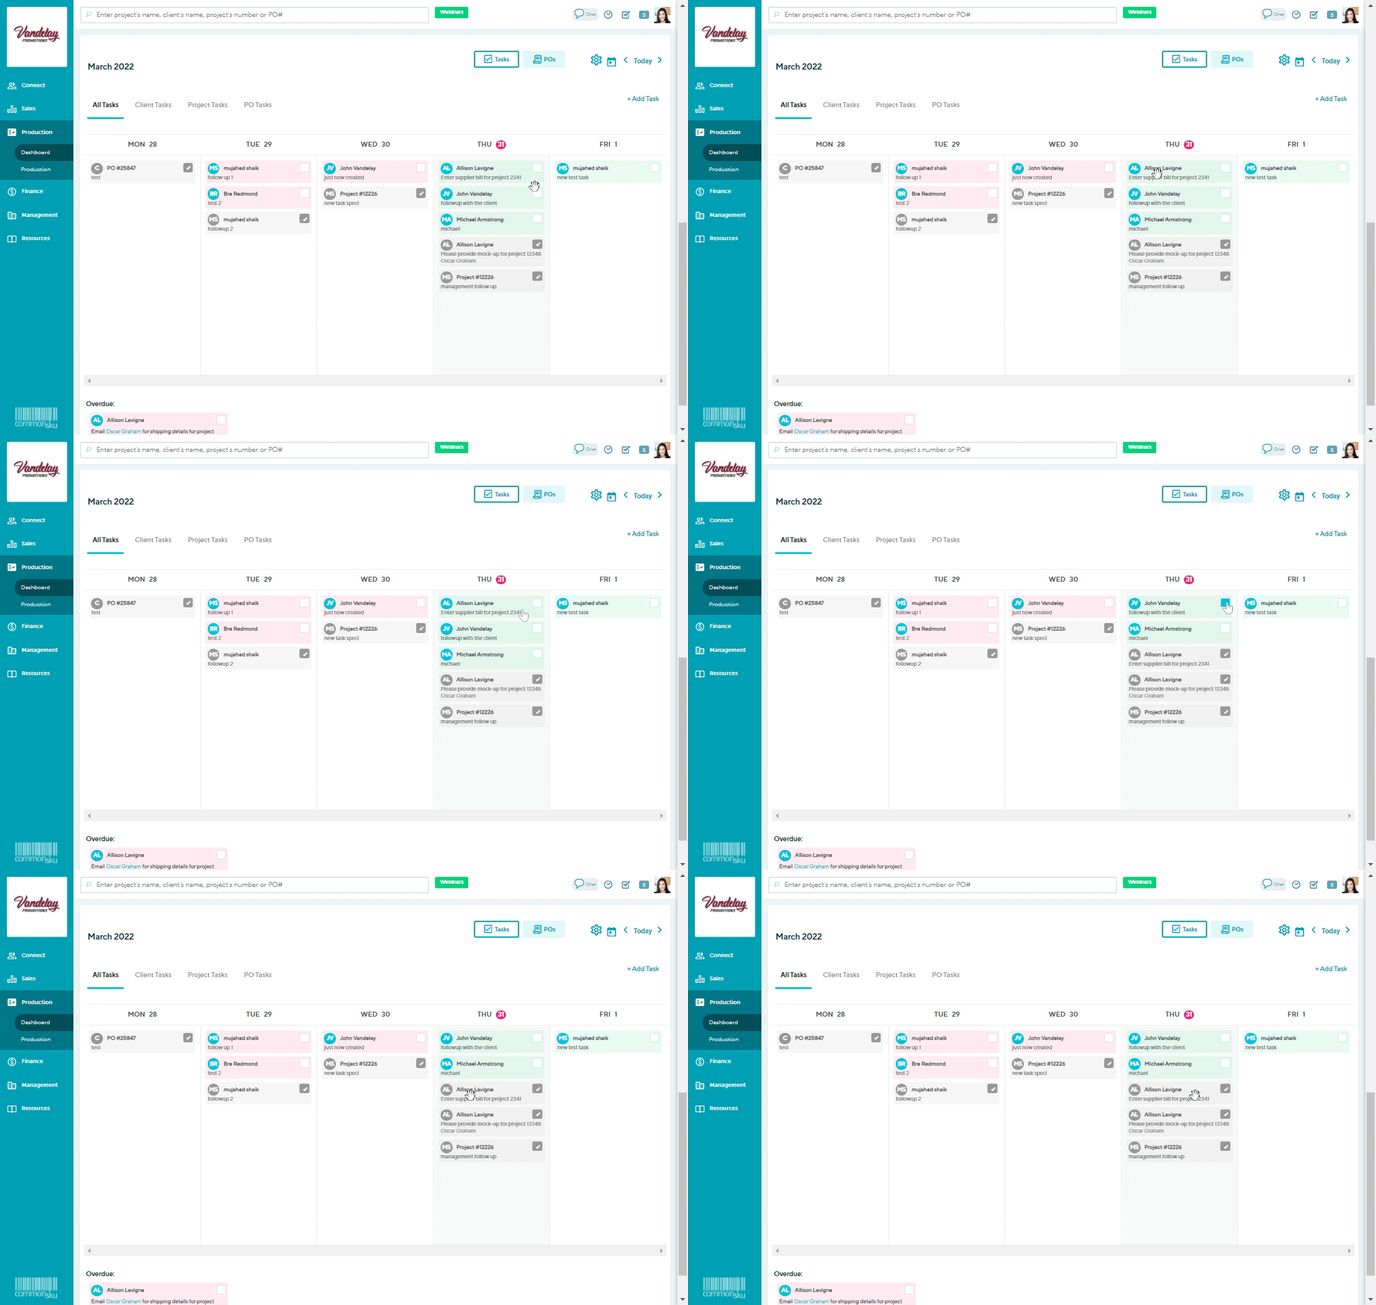
How to mark a task as being completed
To complete a task
- Locate the task you'd like to complete and select the checkbox to the right
Completed tasks will automatically move to the bottom of the (daily) task list and fade from green or red to grey.
How to delete a task
To delete a task:
- Click on the task to open the slide-out menu
- Click the Actions button > Delete Task
- Click OK in the browser confirmation pop-up
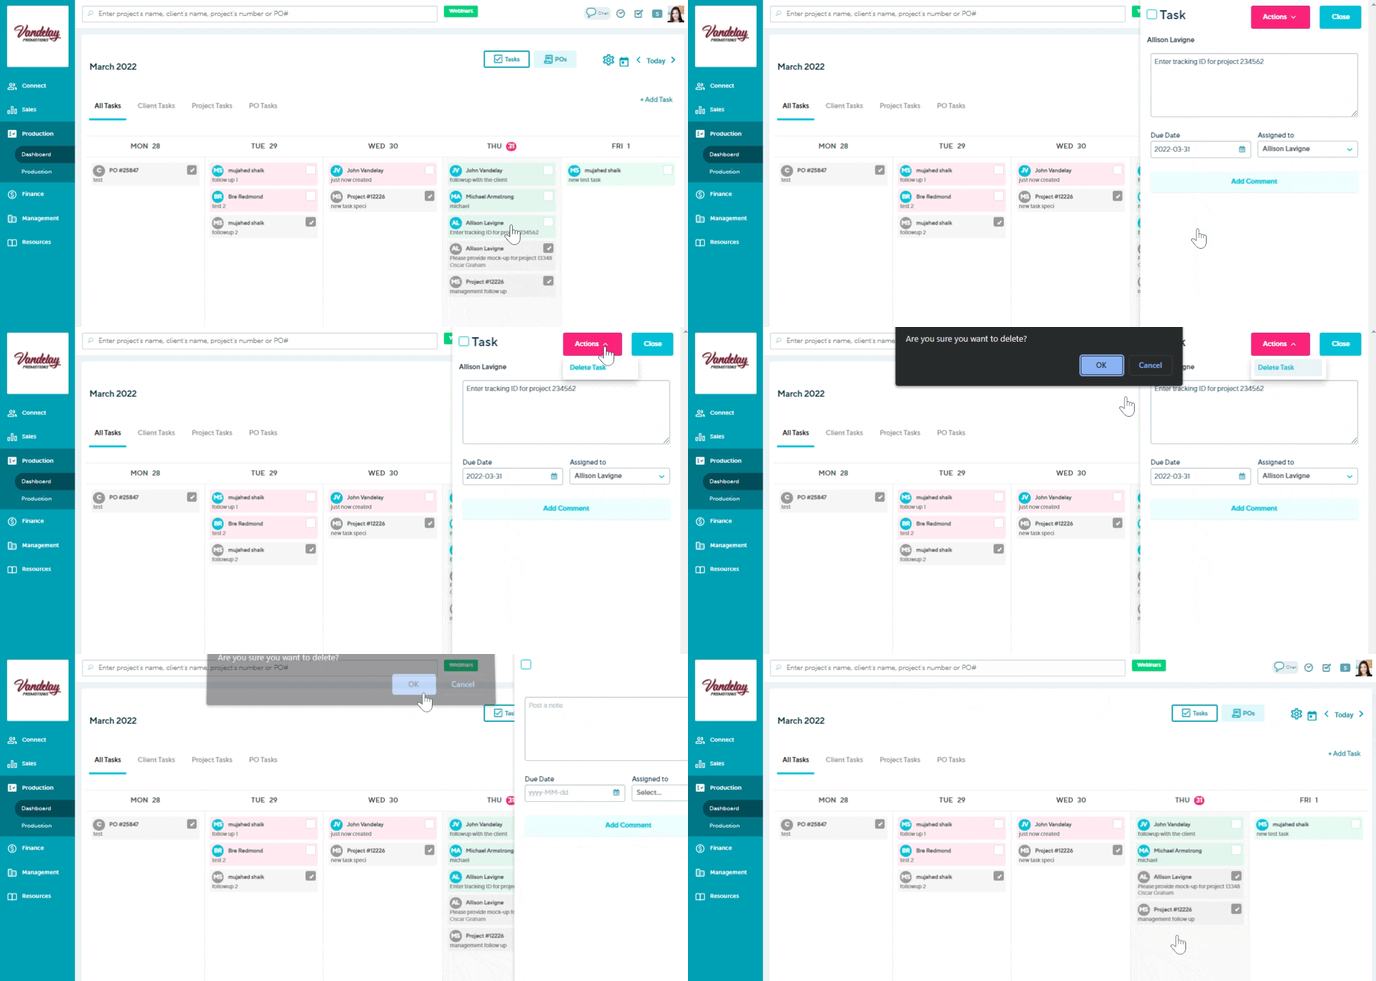
Only the user who created the task will be able to delete it.
How to add a new task
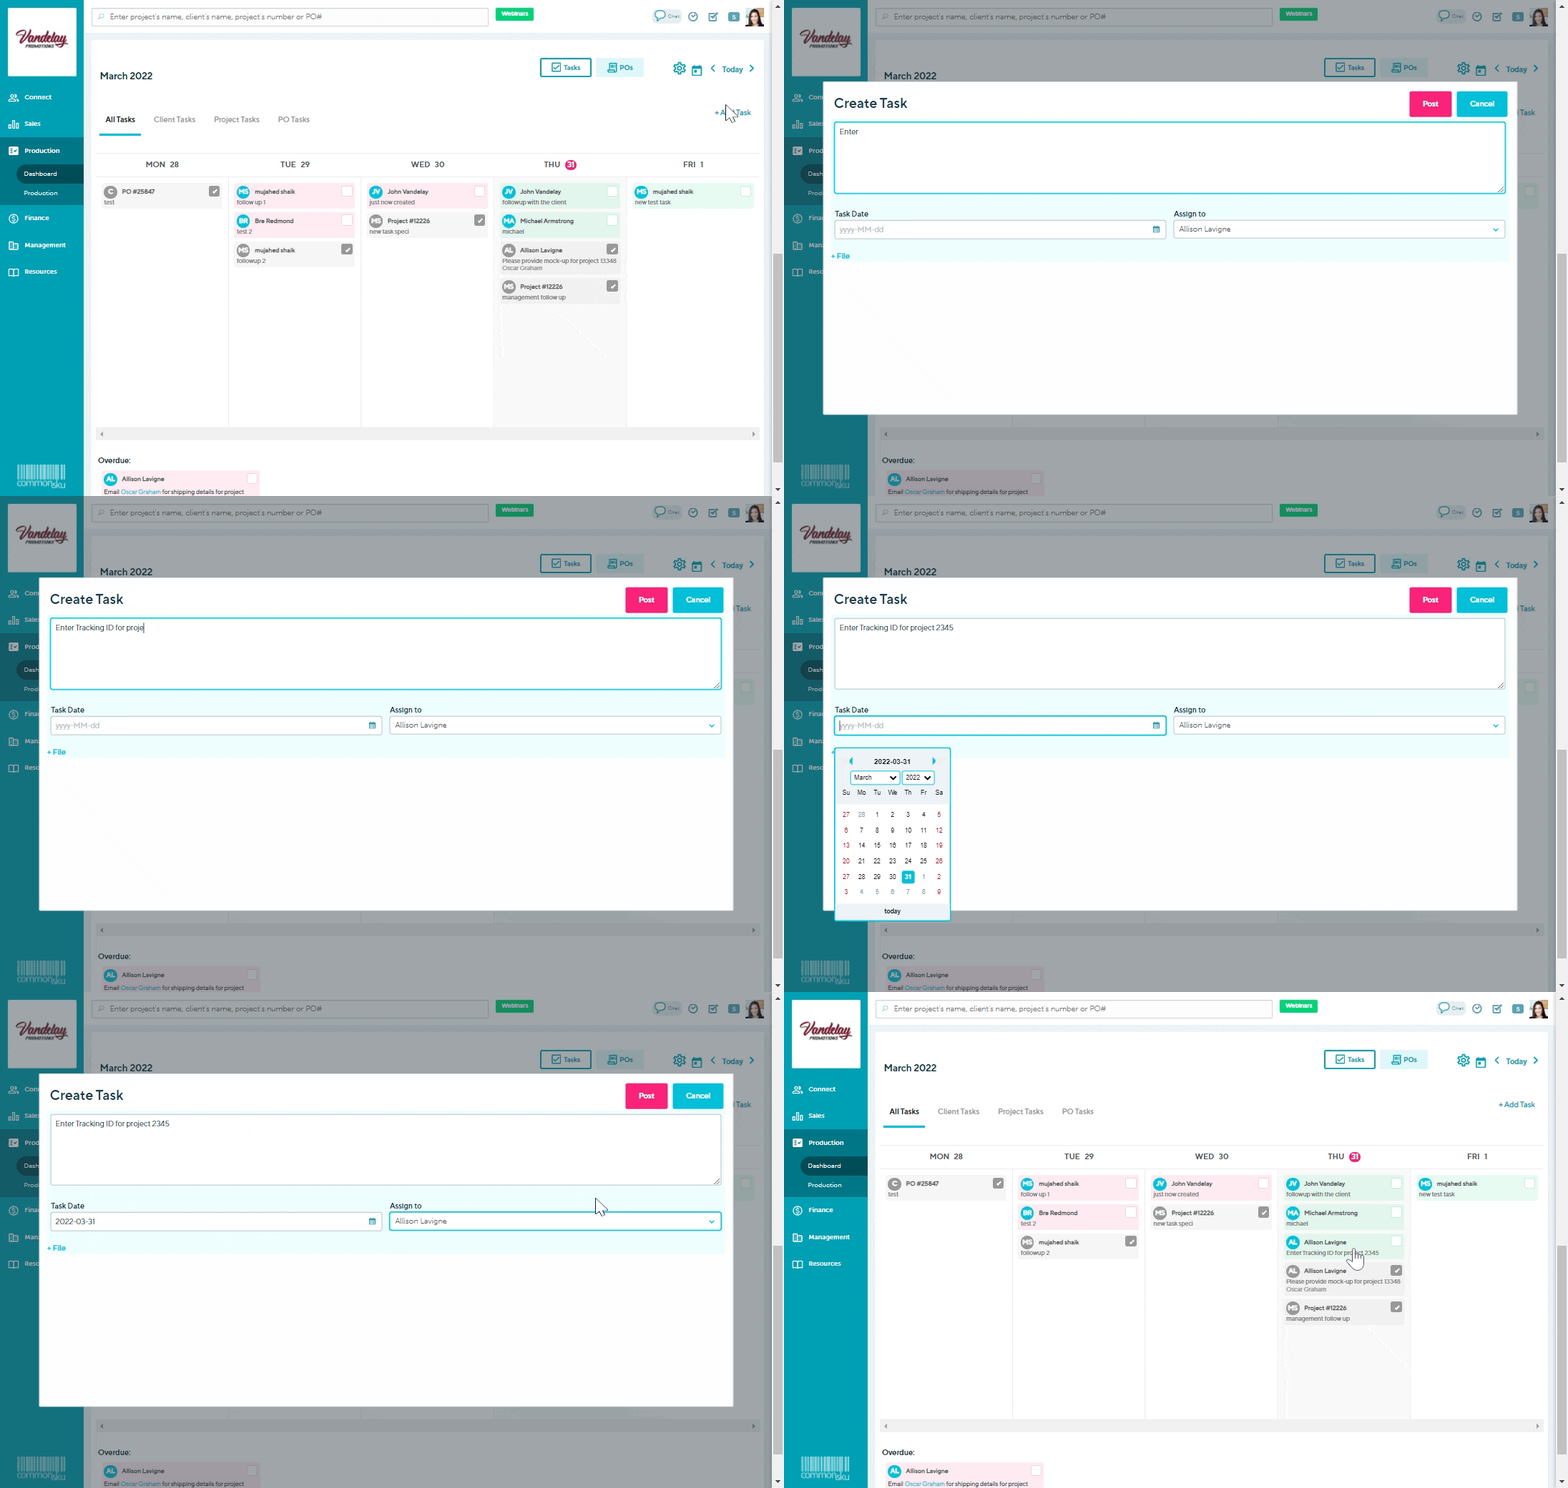
To add a new task:
- Click the + Add Task button in the top right corner of the task panel
- Enter the task details
- Click Post
How to add weekends to your task panel
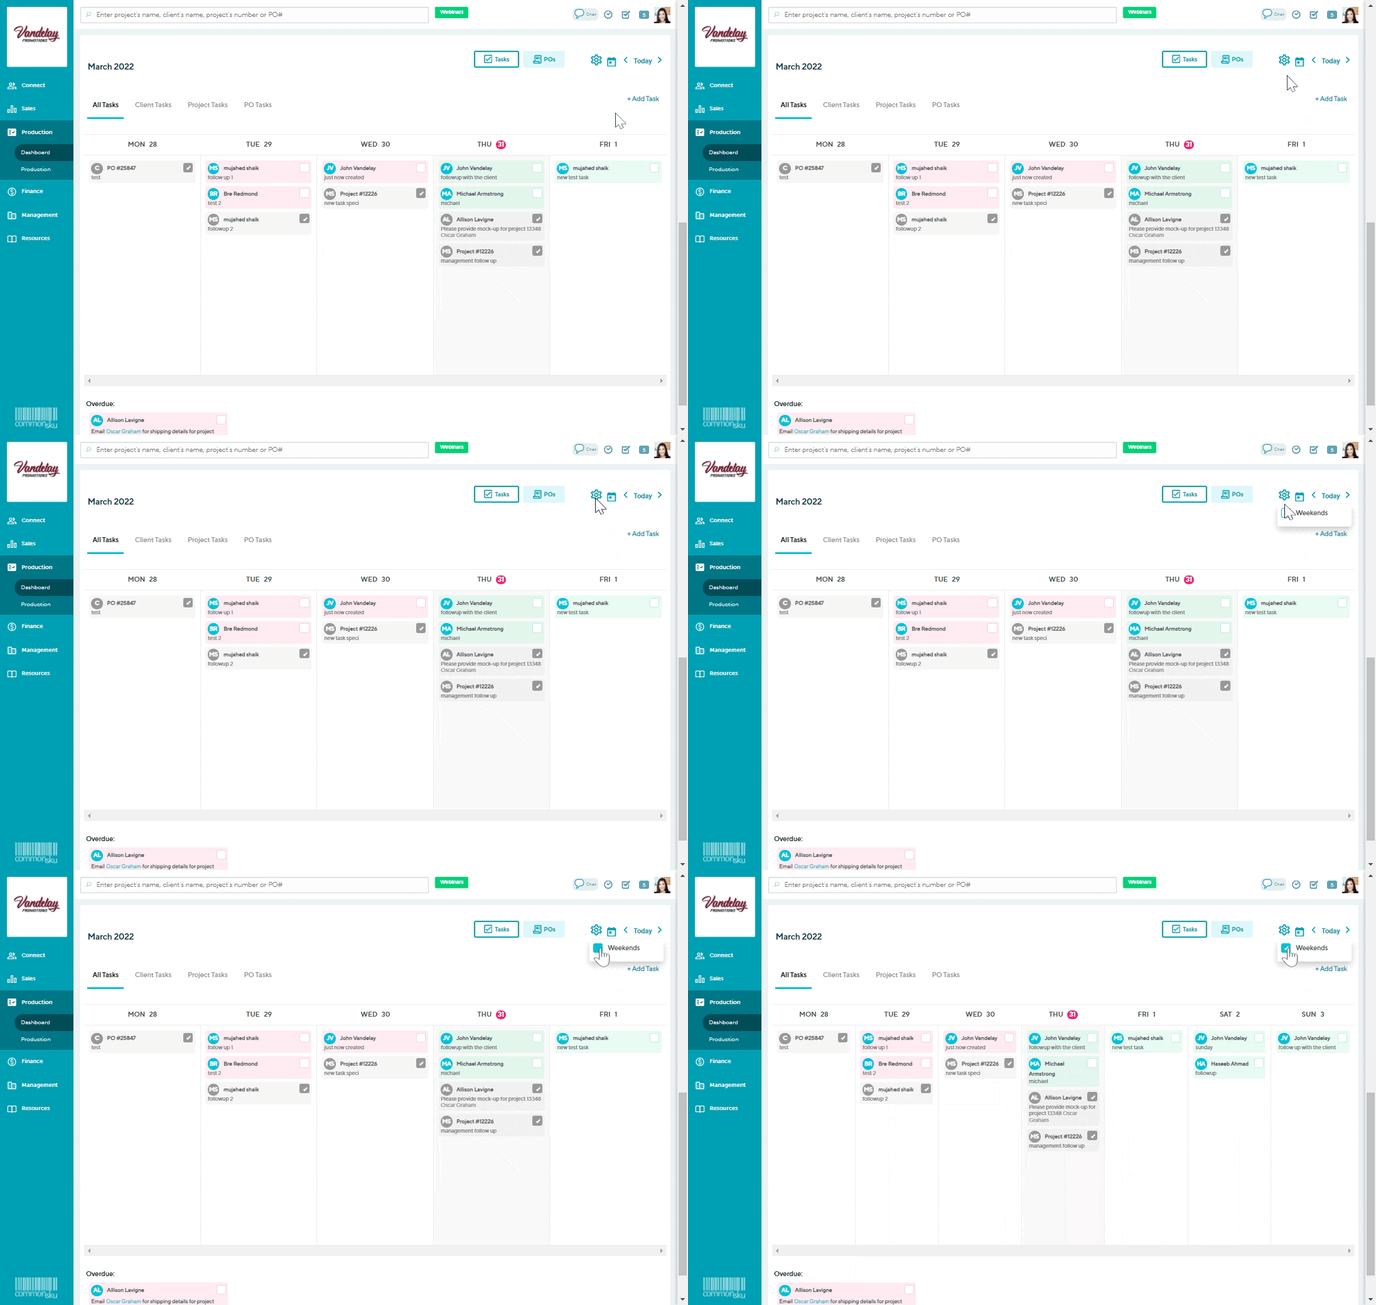
By default, the task panel displays tasks due within the present week (Mon-Fri).
To add weekends to your task panel:
- Click the settings icon on the top right corner of the task panel
- Select the checkbox beside "Weekends"
How to view past and upcoming tasks by week
To change the week displayed on your task panel:
- Click the left arrow in the top right corner of the task panel to view past weeks, or click the right arrow to view upcoming weeks
- Click the Today button to jump back to the present week's tasks
The POs tab on the task panel gives reps a calendar view to manage their POs. Reps can toggle between three categories to see where their POs fall in the pipeline:
- Next Action date
- In Hands date
- Projected Ship Dates
-png-1.png?width=688&height=386&name=Production-Dashboard%20(2)-png-1.png)
Reps can drag and drop POs to change the selected date or click on a PO to see more details and actionable items. Clicking on a PO will prompt a slide-out menu from the right that mirrors the slide-out menu from the Production Report.
The slide-out menu consists of the:
Actions button
Click the Actions button to:
- View the Project - view the selected purchase order's associated project
- View the Supplier - view the selected purchase order's associated supplier
- Email SO - email a copy of the associated Sales Order to the client
- Notify shipping changes - send a notification to the order rep on the associated project to let them know shipping changes have been entered.
-png.png?width=688&height=519&name=Production-Dashboard%20(12)-png.png)
Your slide out menu has four different tabs where you can view and edit a POs details:
Overview
The Overview tab is where you can:
- View and add notes on the purchase order
- View and add tasks on the purchase order
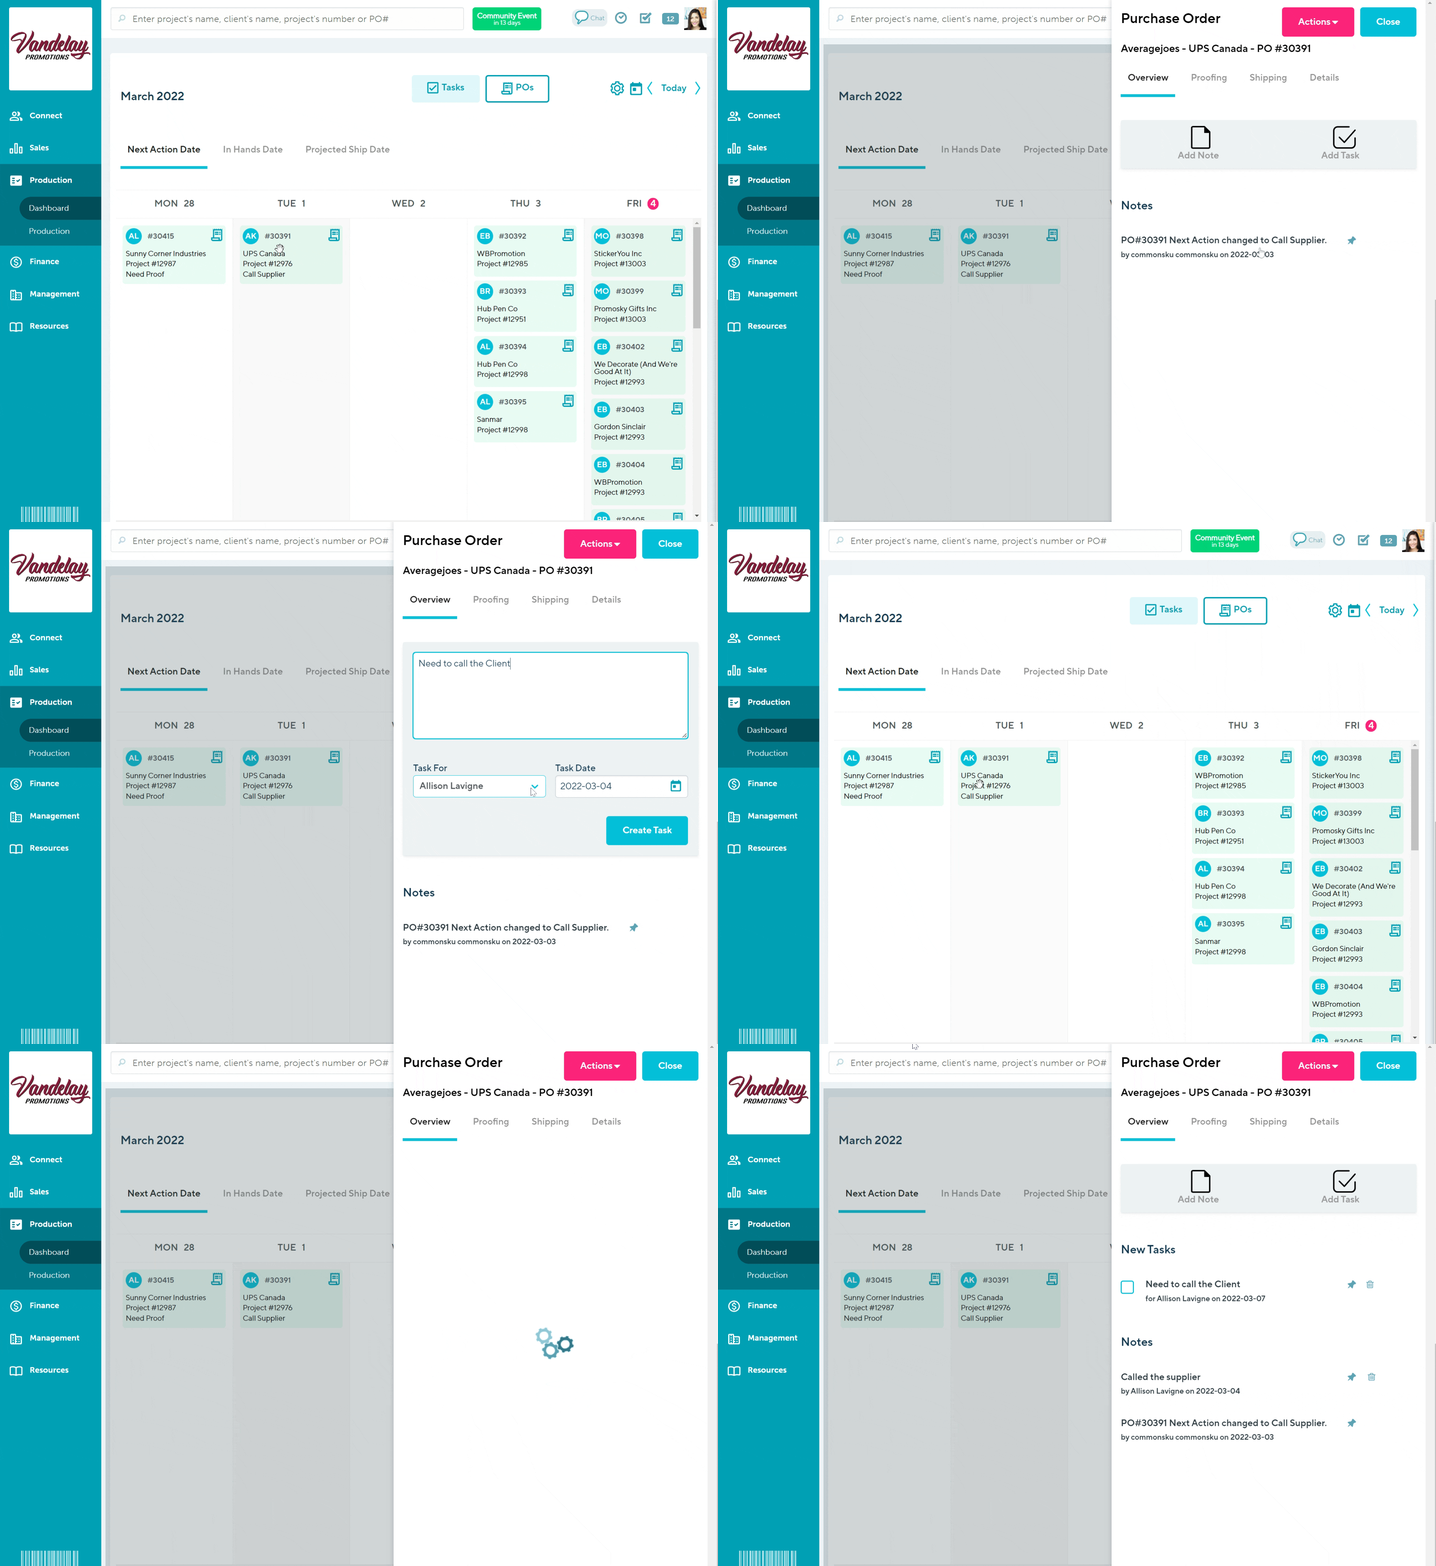
To add a note to a purchase order:
- Click Add Note
- Type your note into the text field
- Click Select Files to attach a file (optional)
- Click Create Note
To add a task to a purchase order:
- Click Add Task
- Type your task's details into the text field
- Click the "Task For" drop-down to assign the task to another member of your team (optional)
- Click the "Task Date" field and select a due date
- Click Create Task
Proofing
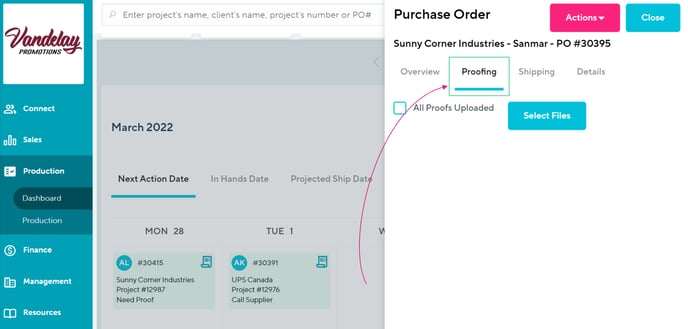
The Proofing tab allows you to manage the purchase order's proofs as you would from the production report.
Shipping
Use the Shipping tab to record the purchase order's shipping details.
-png-3.png?width=688&height=334&name=Production-Dashboard%20(1)-png-3.png)
Details
The Details tab displays:
- Client - the client associated with the PO
- Project - the project associated with the PO
- Prod. Rep - the production rep associated with the PO
- Client Rep / Order Rep
- Stage - the purchase order's stage
- Status - the purchase order's status
- Next Action - the purchase order's Next Action Type
- Next Action Date - the purchase order's Next Action Date.
- In Hands Date - the purchase order's in-hands date.
- Supplier contact information
-png-1.png?width=688&height=386&name=Production-Dashboard%20(2)-png-1.png)
How to submit suggestions to make the Production Dashboard more useful
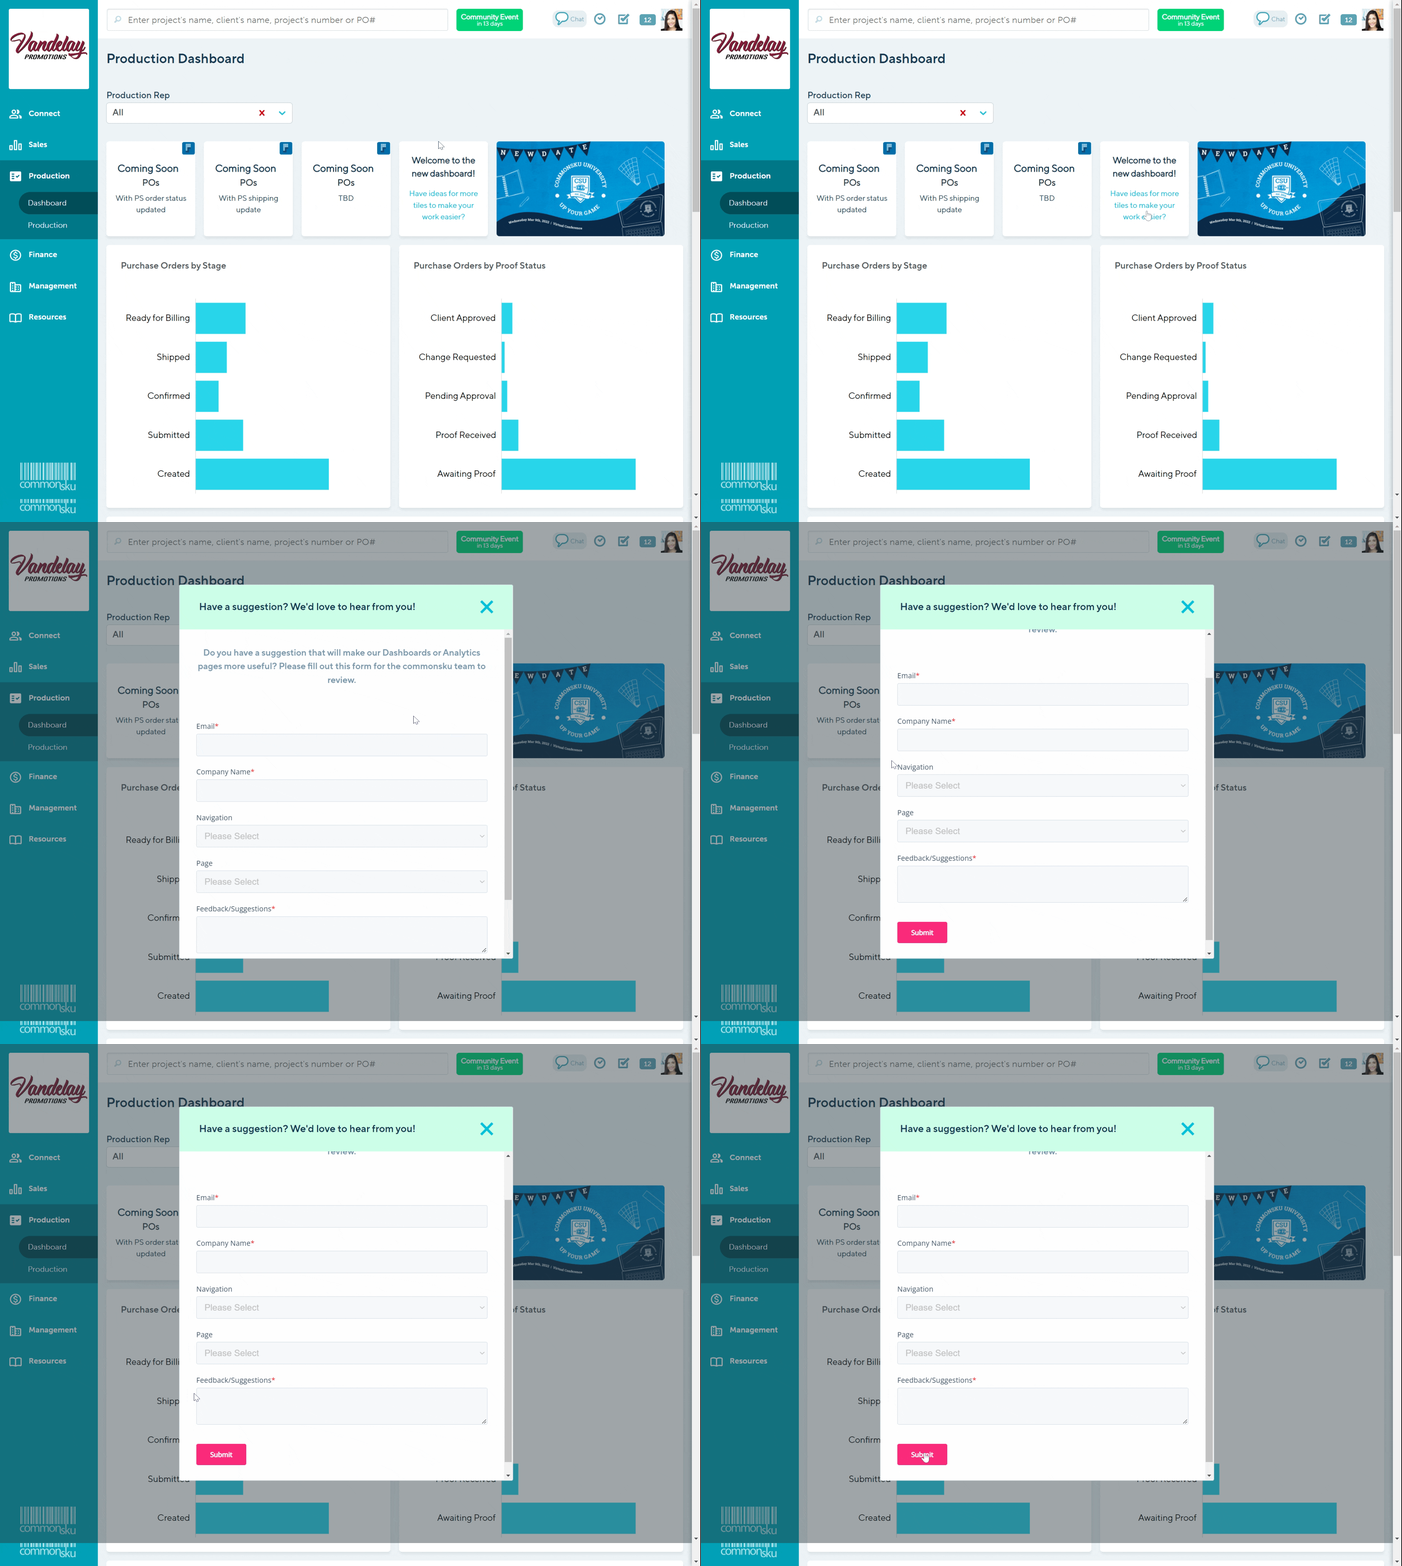
Do you have a suggestion that will make our Dashboards or Analytics pages more useful? We'd love to hear from you!
To send your feedback:
- Click the "Got an Idea?" button at the top of your Production Dashboard
- Enter your email address, company name, choose the navigation section and page your suggestion applies to
- Type your feedback in the "Feedback/Suggestions" text box
- Click Submit
FAQ
Will the task panel remember if I'm viewing my tasks vs my POs?
Yes! The task panel will remember the last view you selected (tasks vs. POs.)