On this page:
Adding a Product
To add a product to a sales order:
- Click + Add > Product
- Use the Connected+, ESP, SAGE and SAGE Connect, Distributor Central, Bookmarks, Tagged, Previous Orders, Collections, or Company database
- Enter your search criteria
- Click Search
- Click the product you need; the product's background will turn blue once it's added to the sales order
.gif?width=670&height=414&name=recording%20(14).gif)
You can also add products by right-clicking any of your products, then selecting Product.
Editing a product
To edit a product on the sales order, hover over the product and click Edit.
.png?width=670&height=204&name=Doc-Brown-s-Auto-Project-10522-New-Project-%20(37).png)
You can edit the product's:
- Name
- Product Description (including AI Rewrite)
- Private notes
- Warnings
- Image
- In-app Image editor
- Sizes and colors
- Breakdowns
- Quantities and pricing
- Artwork location(s)
- Currency Conversion rate
The "Edit Item" view also allows you to
- view the product page (click View Product Page)
- check net pricing for your products (click Check Pricing)
- view the product's inventory if the supplier offers Promo Standards Inventory (click Check Inventory Level)
.jpeg?width=670&height=276&name=Doc-Brown-s-Auto-Project-10522-New-Project-%20(40).jpeg)
Learn more about editing a PromoStandards product.
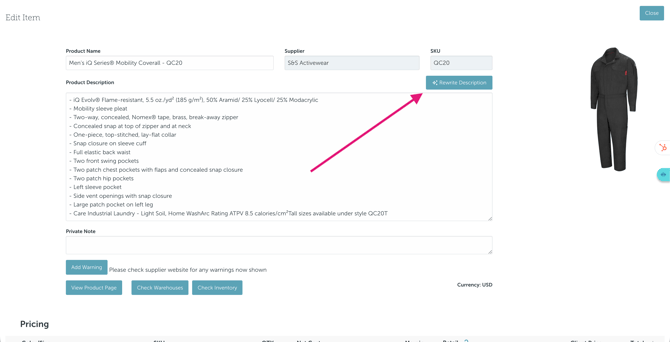
Product Description on Sales Orders
You can edit the product description at any time by typing directly into the Product Description field.
To quickly improve or rewrite the description using AI (only for Advanced and higher plans):
- Open the product and click Edit.
- Click Rewrite Description.
- commonsku will automatically generate a clearer, more polished product description based on the product's existing information.
- Review the generated description and make any additional edits if needed.
Tip: AI-generated descriptions are a great starting point, but we recommend reviewing them before sending them to your client to ensure they match your preferred wording and branding.
Note: The Rewrite Description by AI feature is only available on Advanced plans and higher. It is not available on Essentials plans.
Check Pricing
To check/update net pricing for a product:
- Click Check Pricing
- Select the price point for the correct quantity break; you can pull net costs from either:
- your presentation (if existing)
- the product database
- Select the product line from your sales order you want to apply the new cost to
- Click Update
Your selected price will be pulled onto the product from either your previous form or whichever product database it was sourced from (Connected+, ESP, SAGE and SAGE Connect, Distributor Central, or your company database).
-gif-1.gif?width=670&height=418&name=recording%20(72)-gif-1.gif)
Prices pulled from the Check Pricing feature reflect the current net costs as they are listed on your chosen product database. They do not necessarily reflect the supplier's most up-to-date pricing. When in doubt, double-check your supplier's website for their current pricing.
Private Notes
Private notes are for your team's reference only; they do not appear on the client-facing form.
To leave a note, type your message into the Private Notes text field.
.jpeg?width=670&height=180&name=Doc-Brown-s-Auto-Project-10522-New-Project-%20(41).jpeg)
If your sales order was converted from a presentation or estimate, private notes from the presentation or estimate will pass over to the sales order.
Add product warnings
To add a product warning:
- Click Add Warning
- Either leave the default Prop 65 text or type your own wanting into the text field
The warning's text and icon display under the product's description on the client-facing form.
.jpeg?width=670&height=234&name=Doc-Brown-s-Auto-Project-10522-New-Project-%20(42).jpeg)
Image
To edit the product's image:
- Hover over the current product image
- Click to Edit
The product image displayed at the top of the "Select File" pop-up is visible on the sales order. Any images below are for your reference and do not show to the client.
You can add a product image from:
- Item Files (product images provided by the supplier) > select the file
- Project Files > select the file
- Client Files > filter through the folders (optional) > select the file
To upload a new image, click Upload and
- upload a file From Computer > select the file by dragging and dropping or click within the blue lines to load from your computer > click Done
- upload a file From Web by typing or pasting the image's URL into the text field > click Select > click Done

You can only assign one product image to a product on a sales order.
In-app image editor
You can use the in-app image editor to create mock-ups for the products in your presentation from the commonsku platform.
To use the In-app image editor:
- Select Click to edit from the product image
- Hover over the image you would like to build a mock-up for
- Click the Edit button

To remove an existing logo from a product image:
1. Select the AI erase tool
2. Drag on the Eraser size bar to increase or decrease the size.
3. Highlight the logo you would like erased
4. Select Erase selected
To add a new logo to a product image:
- Select Add logo
- Drag the Scale or Rotate bar to resize the logo or change it's location
- You can also drag the corners to screw the image
To remove the background from your image:
- Select Remove the background
- Click Save

Sizes and colors
To select your size and color for a specific breakdown:
- Click TBD/TBD on the breakdown you need
- Select the size and color you need from the list or click Add Color/ Add Size to add more options
- Click done from the size and color menu to save your choices

Create and copy breakdowns
Click Add Breakdown to add a new breakdown.

To copy an existing breakdown:
- Hover your mouse over the breakdown you want to copy
- Click the blue arrow
 that appears on the far right side of the breakdown
 - Edit the copied breakdown as needed

To add Another size and color breakdown:
1. Click the Add sizes and colors button
2. Select the color you need from the list and add a quantity on the size of your choice
3. Click done from the size and color menu to save your choices

Quantities and pricing
You can adjust each breakdowns':
- QTY (Quantity) - per size/color breakdown.
- Net Cost - your net cost (supplier cost) per item.
- Margin% - your profit percentage.
- Retail - the client's price per unit, not including additional run charges, fixed charges, or decoration charges.
To edit one of these fields, type your new quantity, cost, or percentage into the relevant field.
commonsku automatically adjusts the quantity break's margin or retail price as you make changes to the product's cost, margin, or total. Click the ![]() icon to lock the retail price, so it doesn't automatically adjust when you change the product's cost or margin.
icon to lock the retail price, so it doesn't automatically adjust when you change the product's cost or margin.
To add a run charge that's payable to the supplier:
- Click + Additional Cost > Run Charge
- Give the new charge a name
- Enter the net cost, margin percentage, and retail price
- Select either "Display to client" or "Include in price" from the drop-down

"Display to client" will give an itemized total for the run charge, while "Include in price" will wrap the run charge into the client's price.
To add a fixed charge that's payable to the supplier:
- Click + Additional Cost > Fixed charge
- Give the new charge a name
- Enter the quantity, net cost, margin percentage, and retail price
- Select either "Display to client" or "Subtract from margin" from the drop-down

"Display to client" will give an itemized total for the fixed charge, while "Subtract from margin" excludes the charge from the product's margin.
You can also add international costs to your sales orders.
Artwork Locations
Artwork Locations capture the product's artwork details, including the decoration location, the artwork itself, the printing details, and the pricing. The sales order's Artwork Locations transfer to the supplier/decorator's PO.
Currency Conversion rate
Sales forms automatically use the Currency Conversion rate that was assigned when the sales form was created. However, there may be times when you need to update the rate to match a new rate by clicking your Profile Icon > Settings > Company Settings > Setup > Currency Conversion.
How to copy a product
To make a copy of an existing product, hover over the product and click Copy. The copied product appears just below the original item and can be edited as normal.
Copy a product to the invoice
Once you have created an invoice, hover over a product on the sales order and click Copy to Invoice to copy the product to the client invoice.
.png?width=670&height=174&name=Doc-Brown-s-Auto-Project-10522-New-Project-%20(45).png)
How to delete a product
To delete a product from sales order, hover over the product and click Delete > Yes.
-1.png?width=670&height=276&name=Doc-Brown-s-Auto-Project-10522-New-Project-%20(34)-1.png)
FAQ
- Are there any product details I can't change?
- Why does commonsku automatically change my margin amount?
- Can I show more than one image of a product?
- Can I show retail pricing past two decimal places?
- How do I add multiple tax rates to a product?
- Which plans include the Rewrite Description by AI feature?
- Where can I use the Rewrite Description by AI feature?
- Can I edit the AI-generated description?
- What information does AI use to generate descriptions?
- Will the Rewrite Description by AI feature always be free?
Are there any product details I can't change?
You are not able to adjust a product's supplier, SKU, or currency. Those details are determined by the product's supplier and cannot be changed.
Why does commonsku automatically change my margin amount?
There are three reasons commonsku may change your margin percentage:
- Retail prices and margins only display up to two decimal places. At times, particular margins are required to generate a retail price that is two decimals or less.
- The margin will change anytime there's a change to the retail price.
- The margin will change anytime there's a change to the cost, and the retail price is locked.
Can I show more than one image of a product?
Unlike presentations, estimates and sales orders only show a single product image. The best practice is to show the image that matches the color variant described in the product's size/color breakdown.
You can also
- copy the product and add a different image to the copy
- attach the other image(s) to the outgoing email
Can I show retail pricing past two decimal places?
Retail prices cannot contain more than two decimal places, but there are two different ways to capture pricing beyond two decimals:
- Option 1 - Add the product quantity to the product's size/color breakdown
- Option 2 - Add a negative value service line to offset the additional price
Option 1
- Click the product's size/color breakdown and select + New Size
- Type the quantity of the product in the "New Size" text field
- Select + New Color
- Type the size and color in the "New Color" text field and click away from the menu to save your choices
- Change the product's quantity to 1
- Enter the total net cost (not the cost per item) in the "Net Cost" field
- Enter the total retail price full (not the price per item) in the "Retail" field
The same can be done with services, i.e., if commonsku is rounding the decorations' charges. In that case, you could change the description of the "fixed charge."
Option 2
- In the sales order, click +Add > Other Service
- Add a note to the description to indicate what the service line is for
- Enter a negative value into the retail field (the difference between the retail total on the sales order and the actual total)
How do I add multiple tax rates to a product?
If your team uses commonsku's manual Tax Codes, you can add multiple tax rates to any product/service. The product will automatically use the default tax rate applied to the order.
To add another tax rate:
- Hover over the product and click Edit
- Scroll to the bottom of the "Edit Item" screen and select + Another beside the current tax rate
- Once the new tax appears, click the drop-down menu and select the tax rate
To delete a tax rate:
- Hover over the product and click Edit
- Select the x beside the tax rate you'd like to remove
Which plans include the Rewrite Description by AI feature?
The Rewrite Description by AI feature is currently available as an open beta for customers on Advanced plans and higher. It is not available on Essentials plans.
Where can I use the Rewrite Description by AI feature?
The feature is currently available on Presentations, Estimates, and Sales Orders. It is not currently available in Shops.
[Back to top]
Can I edit the AI-generated description?
Yes. The generated description is only locked while it is being processed. Once complete, you can edit the text however you like. We recommend reviewing all AI-generated content before sharing it with your clients.
What information does AI use to generate descriptions?
The Rewrite Description by AI feature uses only the product information provided by the supplier to generate product descriptions. It does not use additional product information or external sources.
Will the Rewrite Description by AI feature always be free?