Project Templates
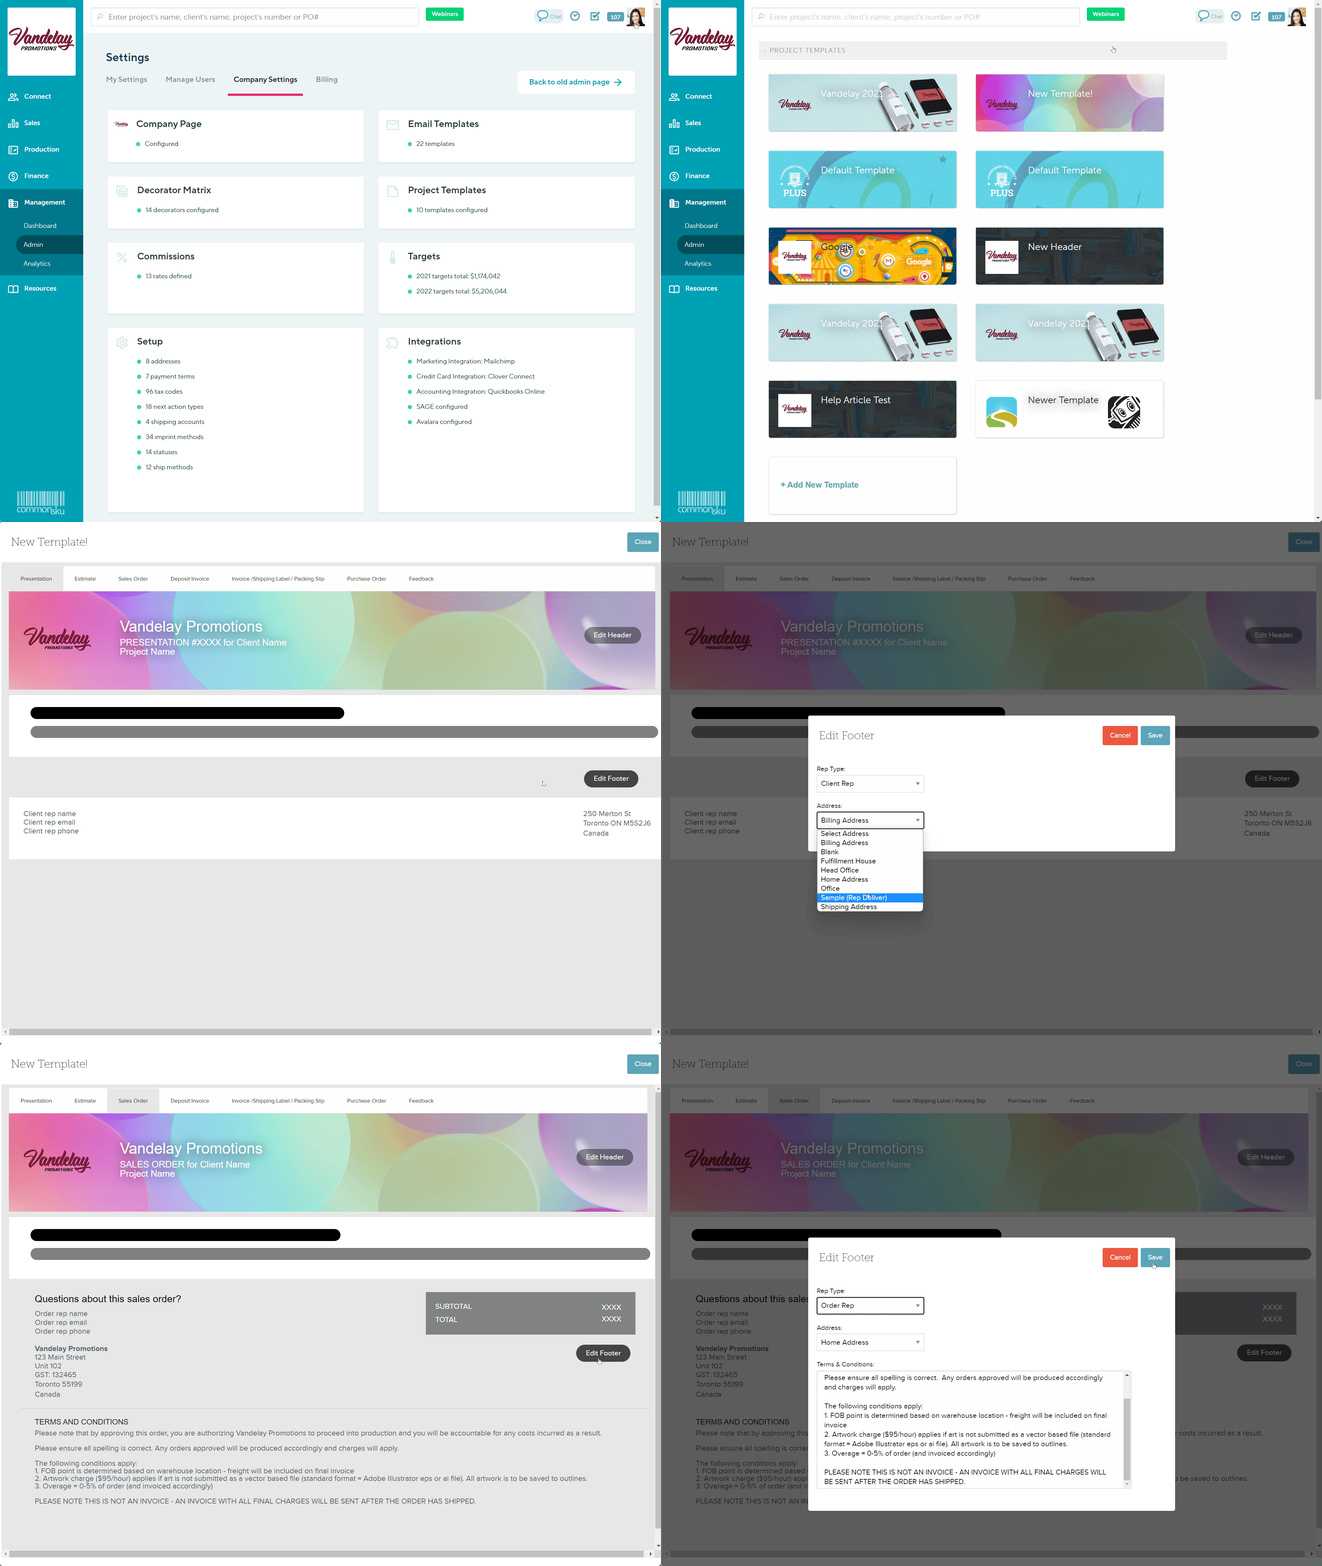
Project Templates allow you to customize the artwork and contact information on your external-facing forms.
On this page:
How to delete Project Templates
Creating Project Templates
commonsku creates a default template with a blue ![]() icon in the top right-hand corner. The original template will always be the default template used when you create a new project, so the best practice is to ensure it has your company branding.
icon in the top right-hand corner. The original template will always be the default template used when you create a new project, so the best practice is to ensure it has your company branding.
To update your default template:
- Click your Profile icon (top right corner of commonsku) > Settings > Company Settings
- Click Project Templates
- Hover over the template titled "Default Template" and click the
 icon
icon - At the top of the edit screen, click Default Template to edit the template's title, then click Save (optional)
- Edit the form headers and footers as needed
- Click Close
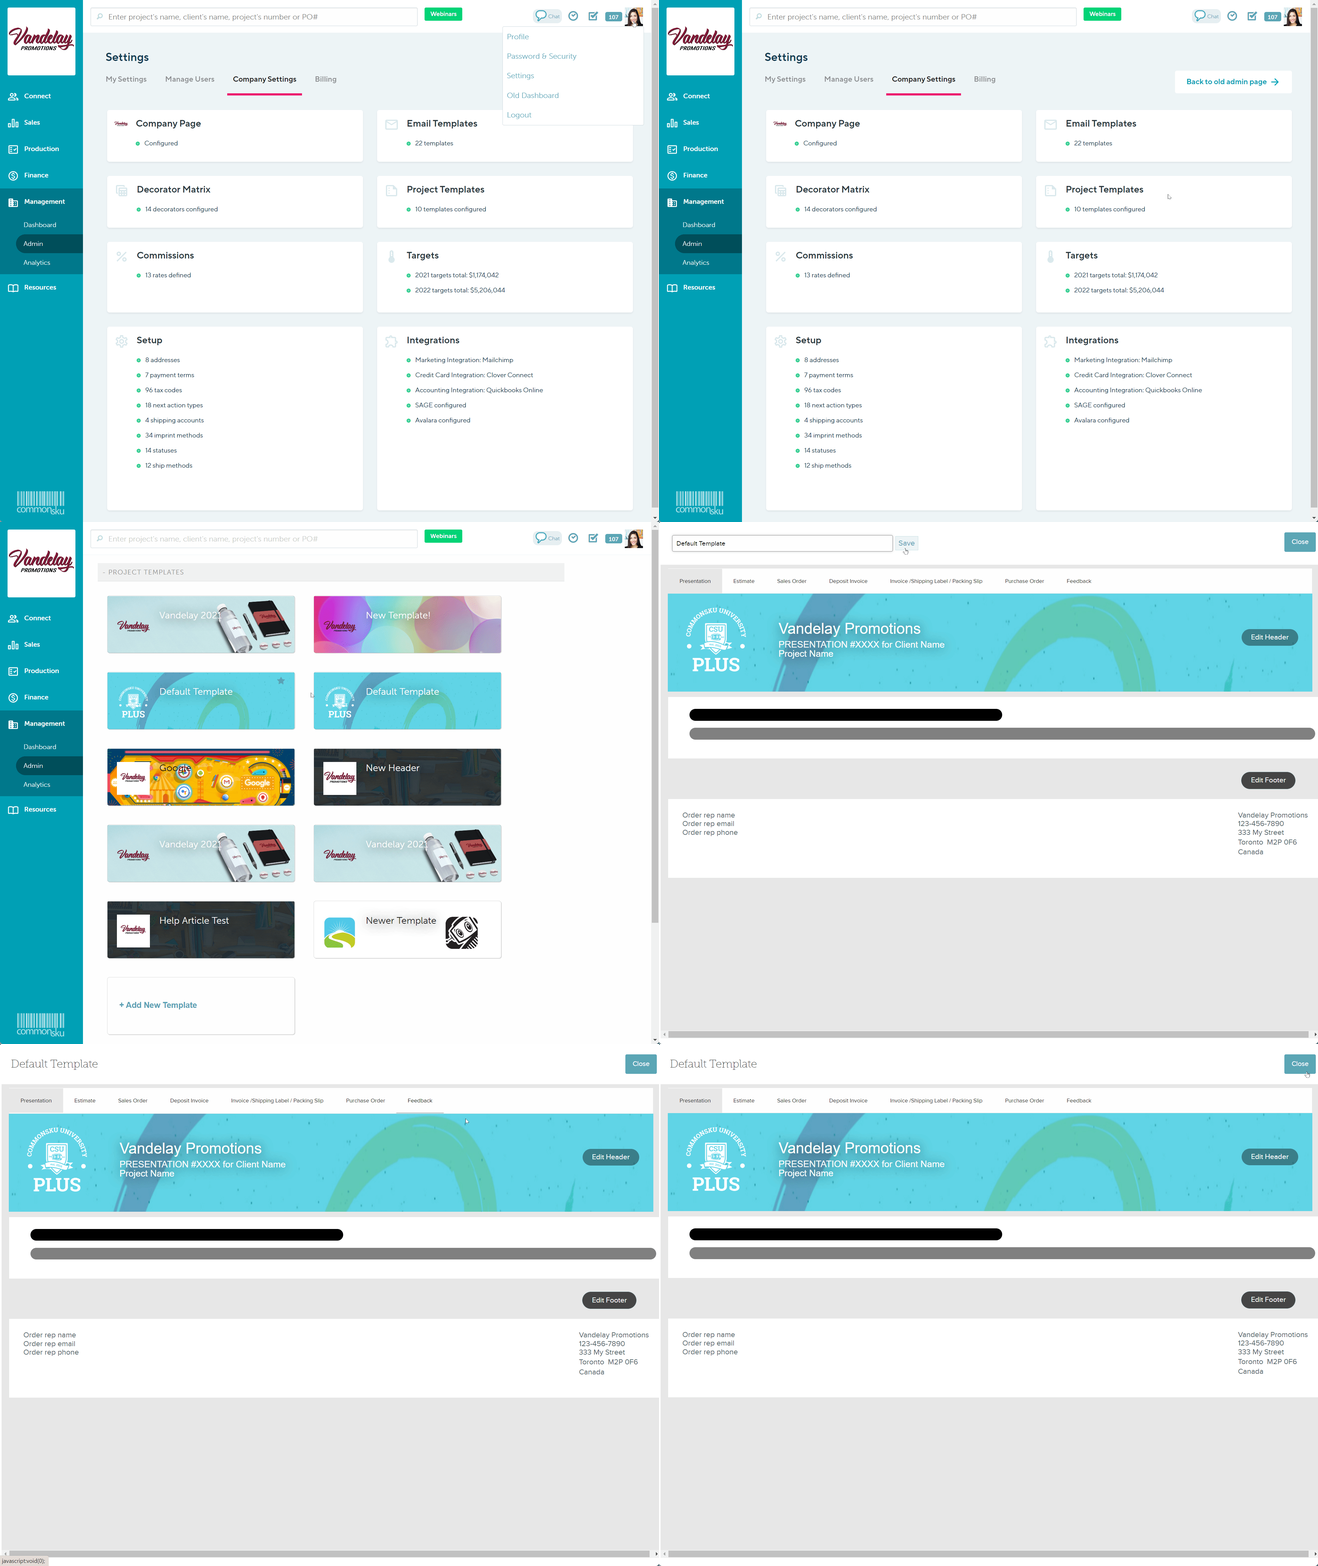
Users need permission to Manage users, billing, and company settings to adjust project templates.
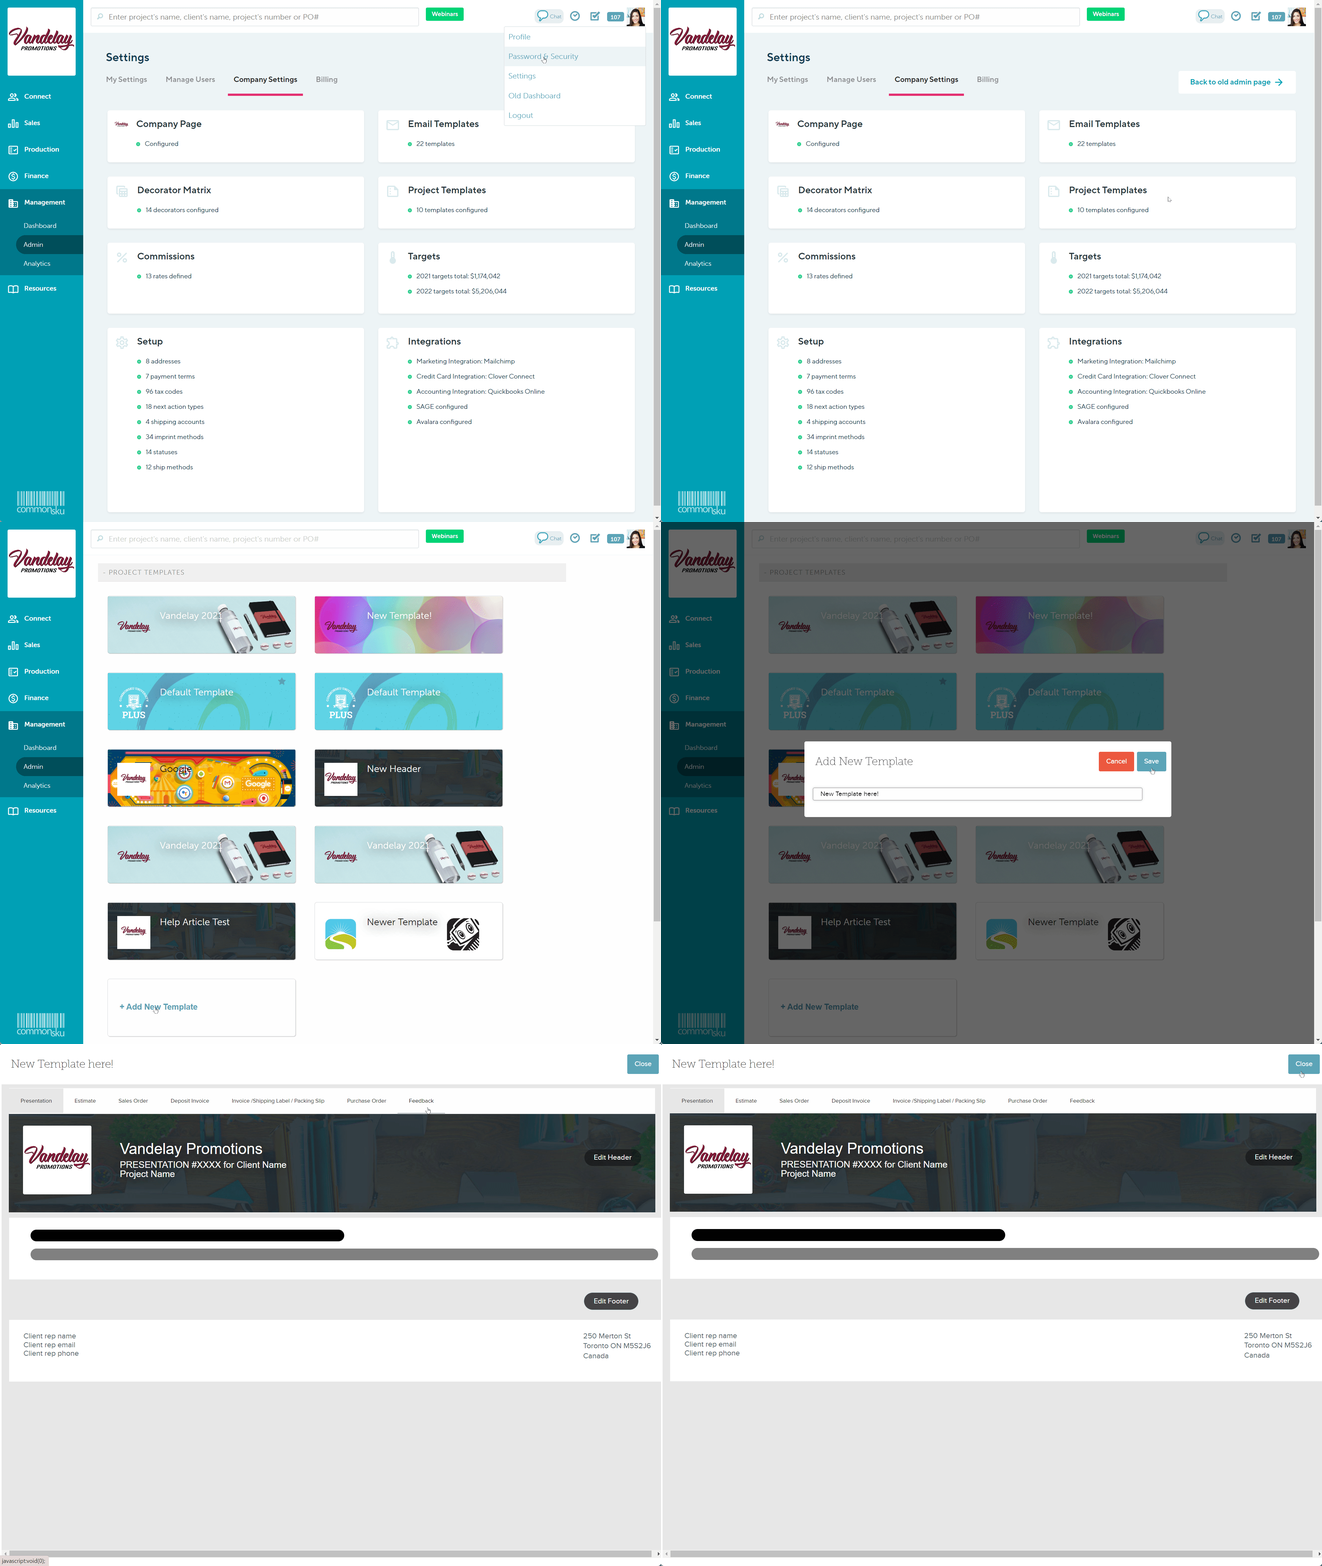
To create a new template:
- Click your Profile icon (top right corner of commonsku) > Settings > Company Settings
- Click Project Templates
- Click + Add New Template
- Enter a name in the "Template Name" field, then click Save
- Edit the form's headers and footers as needed
- Click Close
How to delete Project Templates
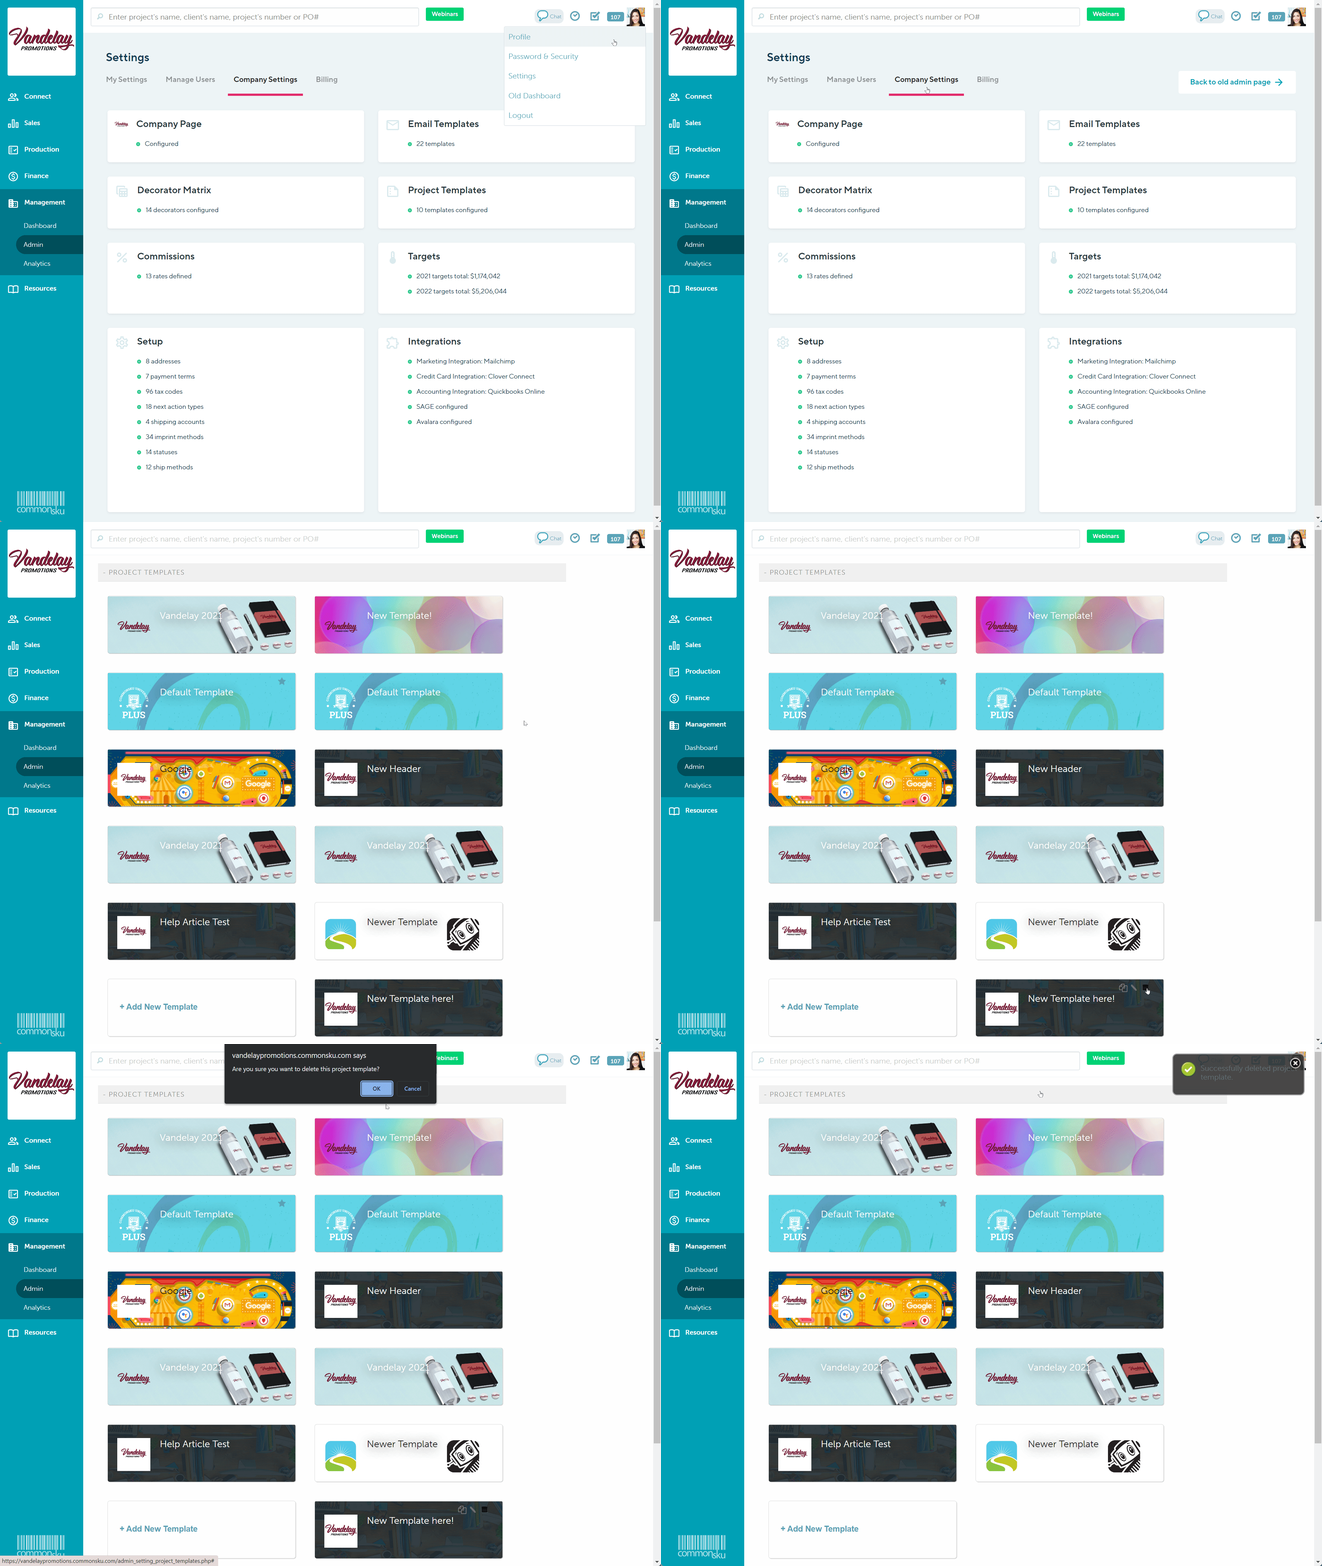
To delete a template:
- Click your Profile icon (top right corner of commonsku) > Settings > Company Settings
- Click Project Templates
- Hover over the template you wish to delete and click the
-png-2.png?width=25&name=Settings-commonsku%20(11)-png-2.png) icon
icon - Click OK in your browser window pop-up
How to edit a form header
Form headers allow you to upload the artwork to your forms, whether it's your company's branding or a client's custom header. You can edit each form's header to make it unique or save the same header image to all of your external-facing forms.
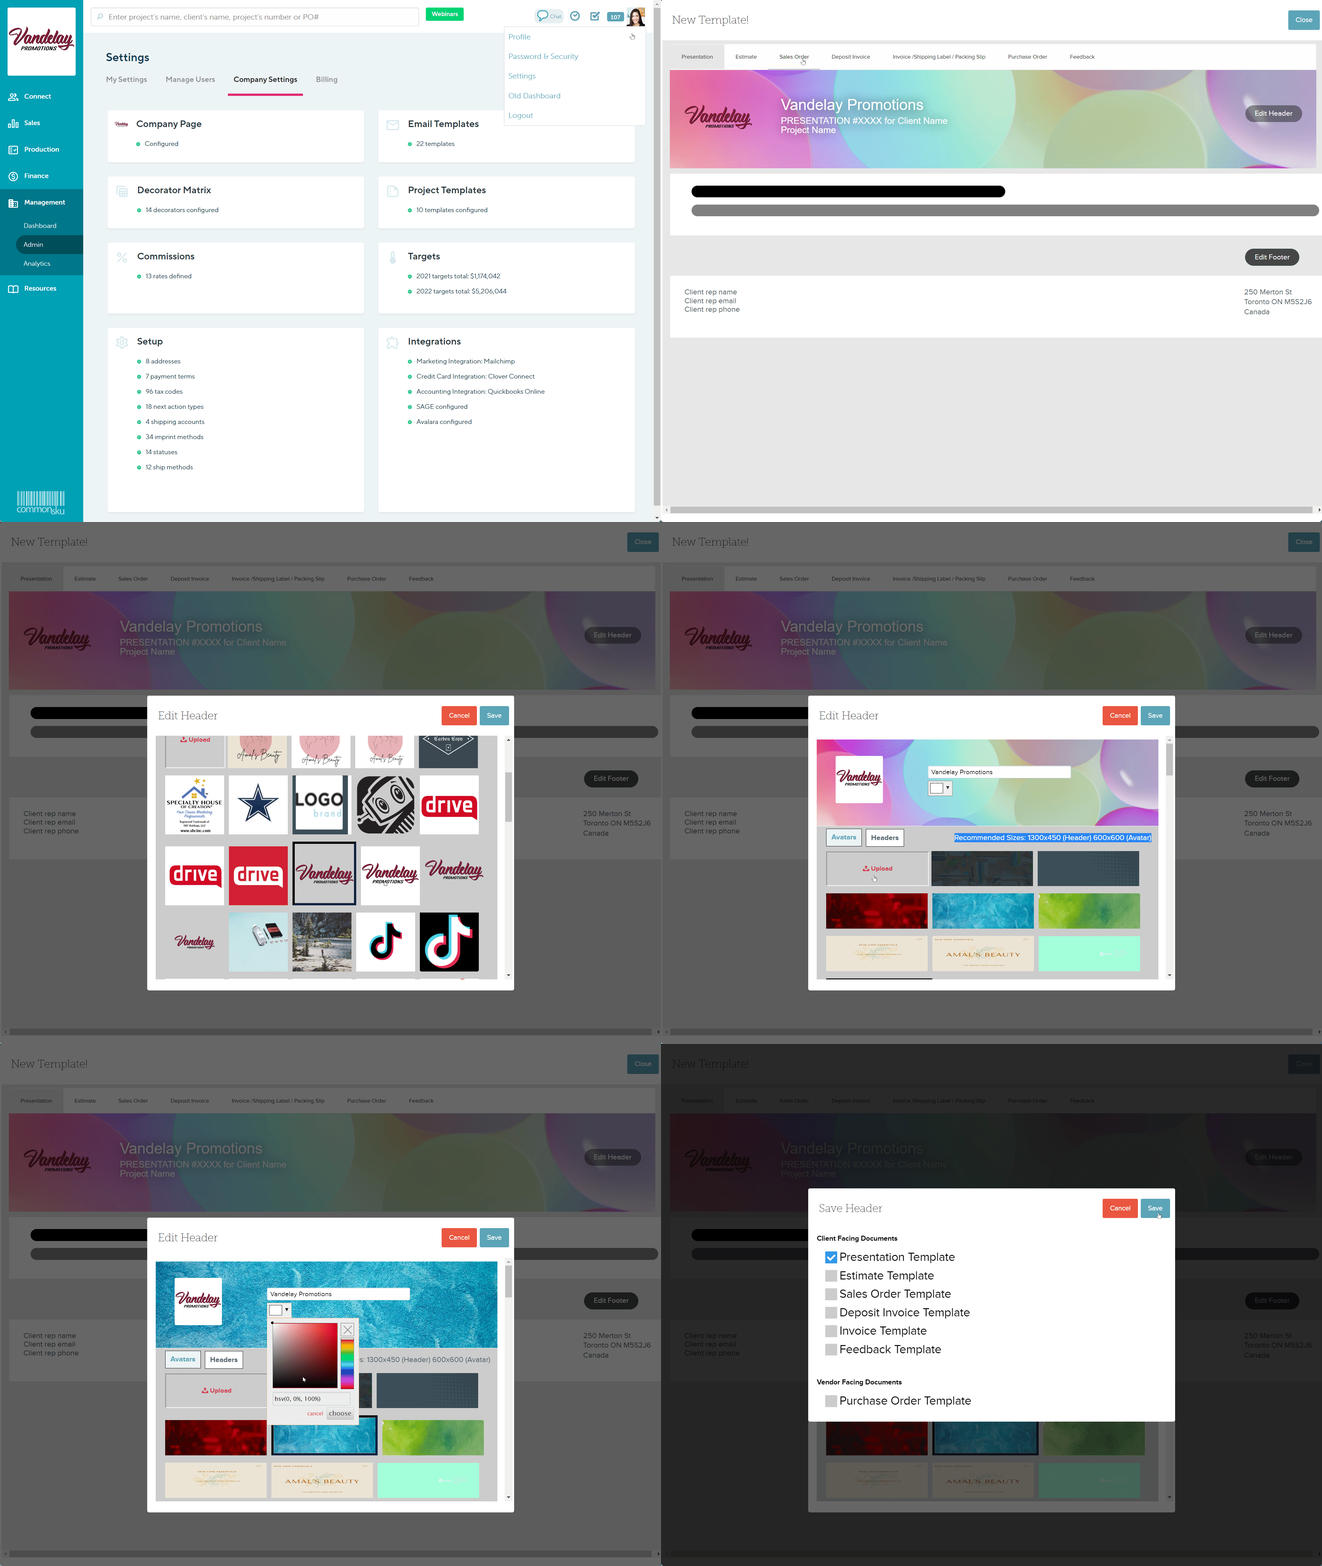
To edit a form header:
- Click your Profile icon (top right corner of commonsku) > Settings > Company Settings
- Click Project Templates
- Hover over the template you wish to edit, and click the
 icon
icon - Select the form type you'd like to edit (presentation, estimate, sales order, deposit invoice, invoice/shipping label/packing slip, purchase order, feedback)
- Click to Edit Header
- Click on Avatars, then select Upload the avatar image (600 x 600 pixels)
- Choose a file from your computer, then click Open
- Crop the image if necessary (the image must be square), then click Done
- Click on Headers and choose from the pre-loaded images or click to Upload a custom header (1300 x 450 pixels)
- Choose a file from your computer, then click Open
- Crop the image if necessary (the image must be square), then click Done
- In the "Company Name" field, edit your company name (optional)
- Below the "Company Name" field, choose the header's text color by selecting from the color chart or entering an HSV color value, then click Choose
- Click Save
- In the "Save Header" pop-up, select the forms you'd like to apply the header on, then click Save
commonsku Tip - Form headers are adaptive and change size depending on the device they're viewed on; specifically, smaller devices/screen sizes may cut off the header image. As a best practice, avoid adding text to your header as it may be distorted or cut-off altogether.
How to edit a form footer:
Form footers display
- the point of contact's name, email, and work phone number (pulled from their profile)
- your company address
- any terms and conditions
Terms and conditions are not available on presentation templates.
To edit a form footer:
- Click your Profile icon (top right corner of commonsku) > Settings > Company Settings
- Click Project Templates
- Hover over the template you wish to edit, and click the
 icon
icon - Select the form type you'd like to edit (estimate, sales order, deposit invoice, invoice/shipping label/packing slip, purchase order, feedback)
- Click to Edit Footer
- In the "Rep Type" drop-down to select either the client rep, order rep, production contact, or invoicing contact, depending on the form type you're editing
- In the "Address" drop-down, select the address you'd like to use (the address list pulls from your company contact information)
- In the "Terms & Conditions" text field, enter your custom terms and conditions (terms and conditions are not available on presentation templates)
- Click Save
Email notifications, including comments on presentations, order approvals, credit card payments, etc., are sent to the person listed as the point of contact at the bottom of the form.
Production and invoicing reps
You can assign dedicated production and invoicing reps as the point of contact on specific forms.
Production Rep
You can choose the production rep as the point of contact on your purchase order footers. This rep will default as the contact point on the purchase order forms and should only be assigned to one user.
To assign a production rep:
- Click your Profile icon (top right corner of commonsku) > Settings > Manage Users
- Click the
-png.png?width=30&name=Admin-Users%20(1)-png.png) icon next to the user you would like to edit
icon next to the user you would like to edit - Select Production Contact
- Click Done
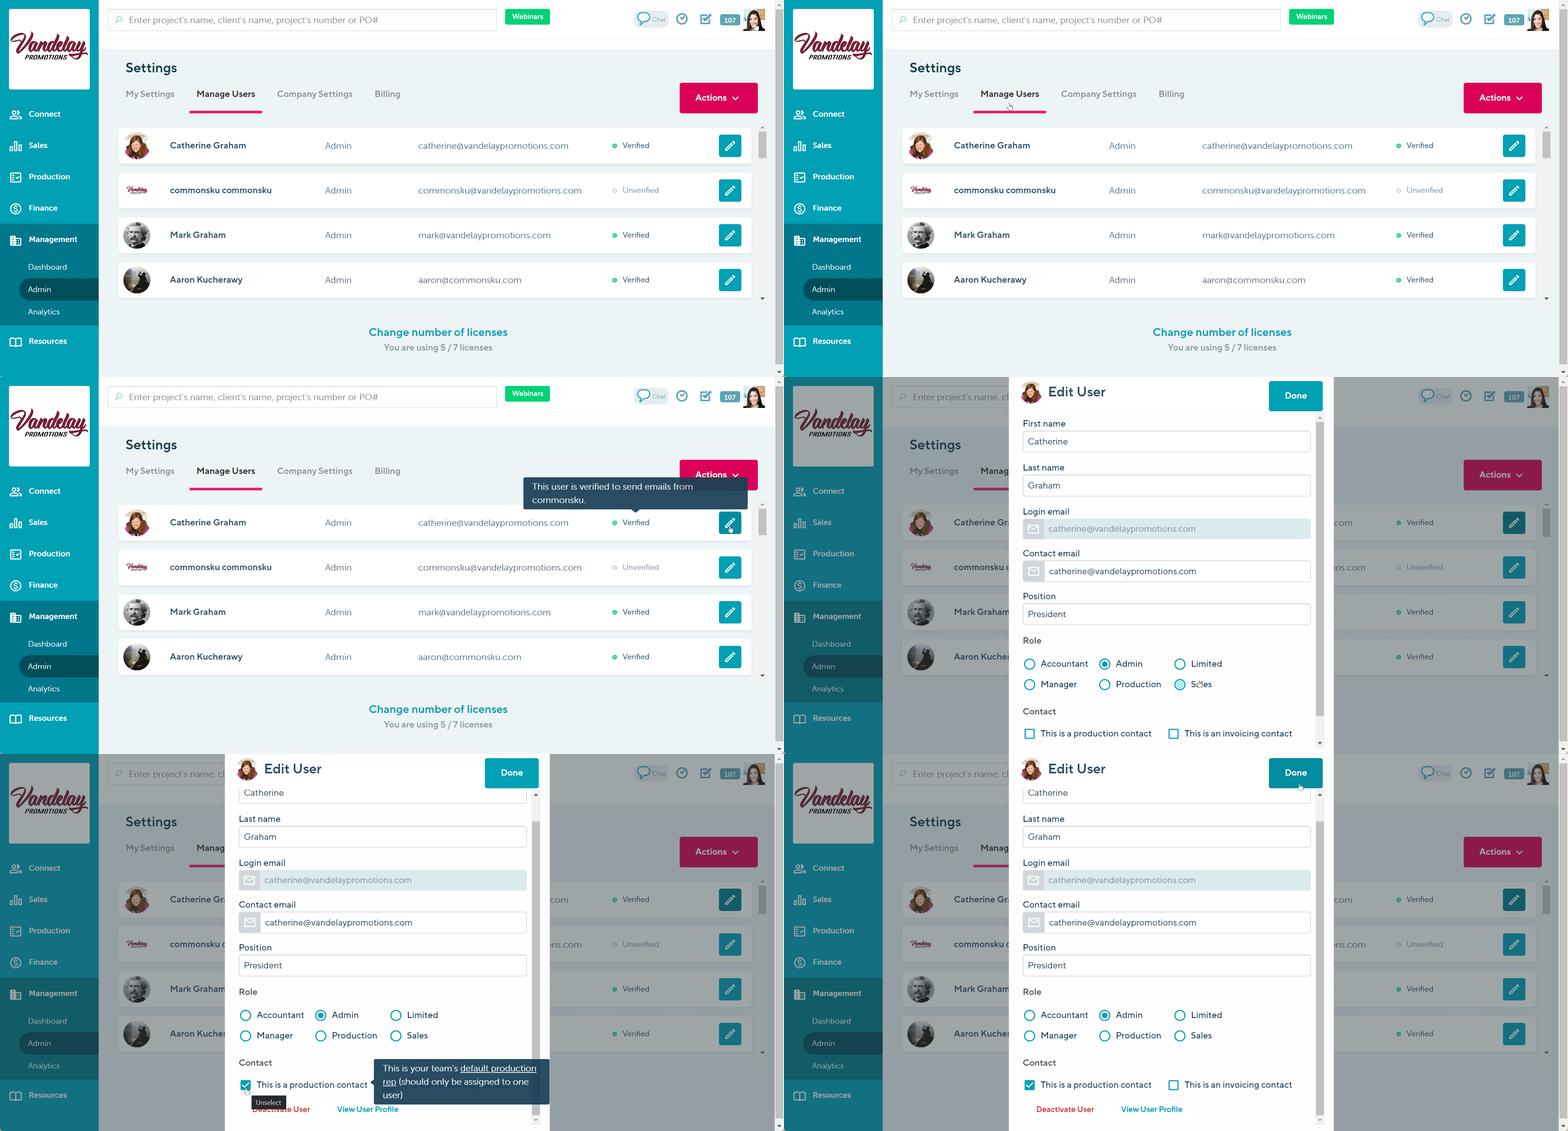
If multiple members of your team have been assigned as your default production contact, commonsku will randomly select one of those users as the production rep in the footers of your purchase orders.
Invoicing Rep
You can choose the invoicing rep as the point of contact on your deposit invoice, invoice, and purchase order footers. This rep will default as the contact point on the select forms and should only be assigned to one user.
To assign an invoicing rep:
- Click your Profile icon (top right corner of commonsku) > Settings > Manage Users
- Click the
-png-1.png?width=30&name=Admin-Users%20(1)-png-1.png) icon next to the user you would like to edit
icon next to the user you would like to edit - Select Invoicing Contact
- Click Done
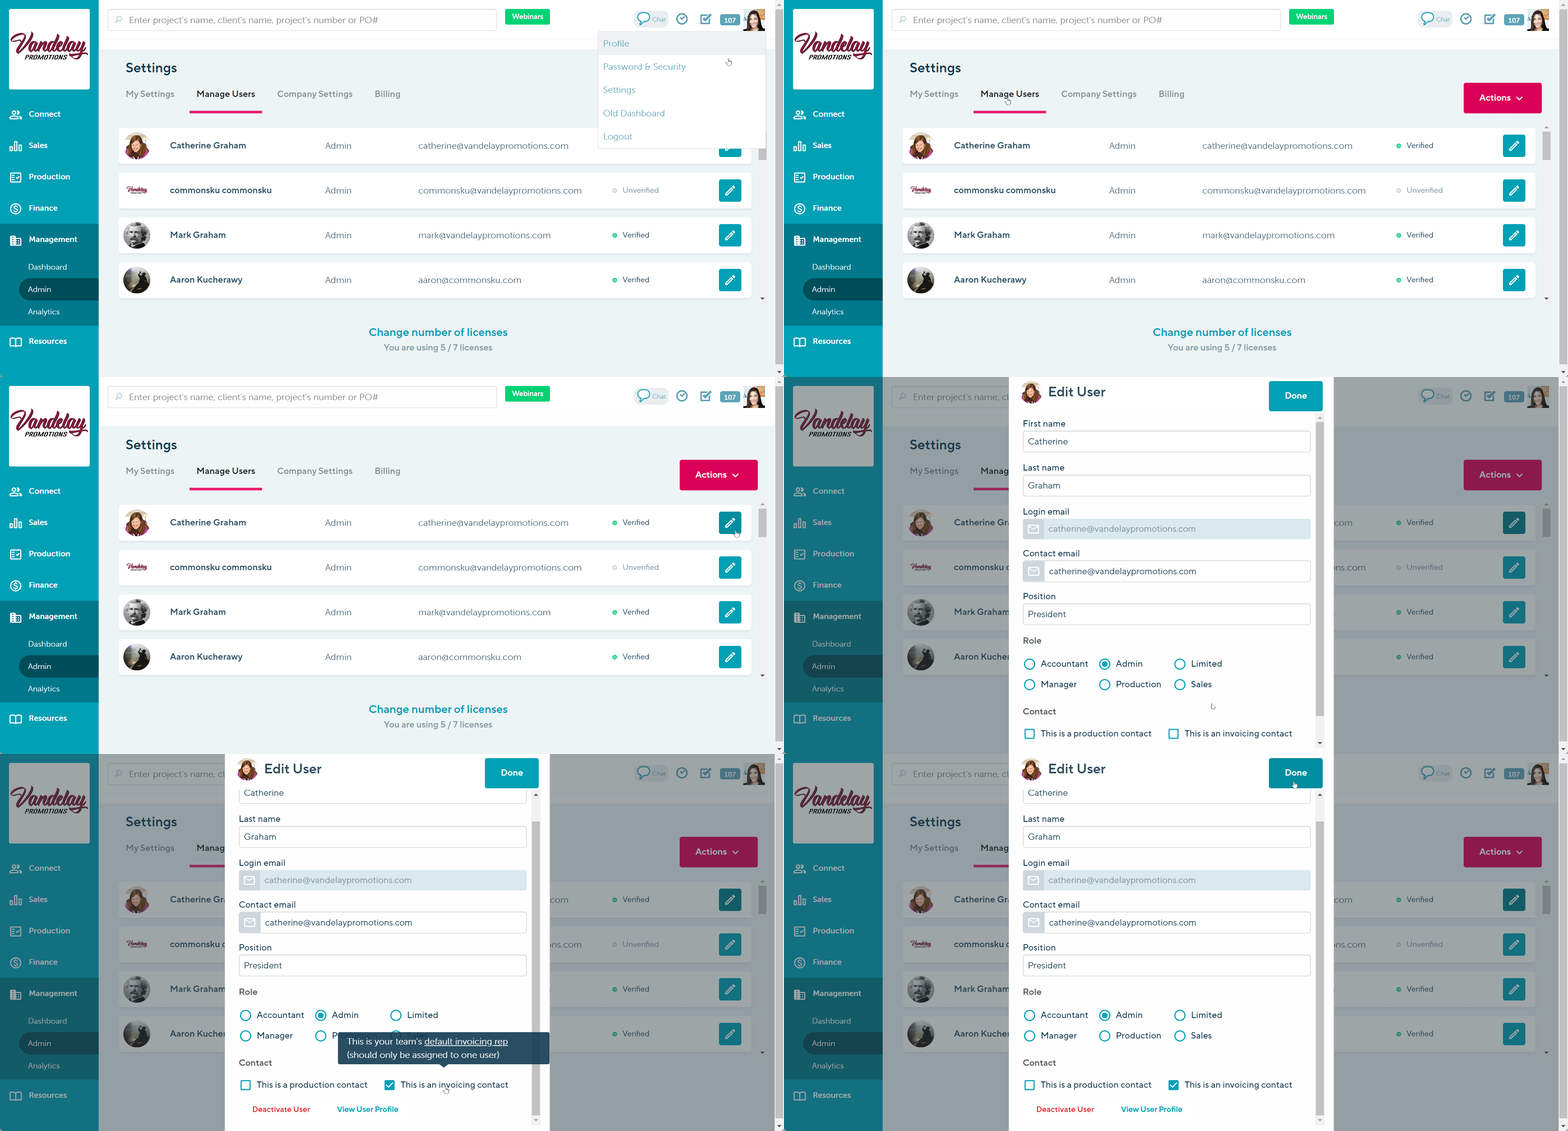
If multiple members of your team have been assigned as your default invoicing contact, commonsku will randomly select one of those users as the invoicing rep in the footers of your invoices.
Choosing a template
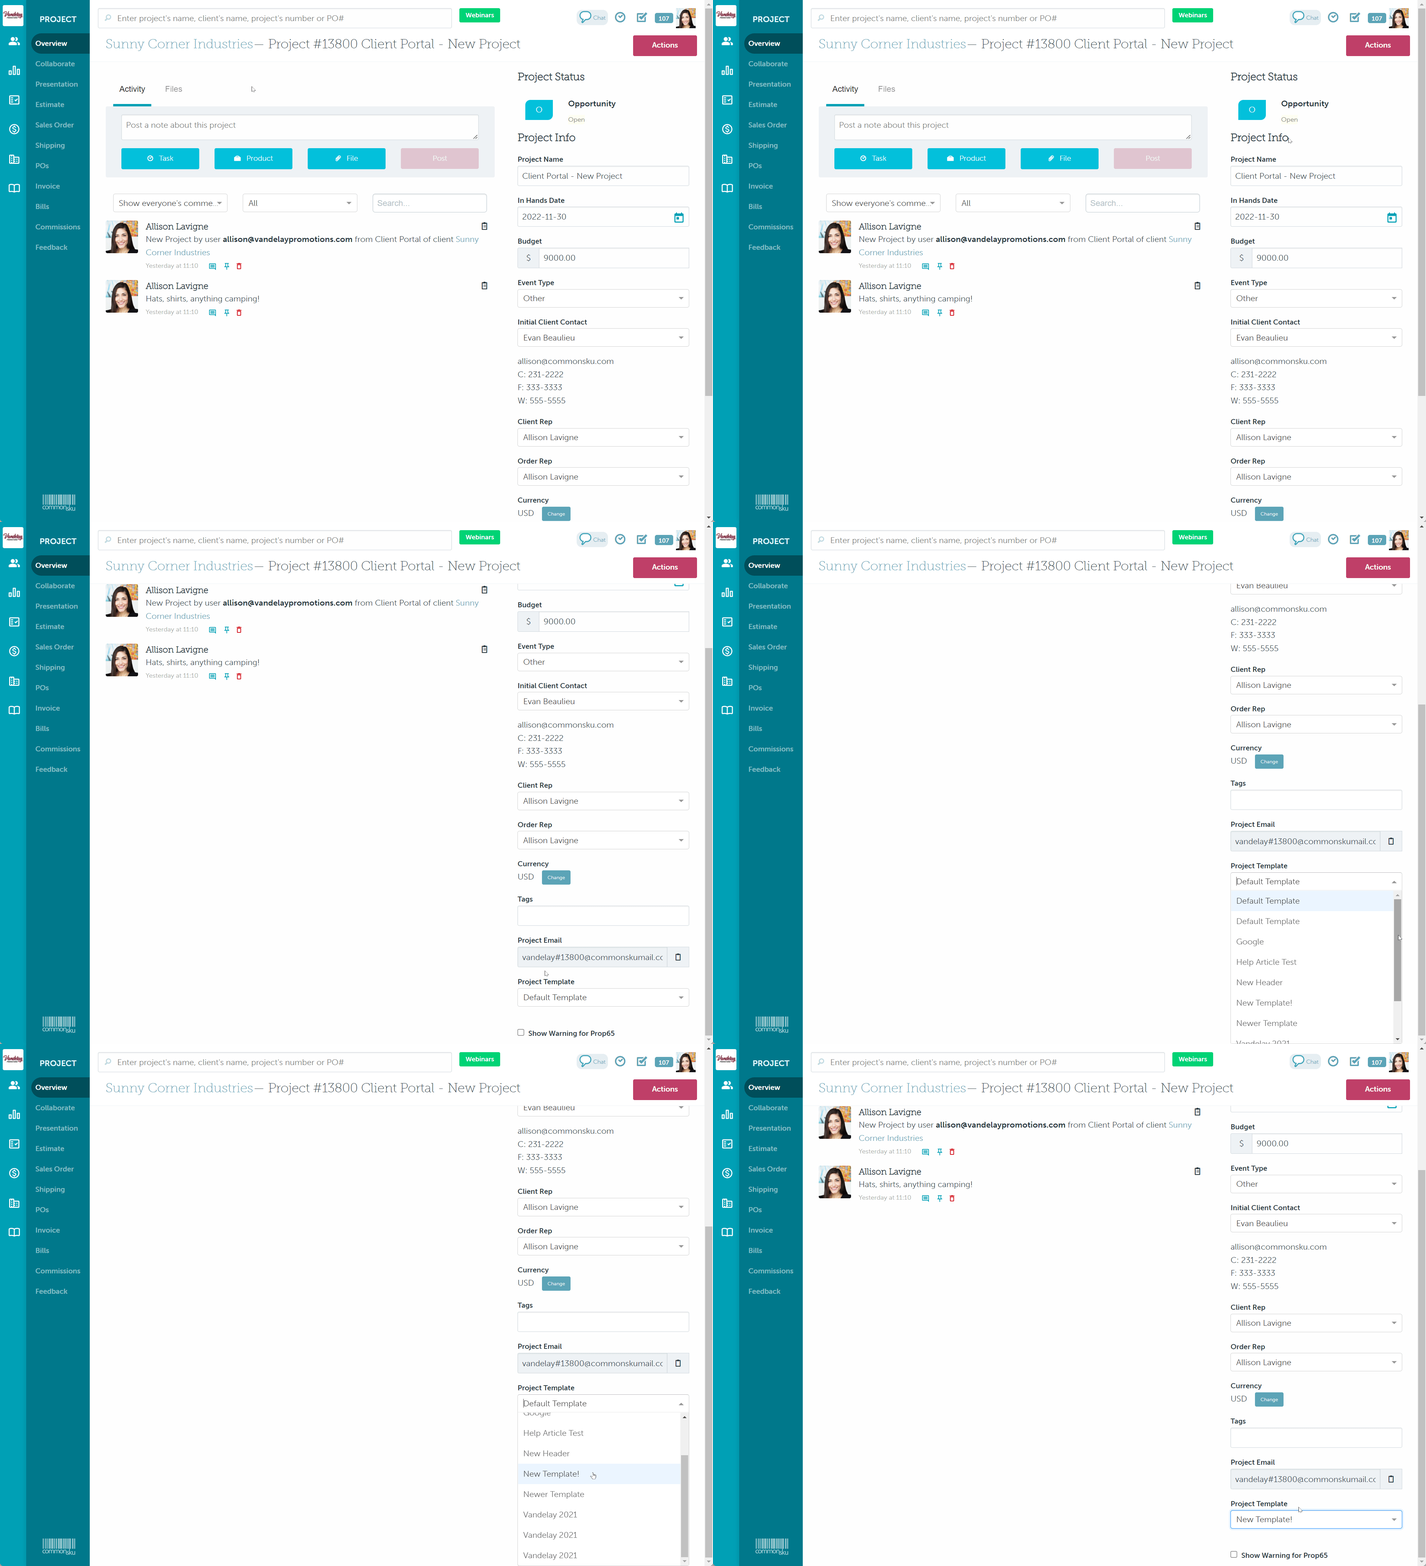
You can use your default template or choose a different template for a particular project.
To change a project's template:
- From the project overview, select a template from the "Project Template" drop-down
That will update the headers and footers on the project's existing sales forms (POs will need to be regenerated).
FAQ
- Why can't I create or update project templates?
- Can I change my default template?
- Can I assign a default template for a specific client or sales rep?
- How can I add text to my header image?
- Why does my avatar/header image look distorted?
Why can't I create or update project templates?
Users must have the permission Manage Users, Billing, and Company Settings in order to be able to create new or update existing project templates.
Can I change my default template?
You cannot change which template acts as the default template, but you can edit your current default template! The default template has a blue ![]() icon in the top right-hand corner.
icon in the top right-hand corner.
Can I assign a default template for a specific client or sales rep?
There's no way to assign a template to a specific client or sales rep.
If you've created a custom template for a client, the best practice is to
- add a template name that's clear and easy to identify
- add a note in the client's page > client details > profile that they have a custom template, so your team knows to use it on future orders
If you've created a custom template for a sales rep, the best practice is to
- add a template name that's clear and easy to identify
- have that rep select their custom template whenever they create a new project before they begin working on client-facing forms
How can I add text to my header image?
We strongly recommend not adding text to your header images since the text could be distorted or cut-off depending on the device your client is using. If you'd still like the use text, the best practice is to
- center the text within the header dimensions (1300 x 450 pixels)
- ensure you place the text on the right side of the header, so it's not covered by your company name or any of the project's details
- upload the header image and then check what it looks like within a project and on your mobile device, then make changes as needed
Why does my avatar/header image look distorted?
Both the avatar and header images have recommended dimensions/ shapes.
- The avatar image should be 600 x 600 pixels or a perfect square.
- The header image should be 1300 x 450 pixels or a rectangle with proportionate dimensions
As a best practice, set the canvas (background) to the recommended dimensions and center your image within the canvas.