On this page:
Shipping to your client or your company
Ship to a third-party decorator
Enter shipping details for multiple products
Filter the Shipping tab
A project's Shipping tab shows all products from the sales order. The products are displayed in the same arrangement as on the sales order, but you can filter them to make it easier to enter shipping information.
To filter products by the supplier:
- In the project's Shipping tab, click the "Suppliers" drop-down and select a supplier from the list
-2.png?width=670&height=177&name=Doc-Brown-s-Auto-Project-10522-New-Project-%20(14)-2.png)
Shipping to your client or your company
To enter shipping details for products that are shipping directly to the client or your company:
- In the project, click the Shipping tab
- Click to Edit the relevant product
- In the "Edit shipping information" screen, check the box next to Sample Order to indicate to the supplier if this is a sample PO (optional)
- Enter the in-hands date/ship date
- Select the box beside "Firm" to mark in-hands/shipping date as firm (optional)
- In the "Ship To" options, select the client or your company
- Click the "Address" drop-down to select the shipping address
- Select the "Shipping Account" drop-down and choose either Client's Account, Supplier's Account, Our Account, or Other
- Select one of your existing accounts from the drop-down below, or, for client accounts, click the "+" to add a new 3rd Party Shipping account to your client's profile (this selection will filter the available Ship Methods based on the courier assigned to the shipping account)
- Enter Shipping Quote - enter the shipping quote from your rep (Supplier's accounts only)
- Select the "Shipping Method" drop-down and choose your preferred method
- Enter further details in the "Shipping Method (Others)" and "Shipping Method (Details)" fields ("Other" accounts only)
- Enter supplier notes in the "Supplier Notes" field (optional)
- Click Save
Shipping to another supplier
To enter shipping details for products that are shipping to another supplier:
- In the project, click the Shipping tab
- Click Edit on the relevant product
- In the "Edit shipping information" screen, check the box next to Sample Order to indicate to the supplier if this is a sample PO (optional)
- Enter the in-hands date, ship-to details
- Select the box beside "Firm" to mark in-hands/shipping date as firm (optional)
- In the "Ship To" options, select Other Supplier
- Select the "Shipping Account" drop-down and choose either Client's Account, Supplier's Account, Our Account, or Other
- Select one of your existing accounts from the drop-down below, or, for client accounts, click the "+" to add a new 3rd Party Shipping account to your client's profile (this selection will filter the available Ship Methods based on the courier assigned to the shipping account)
- Enter Shipping Quote - enter the shipping quote from your rep (Supplier's accounts only)
- Select the "Shipping Method" drop-down and choose your preferred method
- Enter supplier notes in the "Supplier Notes" field (optional)
- On the right-hand side, click the "Supplier" drop-down and select the supplier the products are shipping to
- Click the "Supplier Address" drop-down to update the shipping address (optional)
- Click Save
Ship to a third-party decorator
If you are shipping your products to a third party decorator:
- In the project, click the Shipping tab
- Click Edit on the relevant product
- In the "Edit shipping information" screen, check the box next to Sample Order to indicate to the supplier if this is a sample PO (optional)
- Enter the in-hands date, ship-to details
- Select the box beside "Firm" to mark in-hands/shipping date as firm (optional)
- In the "Ship To" options, select Decorator
- Select the "Shipping Account" drop-down and choose either Client's Account, Supplier's Account, Our Account, or Other
- Select one of your existing accounts from the drop-down below, or, for client accounts, click the "+" to add a new 3rd Party Shipping account to your client's profile (this selection will filter the available Ship Methods based on the courier assigned to the shipping account)
- Enter Shipping Quote - enter the shipping quote from your rep (Supplier's accounts only)
- Select the "Shipping Method" drop-down and choose your preferred method
- Enter further details in the "Shipping Method (Others)" and "Shipping Method (Details)" fields ("Other" accounts only)
- Enter supplier notes in the "Supplier Notes" field (optional)
- On the right-hand side, click the "Decorator" drop-down and select the decorator
- Click the "Decorator Address" drop-down to update the shipping address (optional)
- In the "Ship To" options, choose either the client or your company
- Click the "Client Address" drop-down to update the shipping address
- Adjust the in-hands/shipping date
- Select the box beside "Firm" to mark in-hands/shipping date as firm (optional)
- Select the "Shipping Account" drop-down and choose either Client's Account, Supplier's Account, Our Account, or Other
- Select one of your existing accounts from the drop-down below, or, for client accounts, click the "+" to add a new 3rd Party Shipping account to your client's profile (this selection will filter the available Ship Methods based on the courier assigned to the shipping account)
- Enter Shipping Quote - enter the shipping quote from your rep (Supplier's accounts only)
- Select the "Shipping Method" drop-down and choose your preferred method
- Enter further details in the "Shipping Method (Others)" and "Shipping Method (Details)" fields ("Other" accounts only)
- Enter supplier notes in the "Supplier Notes" field (optional)
- Click Save
Adding shipping details for a third party decorator to a product will create two separate purchase orders: a supplier purchase order for the blank goods and a decorator purchase order with all artwork details.
Ship to two decorators
Suppose you are shipping a product to two separate decorators before sending it to the client. In that case, you need to add a product to your sales order to represent the second decoration.
To ship to two third-party decorators, you'll need to:
- Create a custom product
- Add a decoration location to the custom product
- Add the decorator's address to the client page
- Enter the shipping details
Step 1 - Create a custom product
Once you have entered the decoration details on your product for your first decoration (e.g., embroidery):
- While viewing the sales order, Click + Add > Product
- Click your company database
- Click + New Product
- Enter the product details (see notes below)
- Click Save to save and add the product to the sales order
- Click Close
When creating your custom product:
- Add the second decorator as the supplier
- Enter the type of decoration you need (e.g., screen printing) as the product name
- Use any stock image for the product image (some teams create a branded image so they can use it in the future)
- Skip the pricing and additional details
Step 2 - Add a decoration location to the custom product
Once you've created the custom product:
- In the sales order, click to Edit the custom product
- Change the product name and description as needed (optional)
- In the SKU details, add the size/color/quantity of the items that will be decorated, but leave SKU costs and pricing at $0
- Add a decoration location and enter the decoration details and pricing and normal
Step 3 - Add the decorator's address to the client page
Once you've added the product to the sales order, you will need to add your second decorator's mailing address to your client's page.
To add the decorator's address to the client page:
- Open the client page
- Scroll down to the client addresses section > click Add Address
- Enter the address information for the second decorator
- Click Save
Step 4 - Enter the shipping details
To enter the shipping details for the product and initial decorator.
- In the project, click the Shipping tab
- Click Edit on the relevant product
- In the "Edit shipping information" screen, check the box next to Sample Order to indicate to the supplier if this is a sample PO (optional)
- Enter the in-hands date, ship-to details
- Select the box beside "Firm" to mark in-hands/shipping date as firm (optional)
- In the "Ship To" options, select Decorator
- Select the "Shipping Account" drop-down and choose either Client's Account, Supplier's Account, Our Account, or Other
- Select one of your existing accounts from the drop-down below, or, for client accounts, click the "+" to add a new 3rd Party Shipping account to your client's profile (this selection will filter the available Ship Methods based on the courier assigned to the shipping account)
- Enter Shipping Quote - enter the shipping quote from your rep (Supplier's accounts only)
- Select the "Shipping Method" drop-down and choose your preferred method
- Enter further details in the "Shipping Method (Others)" and "Shipping Method (Details)" fields ("Other" accounts only)
- Enter supplier notes in the "Supplier Notes" field (optional)
- On the right-hand side, click the "Decorator" drop-down and select the decorator
- Click the "Decorator Address" drop-down to update the shipping address (optional)
- In the "Ship To" options, choose either the client or your company
- Click the "Client Address" drop-down to update the shipping address
- Adjust the in-hands/shipping date
- Select the box beside "Firm" to mark in-hands/shipping date as firm (optional)
- Select the "Shipping Account" drop-down and choose either Client's Account, Supplier's Account, Our Account, or Other
- Select one of your existing accounts from the drop-down below, or, for client accounts, click the "+" to add a new 3rd Party Shipping account to your client's profile (this selection will filter the available Ship Methods based on the courier assigned to the shipping account)
- Enter Shipping Quote - enter the shipping quote from your rep (Supplier's accounts only)
- Select the "Shipping Method" drop-down and choose your preferred method
- Enter further details in the "Shipping Method (Others)" and "Shipping Method (Details)" fields ("Other" accounts only)
- Enter supplier notes in the "Decorator Notes" field (optional)
- Click Save
For the second product (second decoration), edit your shipping details the same way you would
- for products shipping to your client or your company address
- for products shipping to another supplier
Once you create your purchase orders, you will have:
- A purchase order for the supplier to send to the first decorator
- A purchase order for the first decorator to send to the second decorator
- A purchase order for the second decorator to send to the client, your company address, or another supplier
Enter shipping details for multiple products
To enter shipping details for multiple products at once:
- In the Shipping tab, select the box beside products you want to edit or choose the "select all" box at the top left-hand of the screen to select all products
- Click Edit Selected
- Follow the shipping directions listed above
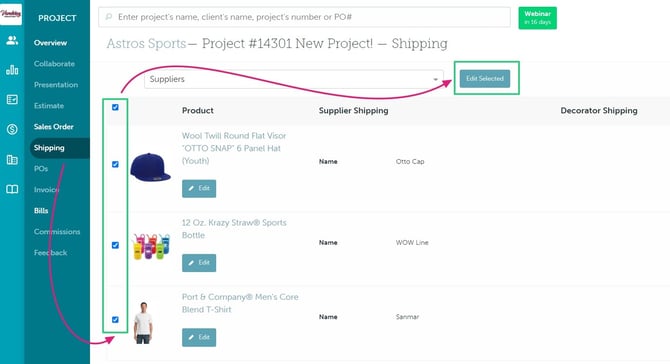
You should only bulk edit shipping information if the items are coming from the same supplier. Do not use the method above if your products are sourced from different suppliers.
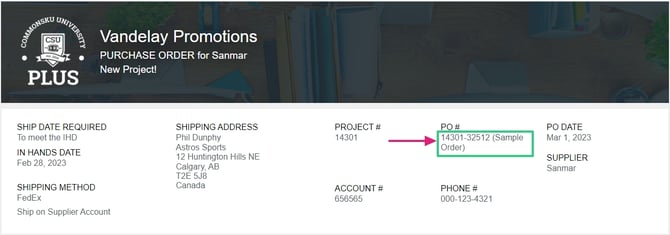
Sample Orders
To mark a purchase order as a sample order:
- In the project, click the Shipping tab
- Click Edit on the relevant product
- In the "Edit shipping information" screen, check the box next to Sample Order to indicate to the supplier if this is a sample PO
- (Re)generate the PO as normal
Selecting this box will add a note to the purchase order's PO# on the supplier facing form:
Split Shipping
You can split up your shipments if you need to send your products to multiple locations.
Shipping an ePO
To enter shipping details for ePO products:
- In the project, click the Shipping tab
- Click to Edit the ePO product
- In the "Edit shipping information" screen, check the box next to Sample Order to indicate to the supplier if this is a sample PO (optional)
- Enter the in-hands date/ship date
- Select the box beside "Firm" to mark in-hands/shipping date as firm (optional)
- In the "Ship To" options, select the relevant ship-to location
- Click the "Address" drop-down to select the shipping address
- Select the "Shipping Account" drop-down and choose either Client's Account, Supplier's Account, or Our Account
- Select one of your existing accounts from the drop-down below, or, for client accounts, click the "+" to add a new 3rd Party Shipping account to your client's profile (this selection will filter the available Ship Methods based on the courier assigned to the shipping account)
- Enter Shipping Quote - enter the shipping quote from your rep (Supplier's accounts only)
- Select the "Shipping Method" drop-down and choose your preferred method
- Enter supplier notes in the "Supplier Notes" field (optional)
- Click Save
Shipping a blank ePO
To enter shipping details for blank ePO products, offered exclusively from alphabroder, Cutter & Buck, and S&S Activewear:
- In the project, click the Shipping tab
- Click to Edit the relevant product
- In the "Edit shipping information" screen, check the box next to Sample Order to indicate to the supplier if this is a sample PO (optional)
- Enter the in-hands date/ship date
- Select the box beside "Firm" to mark in-hands/shipping date as firm (optional)
- In the "Ship To" options, select the relevant ship-to location
- Click the "Address" drop-down to select the shipping address
- Select the "Shipping Account" drop-down and choose either Client's Account, Supplier's Account, or Our Account
- Select one of your existing accounts from the drop-down below, or, for client accounts, click the "+" to add a new 3rd Party Shipping account to your client's profile (this selection will filter the available Ship Methods based on the courier assigned to the shipping account)
- Enter Shipping Quote - enter the shipping quote from your rep (Supplier's accounts only)
- Select the "Shipping Method" drop-down and choose your preferred method
- Click Save
With alphabroder, you can choose which warehouse to source blank apparel from. commonsku does not enforce warehouse selection based on inventory availability. If a warehouse cannot fill the requested quantity, an error message will populate after submitting the ePO.
Unlike decorated ePOs, blank ePOs do not include predefined artwork details. Blank ePO products will revert to regular purchase orders if the product is being decorated by the supplier rather than a third-party decorator.
Errors & warning messages
There are also errors and warning messages anytime your purchase order's in-hands/shipment dates conflict with the sales order or conflict with each other.
Error messages:
Once you click to enter a product's shipping details, you will now see an error (shown in red) anytime
- a purchase order's in-hands or shipment date is set to the past
- a decorator's purchase order has an in-hands or shipment date that is before the supplier's in-hands or shipment date
- a purchase order's in-hands date comes after the sales order's in-hands date
The errors will display until the are corrected.
You can choose to save shipping detail, even if they have error messages. If you'd like to override the errors, click the Save with errors button in the popup. As a best practice, we recommend correcting any warning messages before saving the shipping information.
Warning messages:
Once you click to enter a product's shipping details, you will now see a warning (shown in yellow) anytime
- a sales order's in-hands date or shipment date is set to today
- a purchase order's in-hands or shipment date is set to today
- a decorator's purchase order has the same in-hands or shipment date as the supplier's purchase order
The warnings will display until they are corrected.
You can choose to save shipping details, even if they have warning messages. If you'd like to override the warnings, click the Save with errors button in the warning popup. As a best practice, we recommend correcting any warning messages before saving the shipping information.
FAQ
- Do I need to fill out all my shipping details to create a PO?
- Why do all of my POs say they're for the same supplier?
- Can I change a product's supplier?
- What if the supplier is providing the decoration?
-
How do I add a 3rd Party Shipping account to my commonsku account?
- Why can't I update the shipping account on my ePO?
Do I need to fill out all my shipping details to create a PO?
Yes, it is essential to complete all shipping details for every product in order to create your purchase orders, even if you do not intend to generate all the purchase orders immediately.Yes, You need to fill out all shipping details for all products if you need to create your Pos even if you are not needing to create all the Pos at the time.
Why do all of my POs say they're for the same supplier?
If you bulk edit items from different suppliers, commonsku will default each product's supplier to be the supplier listed on the first product.
To correct this mistake, you will need to:
- Click the Shipping tab
- Click Edit on the relevant product
- Select the correct supplier from the "Supplier" drop-down
- Click Save
- Regenerate your purchase orders
-png.png?width=670&height=566&name=Doc-Brown-s-Auto-Project-11885-Summer-Giveaway-%20(2)-png.png)
Can I change a product's supplier?
Aside from re-adding the item, there's no way to change the supplier listed in the sales order, but there is a workaround to change the supplier listed on the PO!
To change the supplier on a PO
- In the Shipping tab, click to Edit the item
- Click the "Supplier" drop-down and select a new supplier from the drop-down
- Enter shipping details as normal
- Click to Save
- (Re)generate purchase orders as normal
-png-1.png?width=670&height=566&name=Doc-Brown-s-Auto-Project-11885-Summer-Giveaway-%20(2)-png-1.png)
What if the supplier is providing the decoration?
You do not need to enter shipping details for a third-party decorator if the supplier provides your products' decoration; the supplier's purchase order will automatically pull both the product and decoration details.
How do I add a 3rd Party Shipping account to my commonsku account?
You can add a 3rd Party Shipping Account to your team's commonsku account from your admin tab.
How do I add a 3rd Party Shipping account to a client page?
You can add a 3rd Party Shipping account to a client's profile either from the project's shipping tab, or from the client page.
Why can't I update the shipping account on my ePO?
For ePOs, third-party shipping is controlled at the supplier level and applies to all distributors they work with. If third-party shipping is enabled by the supplier, every distributor can access it.
If you don’t see an option to select your client’s or your own distributor’s shipping account when completing the shipping details, it’s typically because an inbound freight charge or another shipping cost was included in the product cost.