On this page:
Create a project
To create a project:
- Click Actions > New Project
- Enter a Project Name
- Select an Event Type from the drop-down
- Select O (Opportunity) as your Starting Stage
- Click Continue
-
Select a Client Contact from the drop-down, or click + New Contact at the bottom of the drop-down to create a new contact
- If you are adding a new contact (optional):
- Enter all required contact details - required fields are indicated by a *
-
Click Create
- If you are adding a new contact (optional):
- Enter a budget for the order
- Select an in-hands date
- Click Done
You won't need to attach a client to this project, as it is automatically tied to their account.
Create a presentation
- Actions > New Project
- Enter a Project Name
- Select an Event Type from the drop-down
- Select P (Presentation) as your Starting Stage
- Click Continue
- Select a client contact from the dropdown, or click + New Contact at the bottom of the drop-down to create a new contact
- If you are adding a new contact (optional):
- Enter all required contact details - required fields are indicated by a *
- Click Create
- If you are adding a new contact (optional):
- Enter a budget for the order
- Select an in-hands date
- Select a presentation style
- Click Select Products
You won't need to attach a client to this project, as it is automatically tied to their account.
Create an estimate
- Click Actions > New Project
- Enter a Project Name
-
Select an Event Type from the drop-down
-
Select E (Estimate) as your Starting Stage
-
Click Continue
-
Enter a budget for the order
-
Select an in-hands date
-
Select a billing contact, or click + New Contact at the bottom of the drop-down to create a new contact
-
If you are adding a new contact (optional):
-
Enter all required contact details - required fields are indicated by a *
-
Click Create
-
-
-
Select a billing address, or click + New Address at the bottom of the drop-down to create a new address
-
If you are adding a new address (optional):
-
Enter all required contact details - required fields are indicated by a *
-
Click Create
-
-
-
Select a shipping contact and address, or select Same as Billing
-
Click Select Products
You won't need to attach a client to this project, as it is automatically tied to their account.
Create a Sales Order
- Click Actions > New Project
- Enter a Project Name
-
Select an Event Type from the drop-down
-
Select SO (sales order) as your Starting Stage
-
Click Continue
-
Select an in-hands date
-
Select a billing contact, or click + New Contact at the bottom of the drop-down to create a new contact
-
If you are adding a new contact (optional):
-
Enter all required contact details - required fields are indicated by a *
-
Click Create
-
-
-
Select a billing address, or click + New Address at the bottom of the drop-down to create a new address
-
If you are adding a new address (optional):
-
Enter all required contact details - required fields are indicated by a *
-
Click Create
-
-
-
Select a shipping contact and address, or select Same as Billing
-
Click Select Products

You won't need to attach a client to this project, as it is automatically tied to their account.
Email the client
To email the client:
- Click Actions > Email Client
- Select a recipient either from the dropdown or manually type their email address
- Compose your email
- Click Send Email
This activity will automatically post to the Client and Contact Newsfeeds with a link to view the email.
Apply/Remove a credit hold
To apply a credit hold to a client:
- Click Actions
- Click Apply Credit Hold
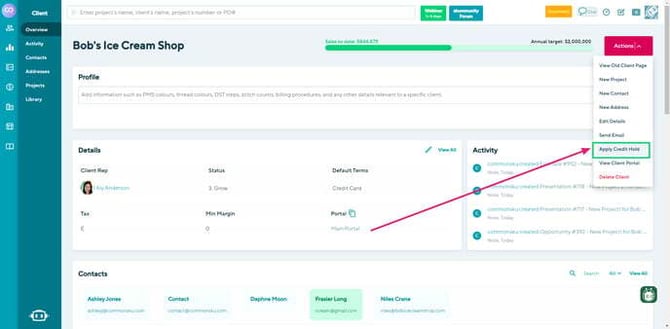
A pop-up will appear on the client's page stating that the account is currently on credit hold. The client will now be in a Credit Hold status, and you will not be able to create purchase orders under their profile.
To remove a credit hold from a client:
- Click Actions
- Click Remove Credit Hold
You need permission to "Apply/Remove Credit Hold." If you need to apply/remove a credit hold but cannot do so, you can contact your Admin to permit you to "Apply/Remove Credit Hold" or do it for you.
Delete the client
To delete a client:
- On the client page, click Actions
- Select Delete Client
- Click Yes in the "Are you sure you want to delete this account" popup
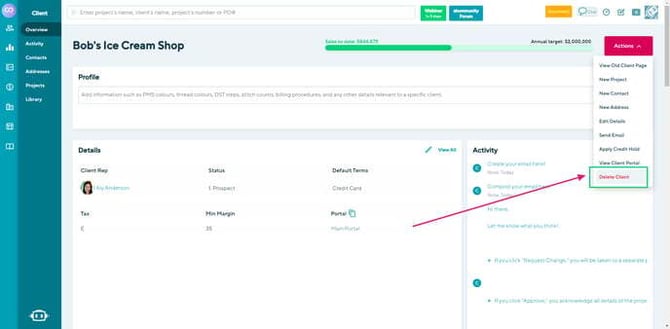
You need permission to "Delete Account." If you don't see the Delete Client option, you can contact your Admin to give you permission, or do it for you.