How to Add/Edit PromoStandards Products
PromoStandards products are available from commonsku suppliers that offer the Electronic Purchase Orders (ePO) endpoint. Product data may contain your team's preferred pricing, auto-cost updates, and decoration details, depending on the supplier.
On this page:
Activate PromoStandards
Reach out to commonsku's PromoStandards supplier contacts and ask them to add PromoStandards to your team's account!
Product data
PromoStandards products display additional details on their product pages, including:
- The product's name
- The available size and color variants
- The SKU number
- The product's live inventory
- Your team's special pricing
Some Product Pages also show things like substitute products and companion sell items.
-png.png?width=670&height=424&name=Promostandards-Product%20(1)-png.png)
Add PromoStandards products
You can source PromoStandards products through your Connected+, ESP, SAGE, or Distributor Central database. The product data varies depending on which database you're adding a PromoStandards item from.
Learn more about adding a PromoStandards product to a:
Presentation/Shop
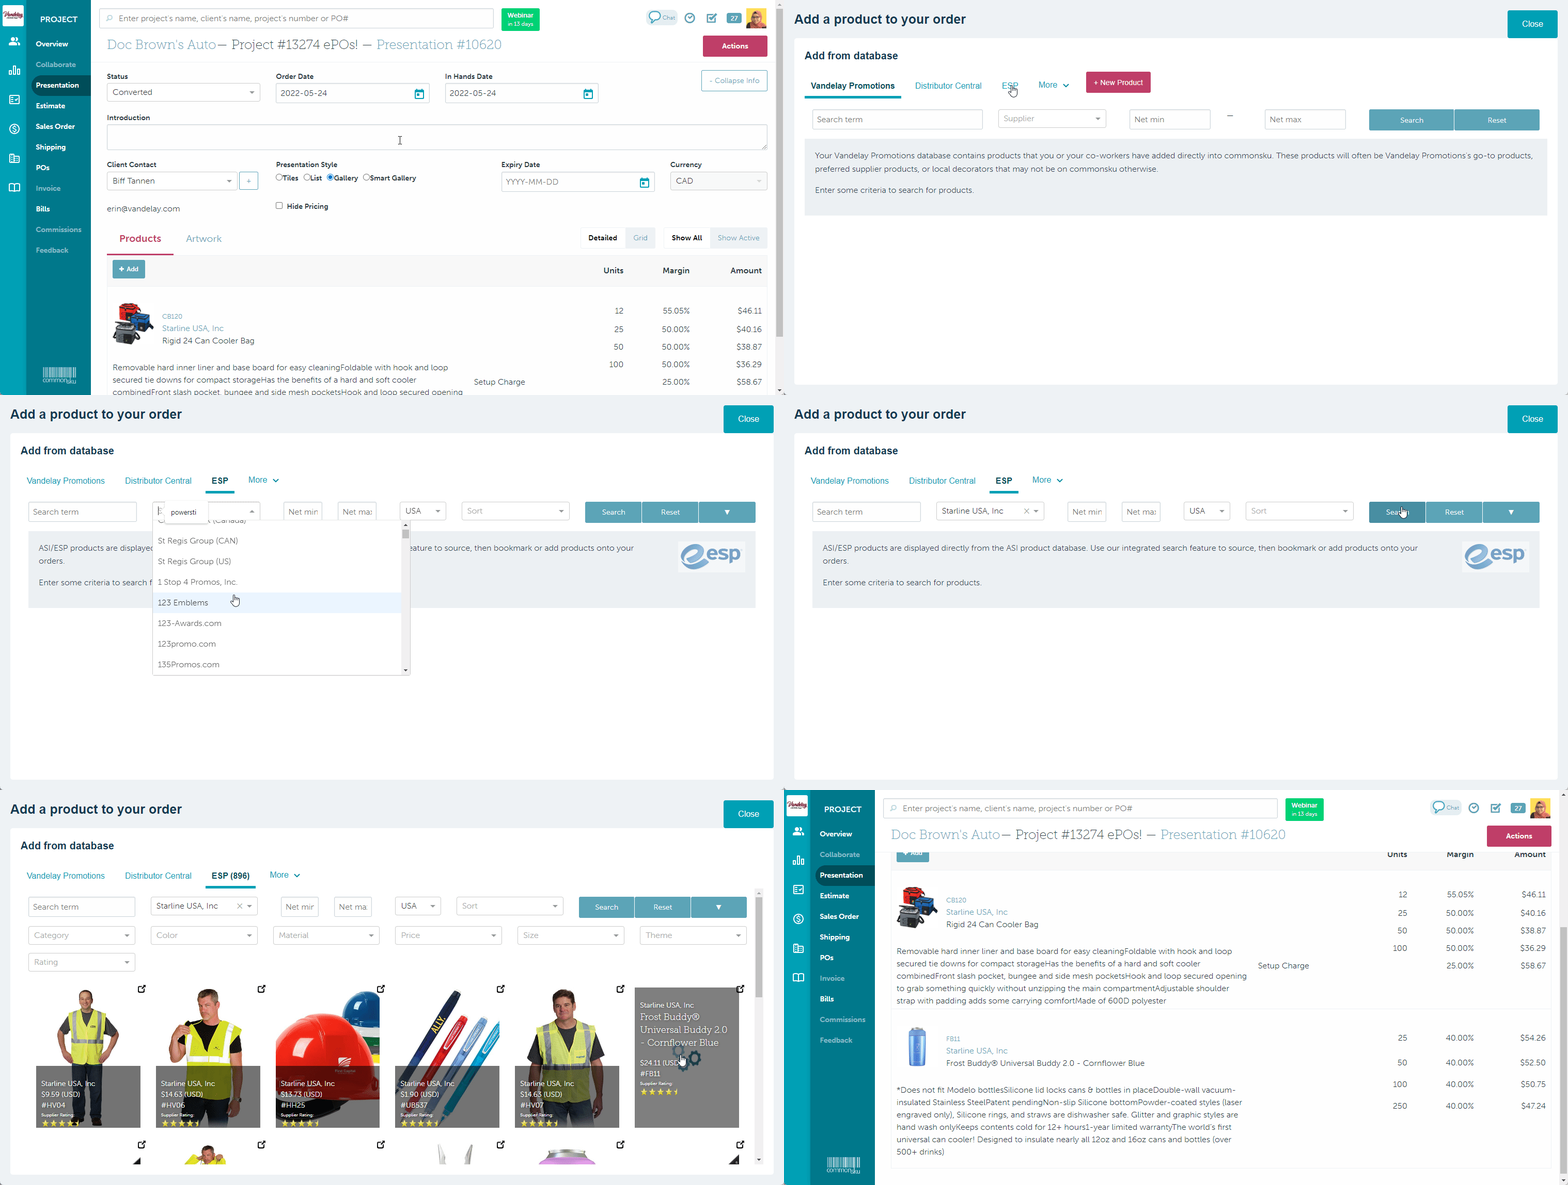
To add a product to a presentation or shop:
- Click + Add > Product
- Select either the Connected+, ESP, SAGE, or Distributor Central database
- Enter your search criteria
- Click Search
- Click the product you need; if no pop-up appears to select a cost group, the product's background will turn blue once it's added to the presentation
- If required, use the pop-up's "Select Cost Group" drop-down to filter your search results (optional)
- Click Add Product; the product's background will turn blue once it's added to the presentation
Estimate/Sales Order/Invoice
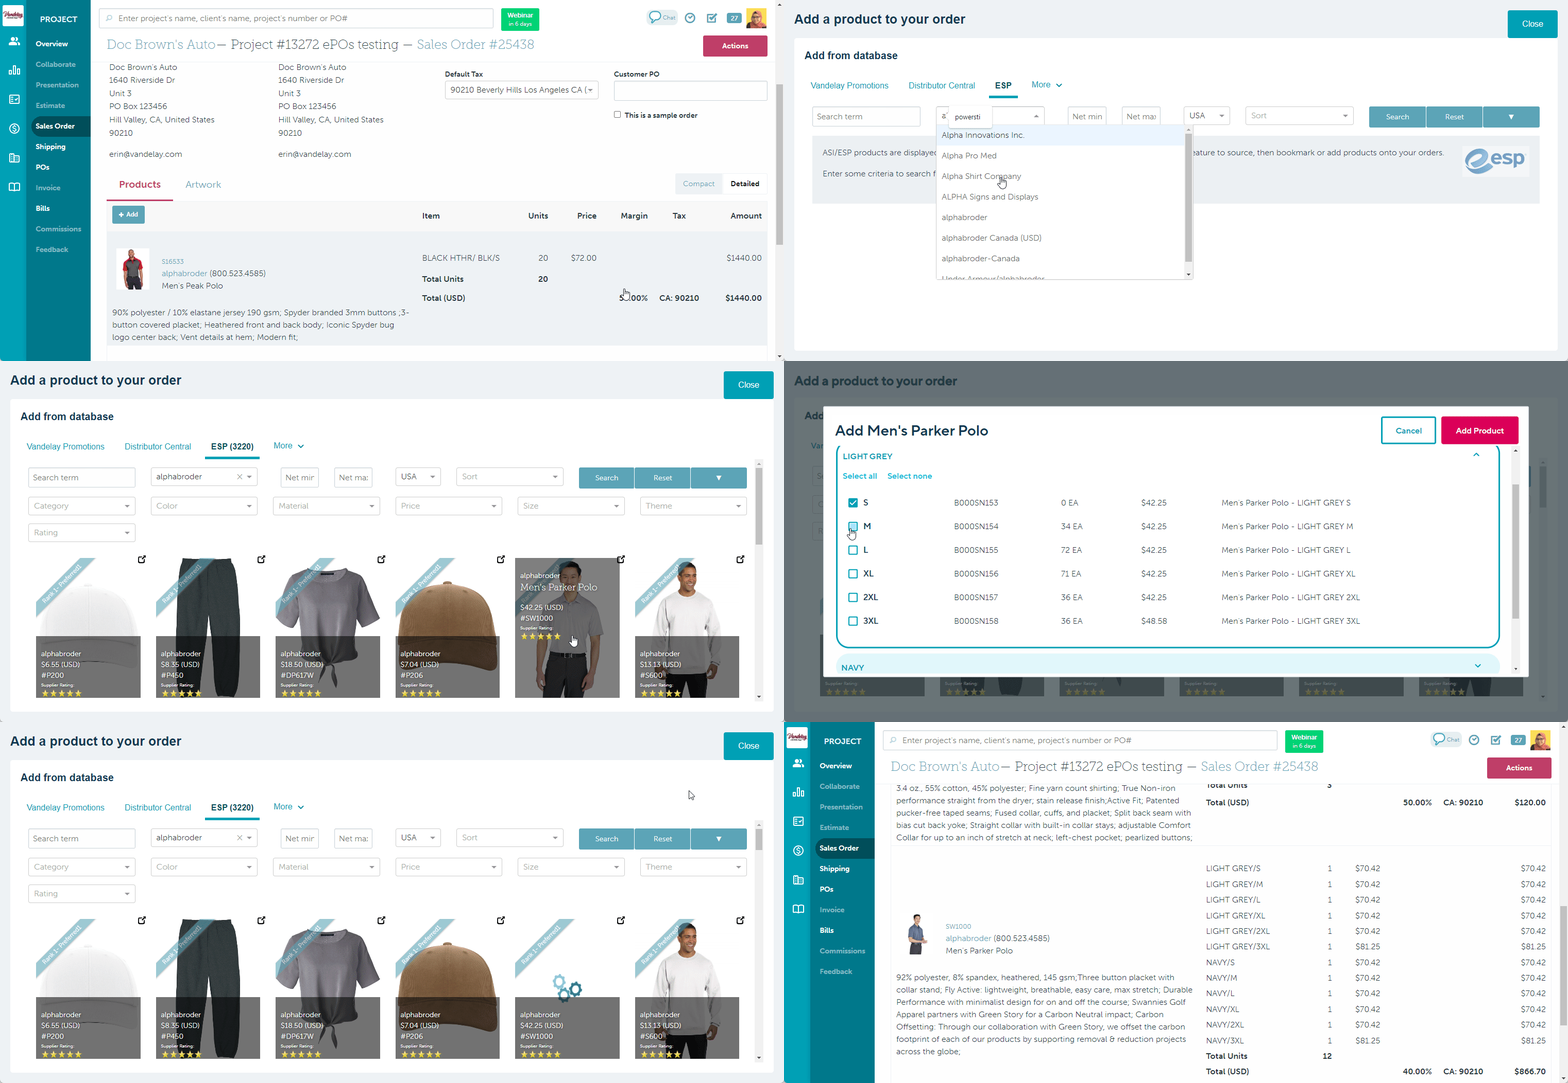
To add a product to an estimate/sales order/invoice:
- In the Products tab, click + Add > Product
- Select either the Connected+, ESP, SAGE, or Distributor Central database
- Enter your search criteria
- Click Search
- Click the product you need
- Use the pop-up's size or color drop-downs to filter your search results (optional)
- Hover over the product variant(s) you want to add and check the boxes for the sizes you want or click Select All for all sizes
- Once you've selected all the variants you want to present, click Add Product; the product's background will turn blue once it's added to the estimate, sales order, or invoice
Edit PromoStandards products
Learn how to edit PromoStandards products on a:
Presentation/Shop
Editing a PromoStandards item in a presentation/shop is very similar to editing any other product, but there are a few differences:
- You cannot add a run or fixed charge to the product; additional charges must be added to the artwork location
- For hard good items, the artwork file upload pulls specs from the supplier's database
- The size/color variants are pulled directly from the supplier's database
- You can click to Update the pricing SKU
For apparel items ordered from alphabroder, Cutter & Buck, and S&S Activewear, artwork specs do not pull in from the supplier's database and artwork details are filled out as normal. PromoStandards apparel products only allow for blank, undecorated ePOs.
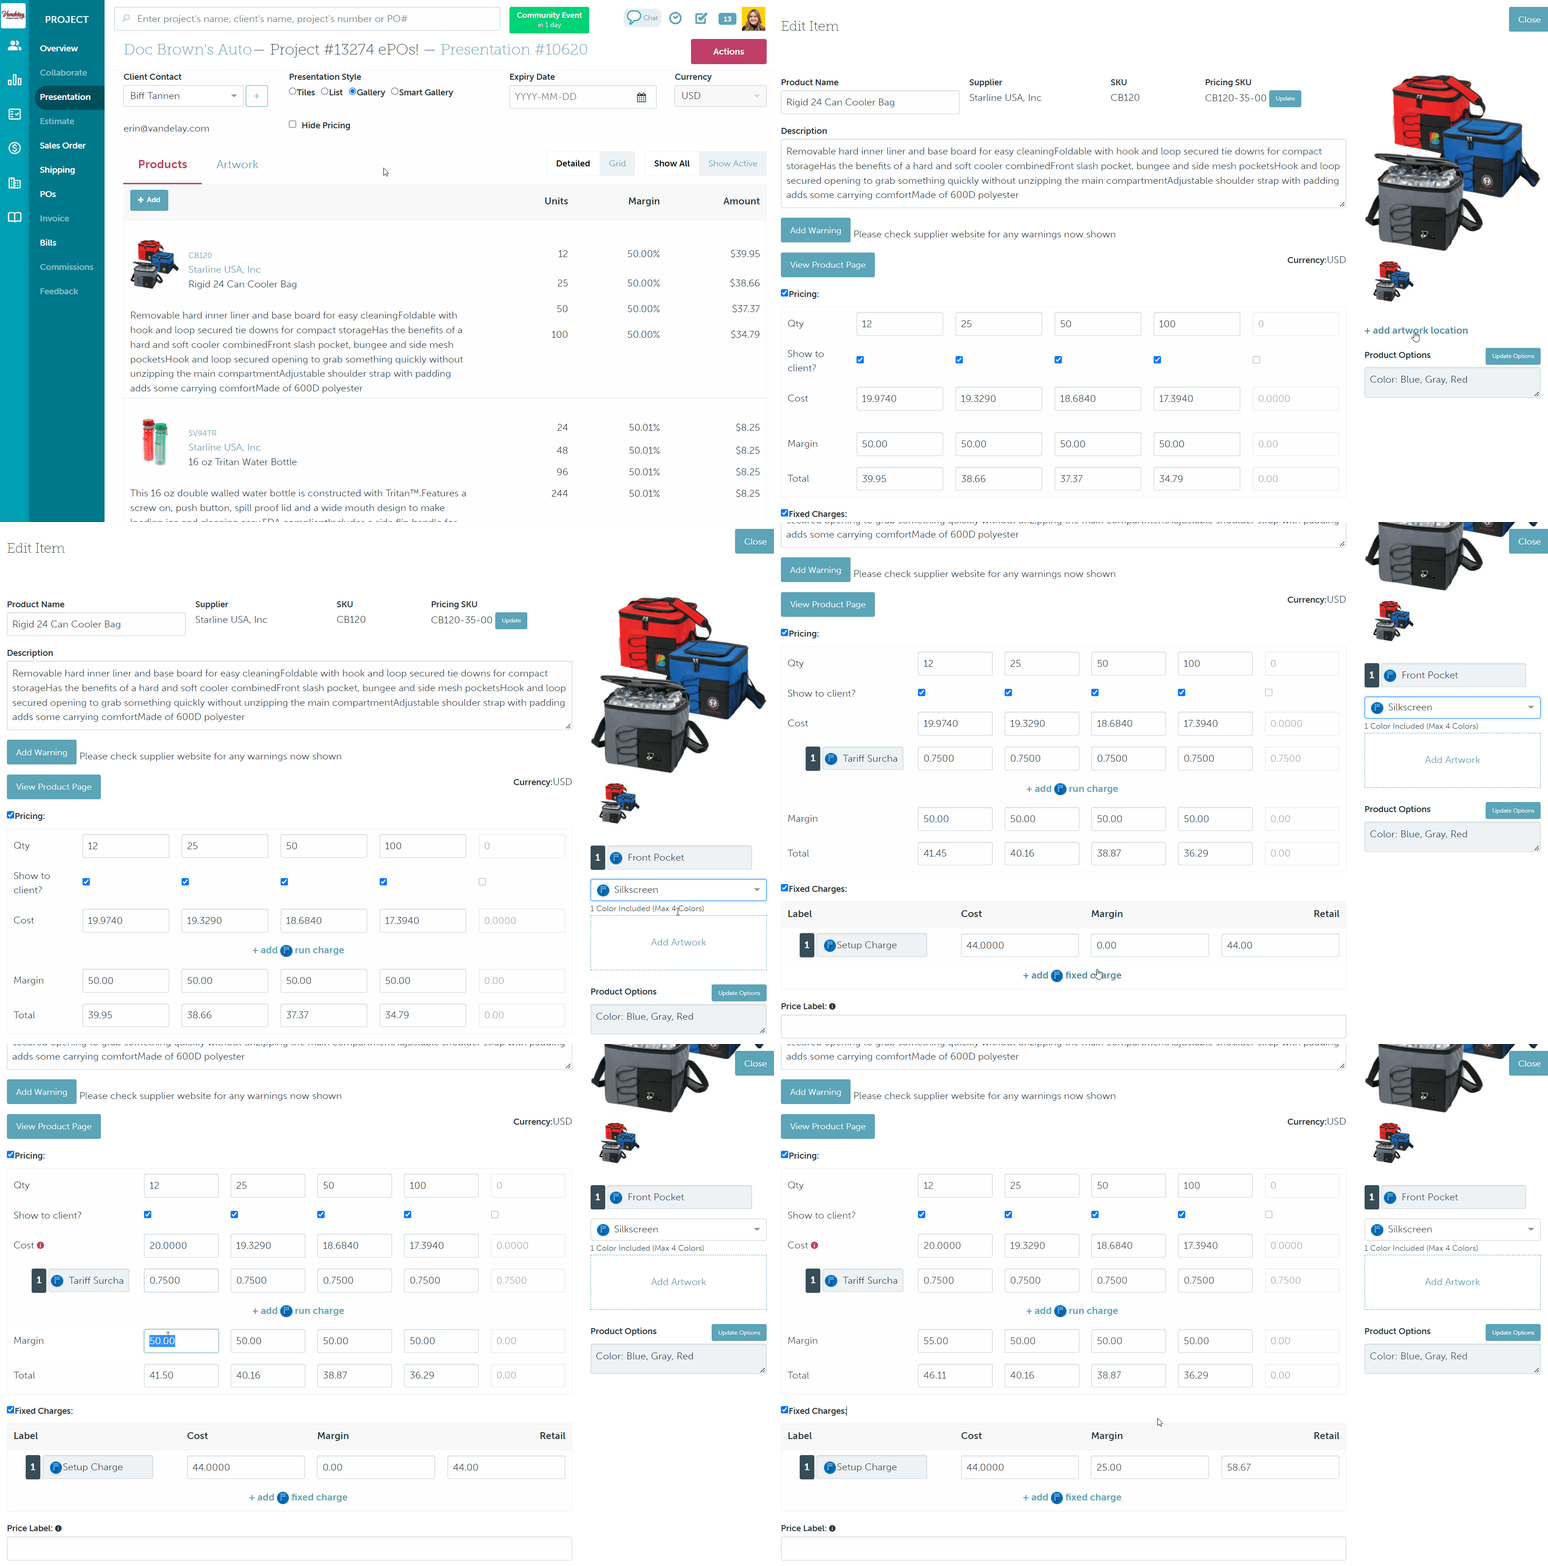
To add an artwork location:
- Hover over the product > click edit
- Select +Add artwork location
- Choose the location from the drop-down
- Choose an imprint type from the "Select an imprint type..." drop-down
- Enter the number of colors (if applicable)
- Click +Add run charge or +Add fixed charge to include additional costs
- Make changes to your margins/retail prices as needed
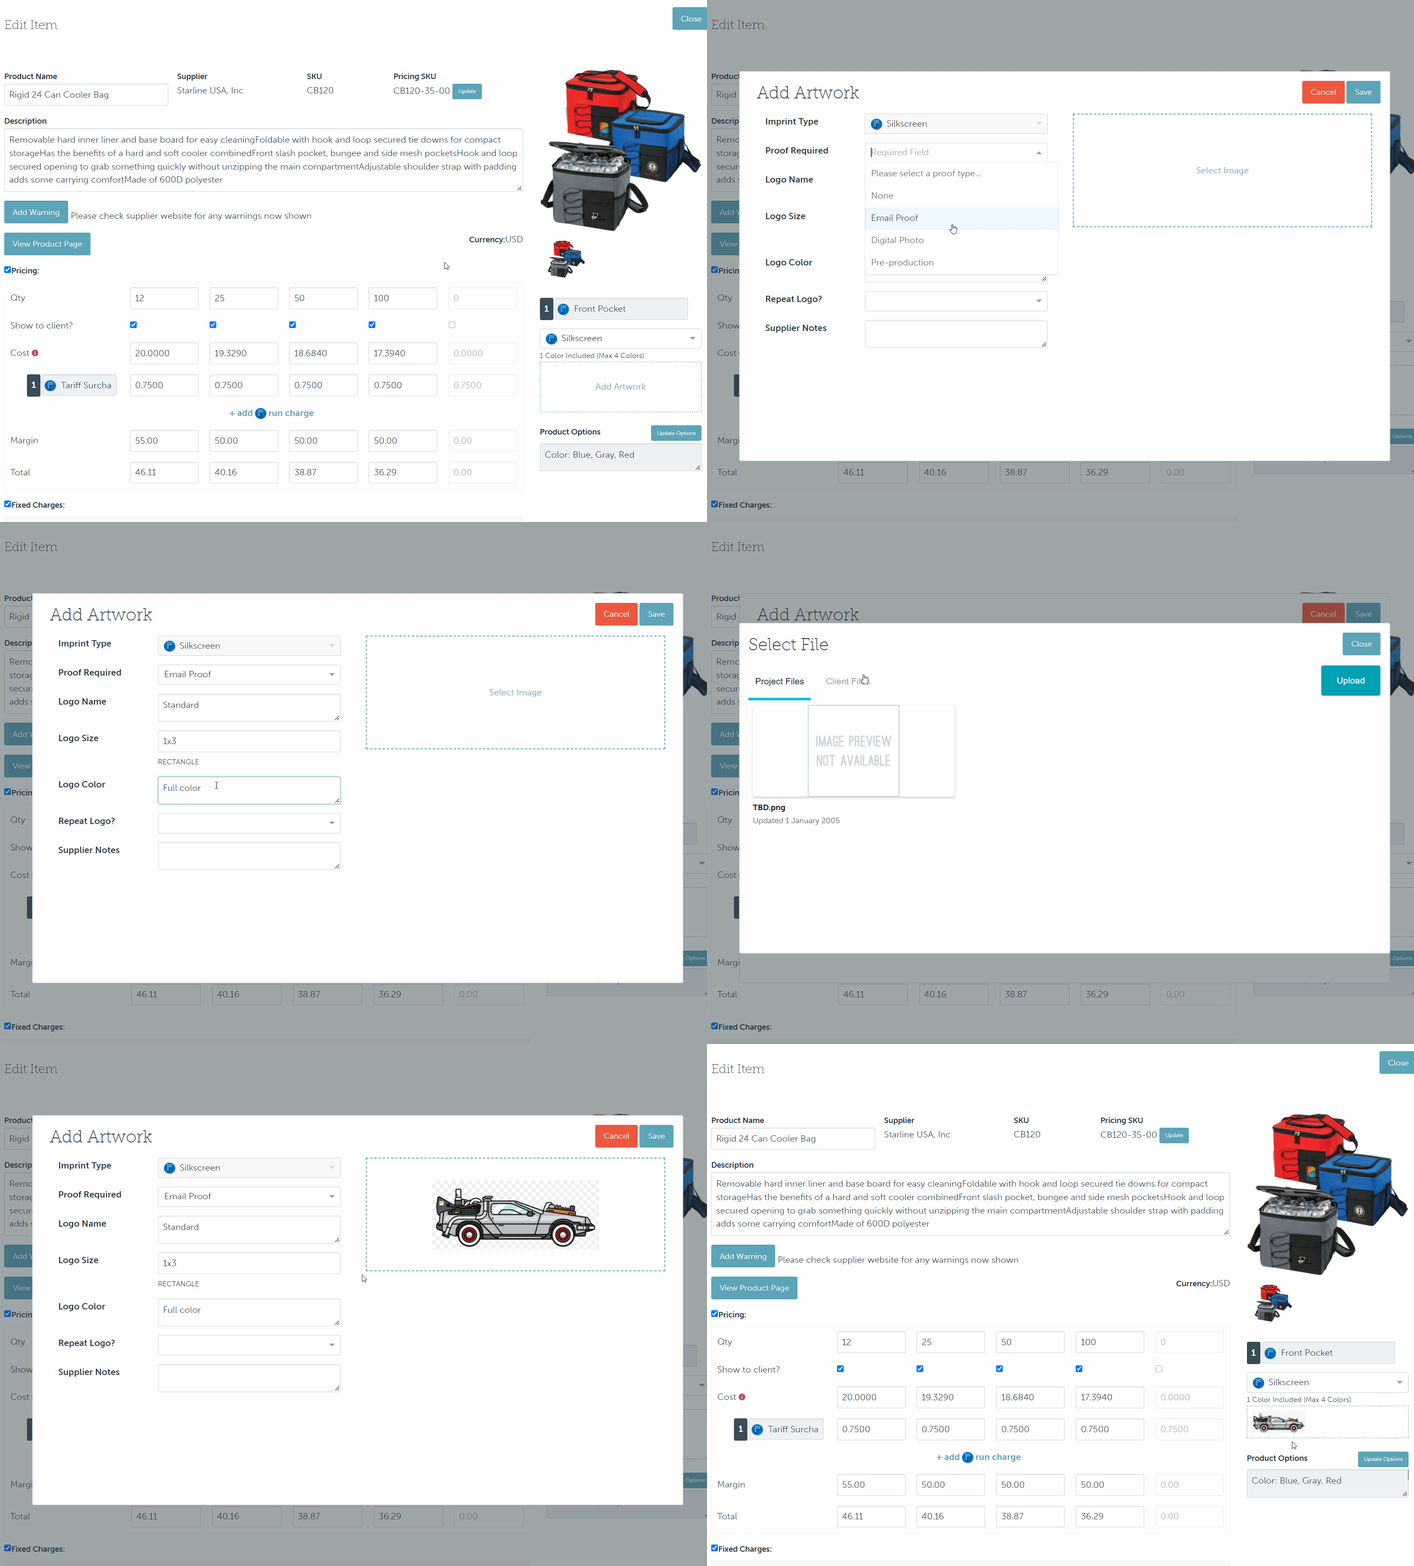
To add an artwork file:
- Click Add Artwork
- Select a proofing option
- Enter a logo name
- Enter a logo size
- Enter a logo color
- Indicate whether the artwork is a repeat logo (optional)
- Leave the decorator a note (optional)
- Click Select Image and upload the artwork by
- clicking Project Files > select the file
- clicking Client Files > filter through the folders (optional) > select the file
- clicking Upload > select the file by dragging and dropping or click within the blue lines to load from your computer > click Done > select the newly uploaded file from the Project Files > click Save
For newly uploaded files, click Add to client files to save to the client page's file for future use.
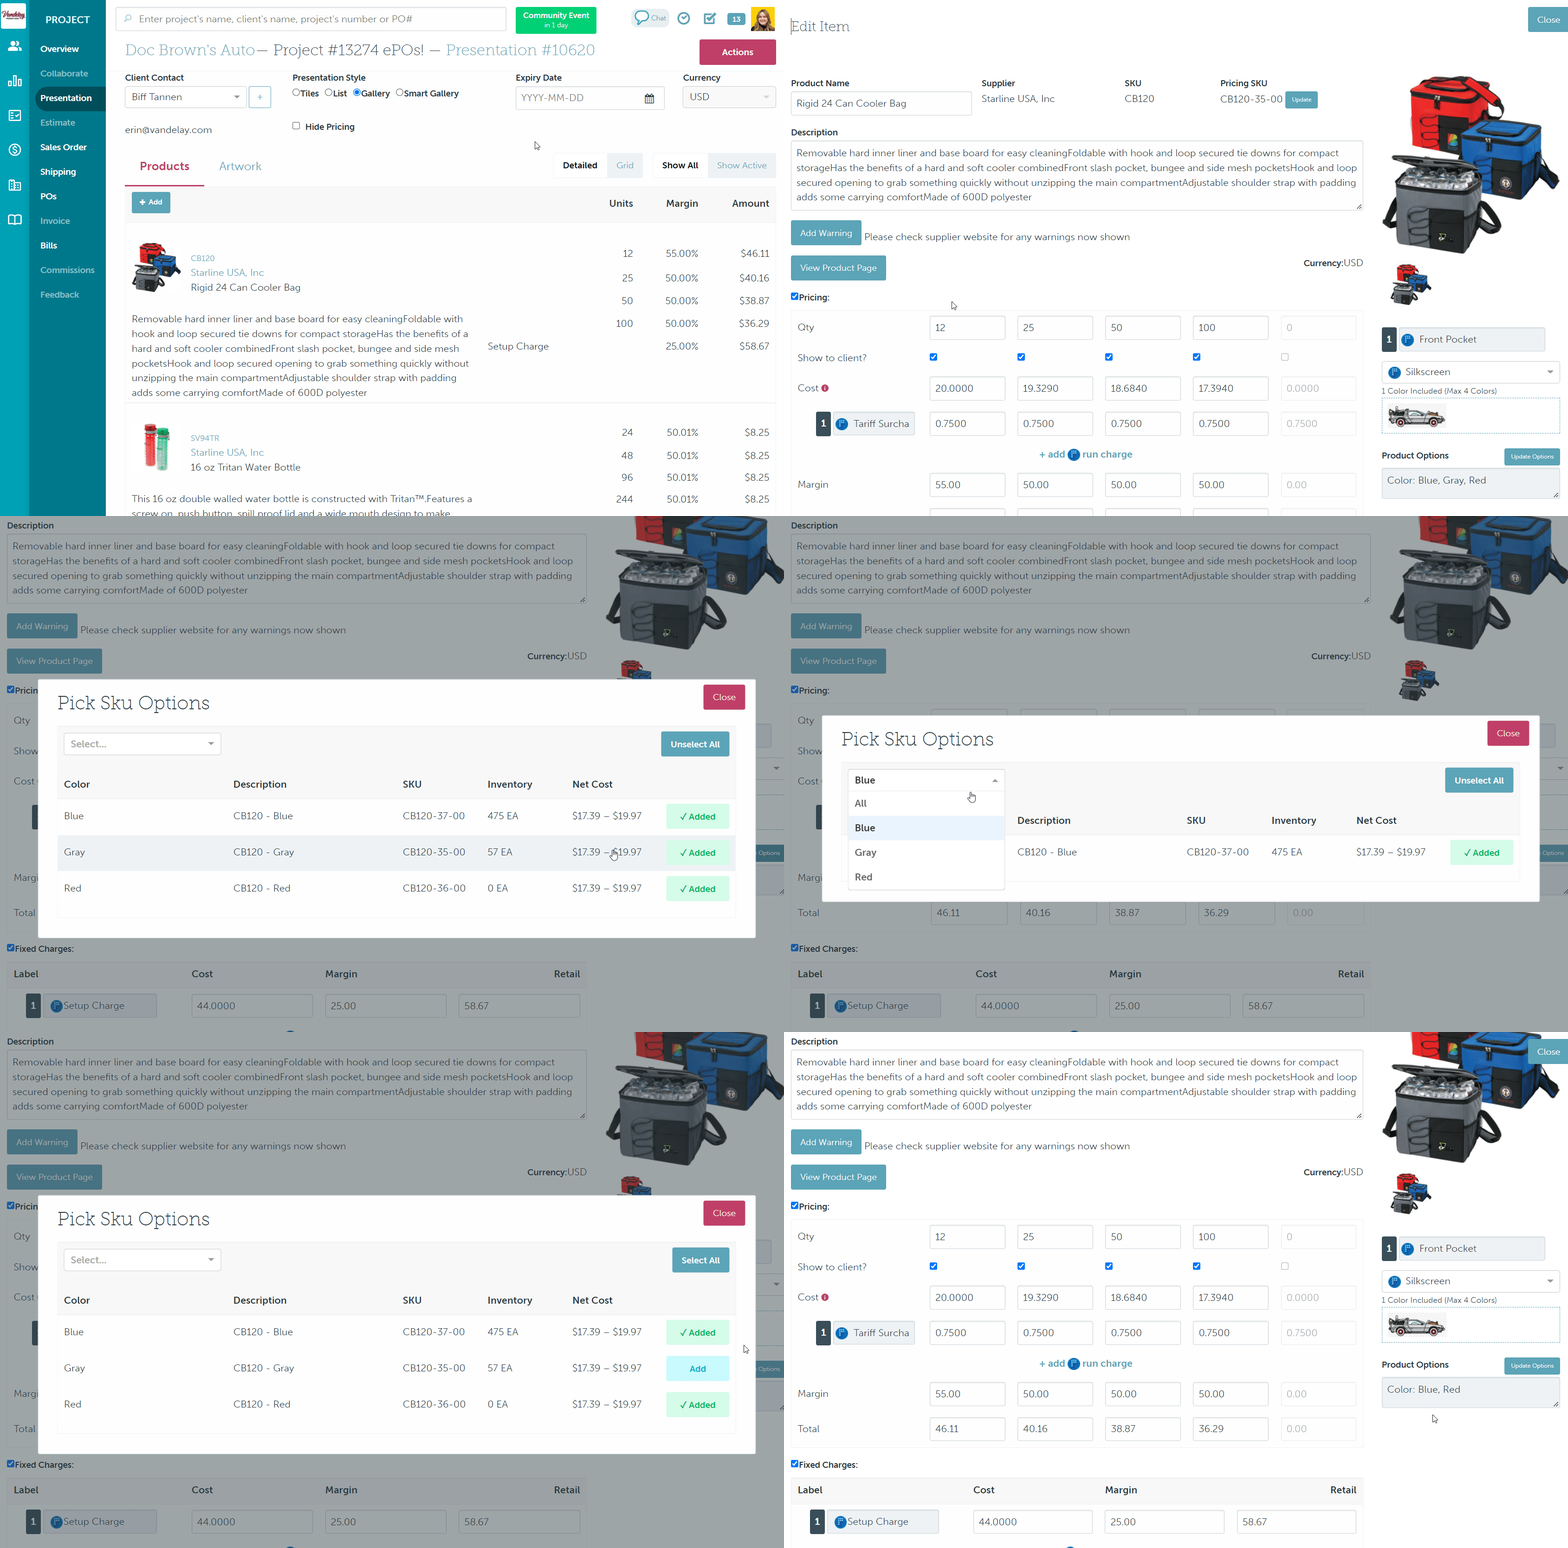
To update the product's size/color variants:
- Click to Edit the product
- Click Update Options
- Use the size and color drop-downs to filter your results (optional)
- Click on a line to select the specific size/color variants you'd like to show your client
- Click Close
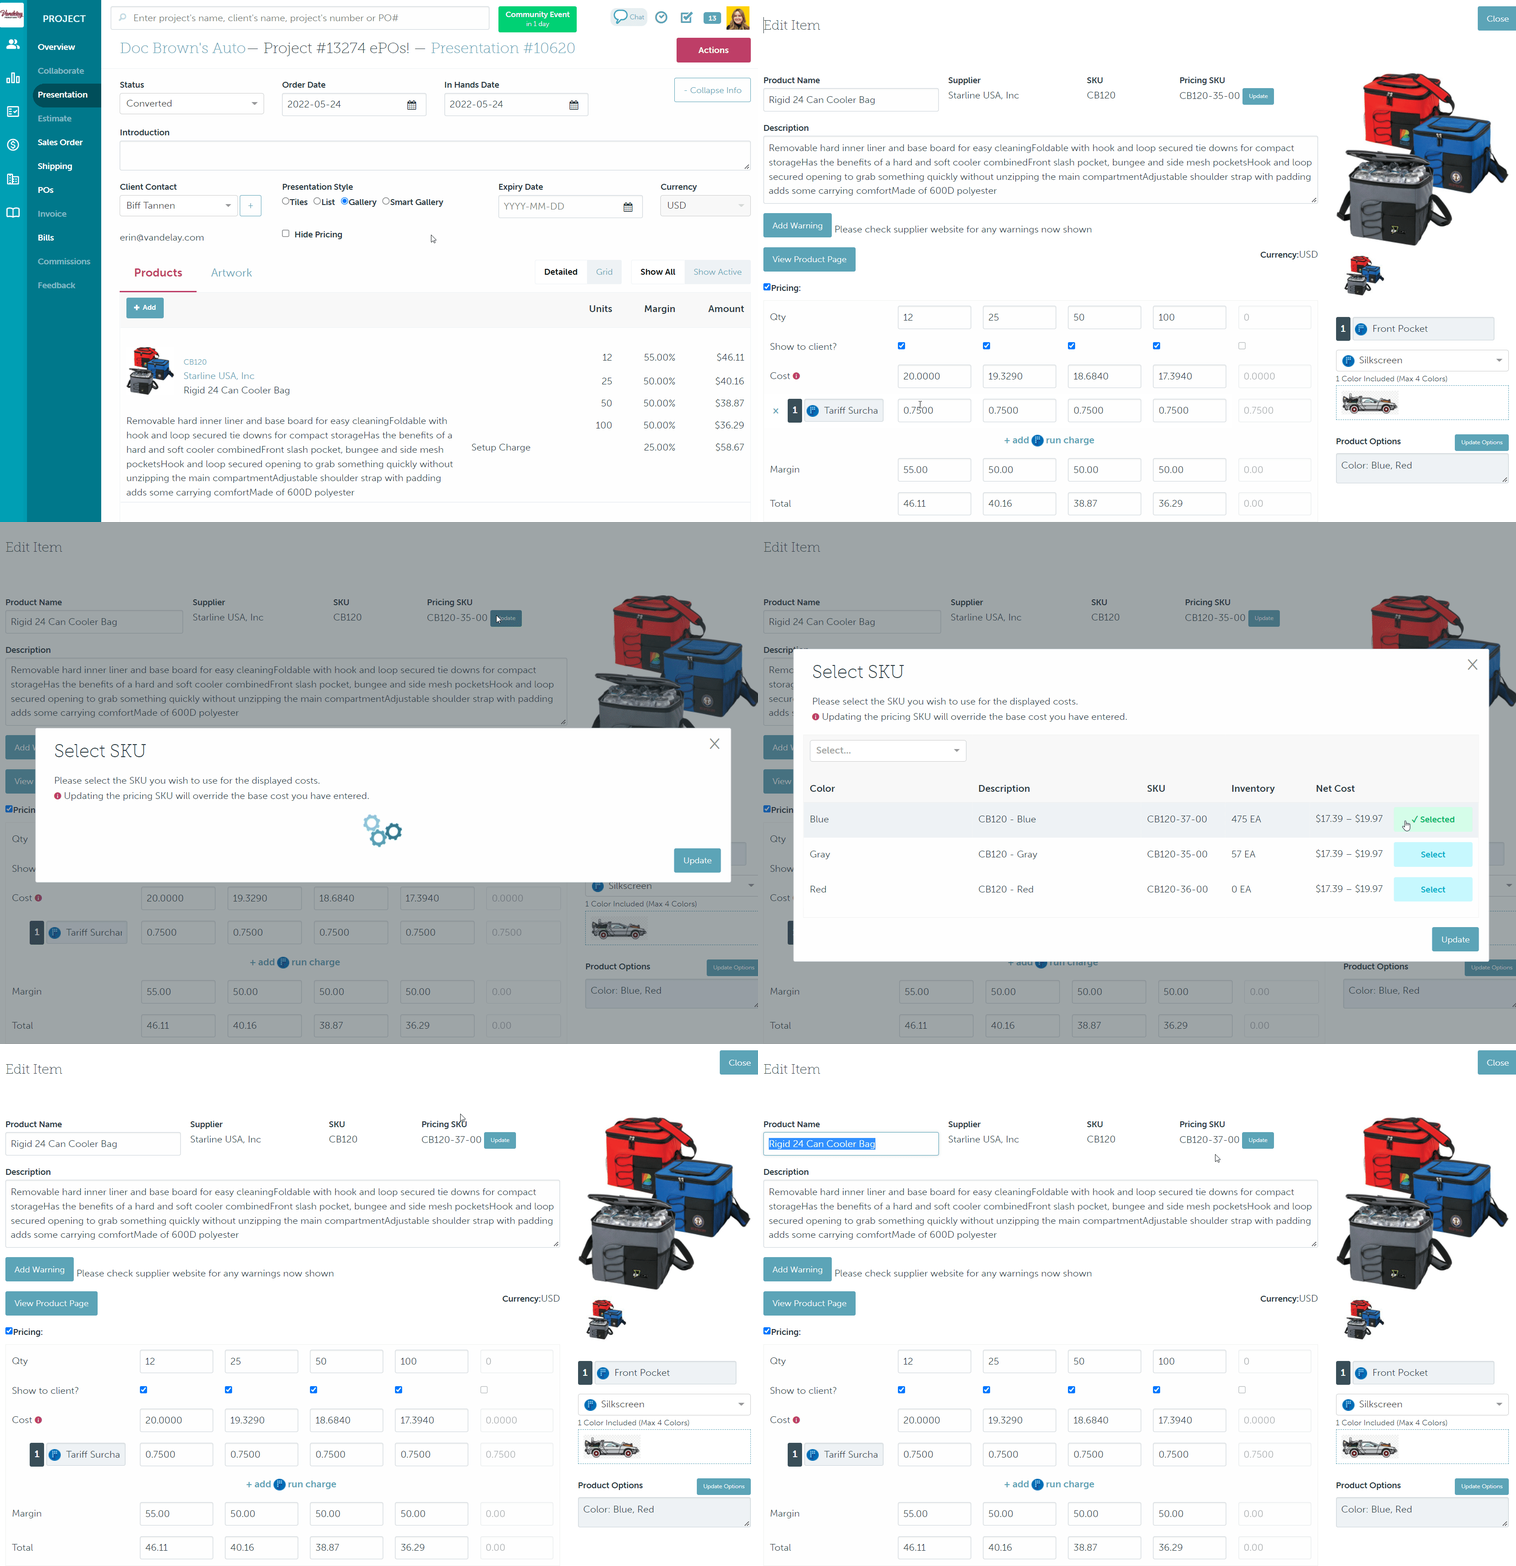
Update the pricing SKU
Click the Update button to change the pricing SKU that you selected during your product search.
Estimate
Editing a PromoStandards item in an estimate is very similar to editing any other product, but there are a few differences:
- You have the option to display TBD details rather than the product's default size/color variants
- You cannot add a run or fixed charge to the product; additional charges must be added to the artwork location.
- For hard good items, the artwork file upload pulls specs from the supplier's database
- The SKU's net costs will automatically update if you increase or decrease the product's quantity to a new quantity break or add sizes/color that have an up-charge
For apparel items ordered from alphabroder, Cutter & Buck, and S&S Activewear, artwork specs do not pull in from the supplier's database, and artwork details are filled out as normal. PromoStandards apparel products only allow for blank, undecorated ePOs.
- Click to Edit the item
- Click Display Options next to Size/Color column title
- Select the checkbox beside "Show TBD instead of Color," "Show TBD instead of Dimension," or "Show TBD instead of Size" (if applicable)
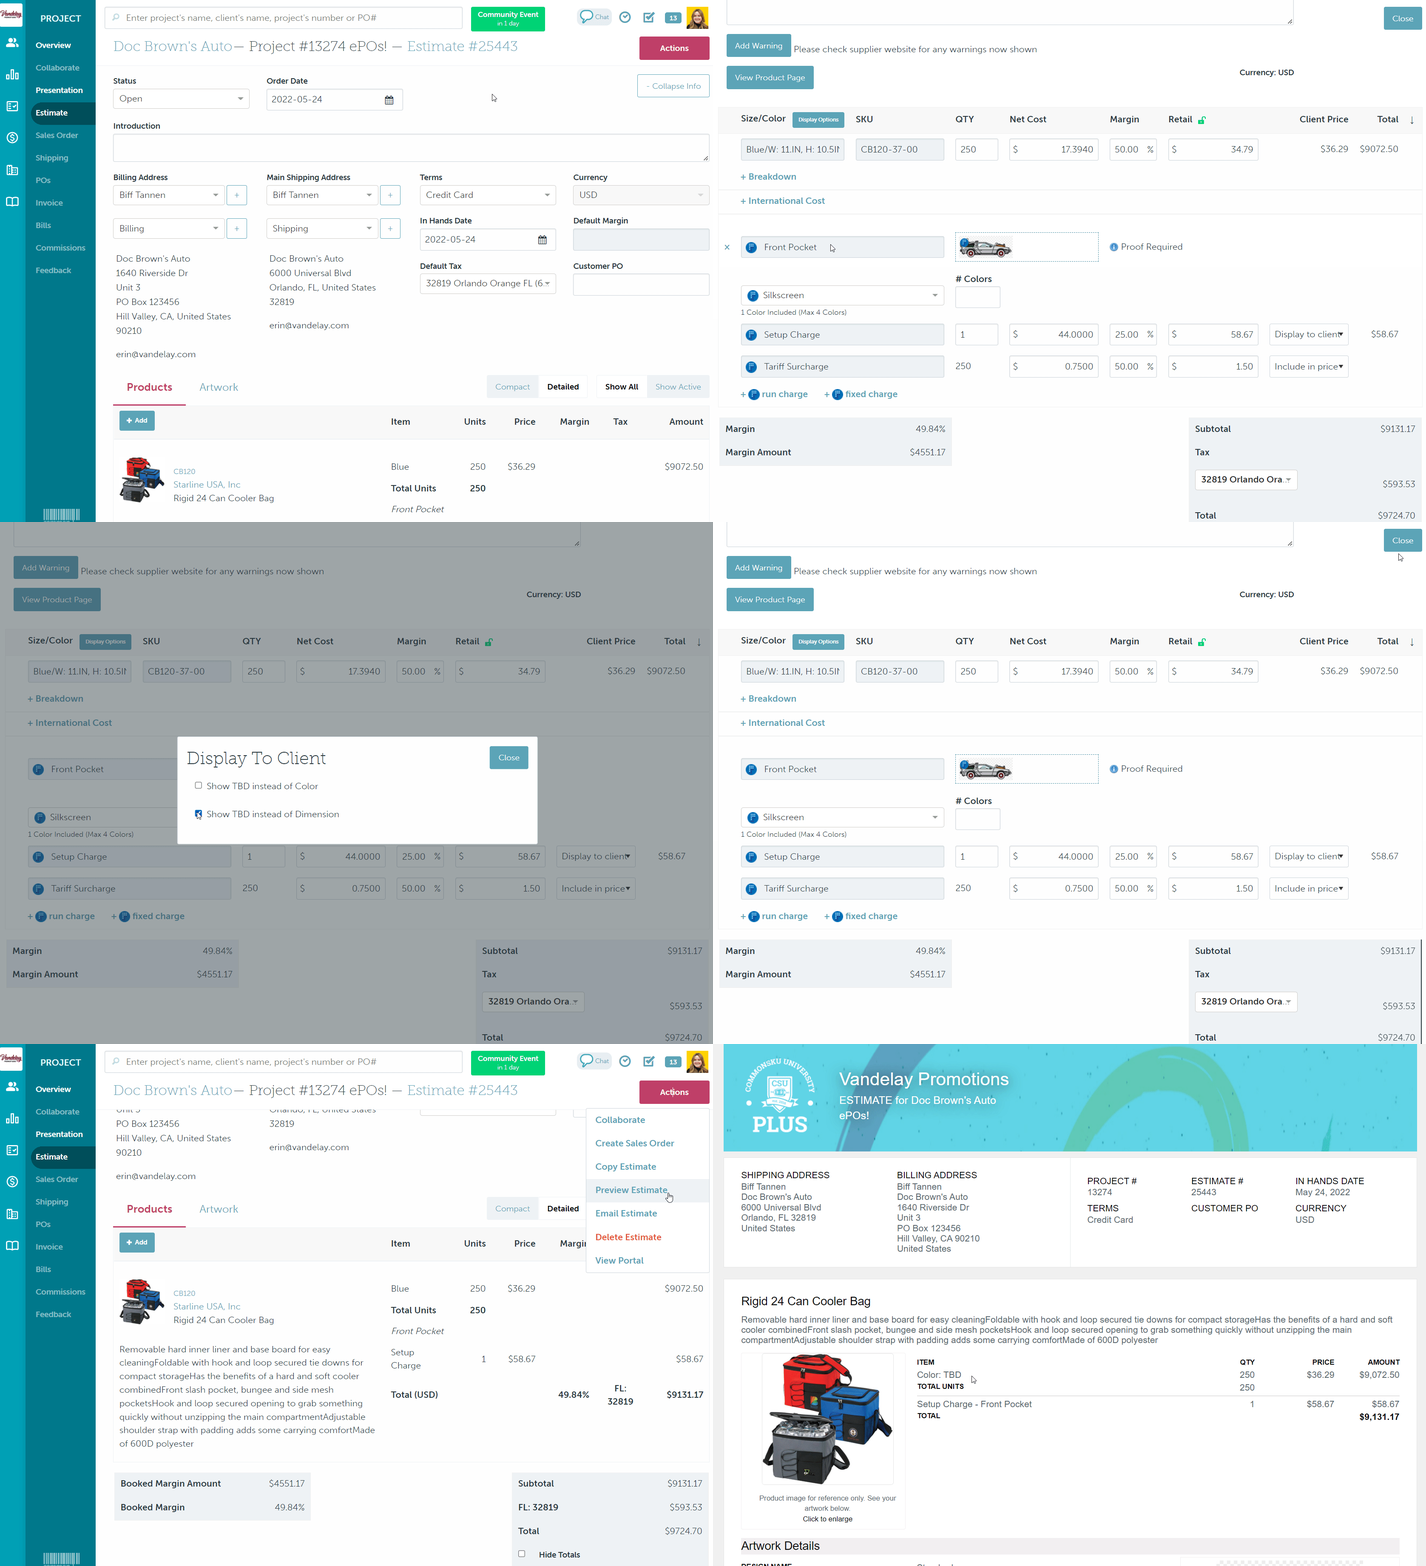
Showing TBD does not affect how you see that variant on the backend - it only affects the client-facing form.
To add an artwork location:
- Click to Edit the item
- Select +Add Decoration Location
- Choose the location from the drop-down
- Choose and imprint type from the "Select an imprint type..." drop-down
- Enter the number of colors (if applicable)
- Click +Add run charge or +Add fixed charge to include additional costs
- Make changes to the costs, margins, and retail prices as needed
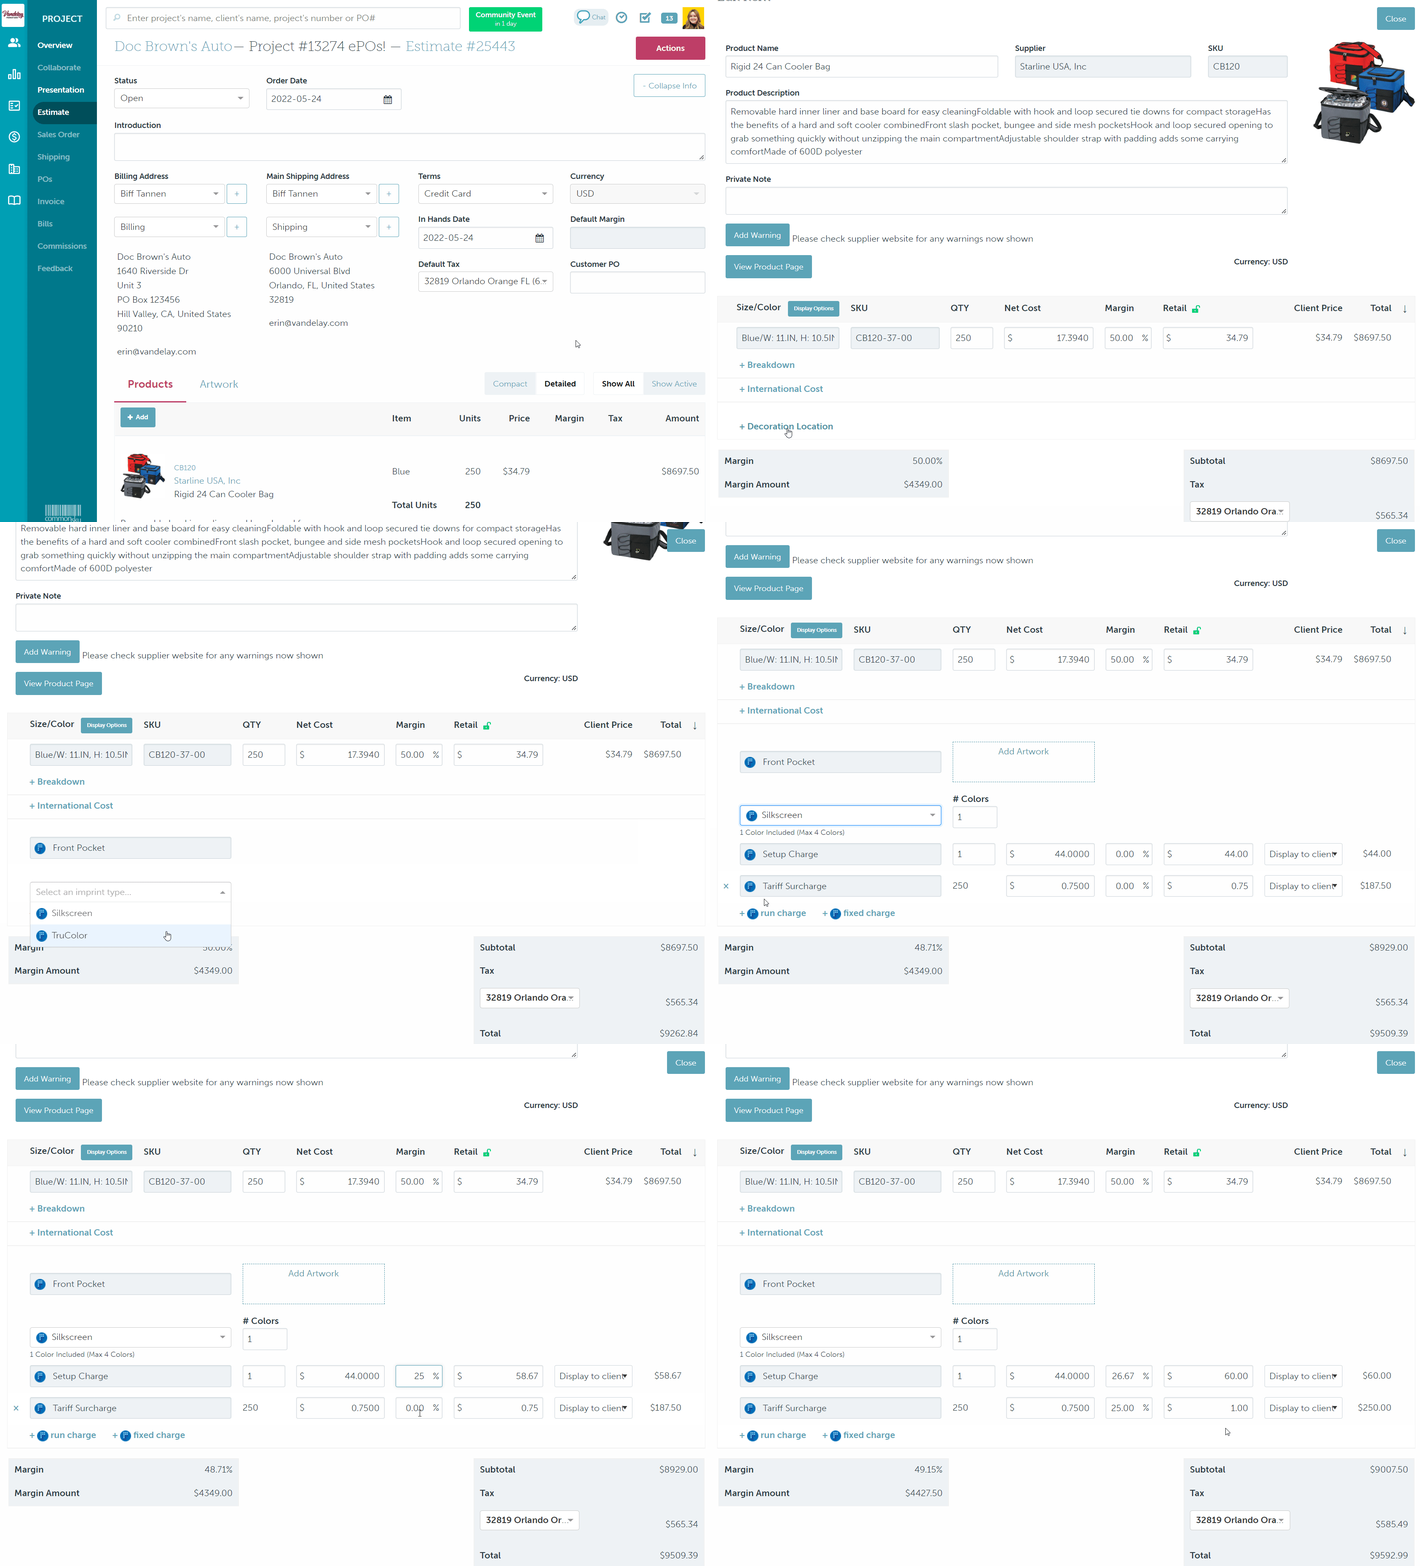
Artwork locations' imprint types and costs are pulled directly from the supplier's database. You cannot change the imprint location or imprint type, but you can make changes to the costs, margin, and retail prices as needed.
To add an artwork file:
- Click Add Artwork
- Select a proofing option
- Enter a logo name
- Enter a logo size
- Enter a logo color
- Indicate whether the artwork is a repeat logo (optional)
- Leave the decorator a note (optional)
- Click Select Image and upload the artwork by
- clicking Project Files > select the file
- clicking Client Files > filter through the folders (optional) > select the file
- clicking Upload > select the file by dragging and dropping or click within the blue lines to load from your computer > click Done > select the newly uploaded file from the Project Files > click Save
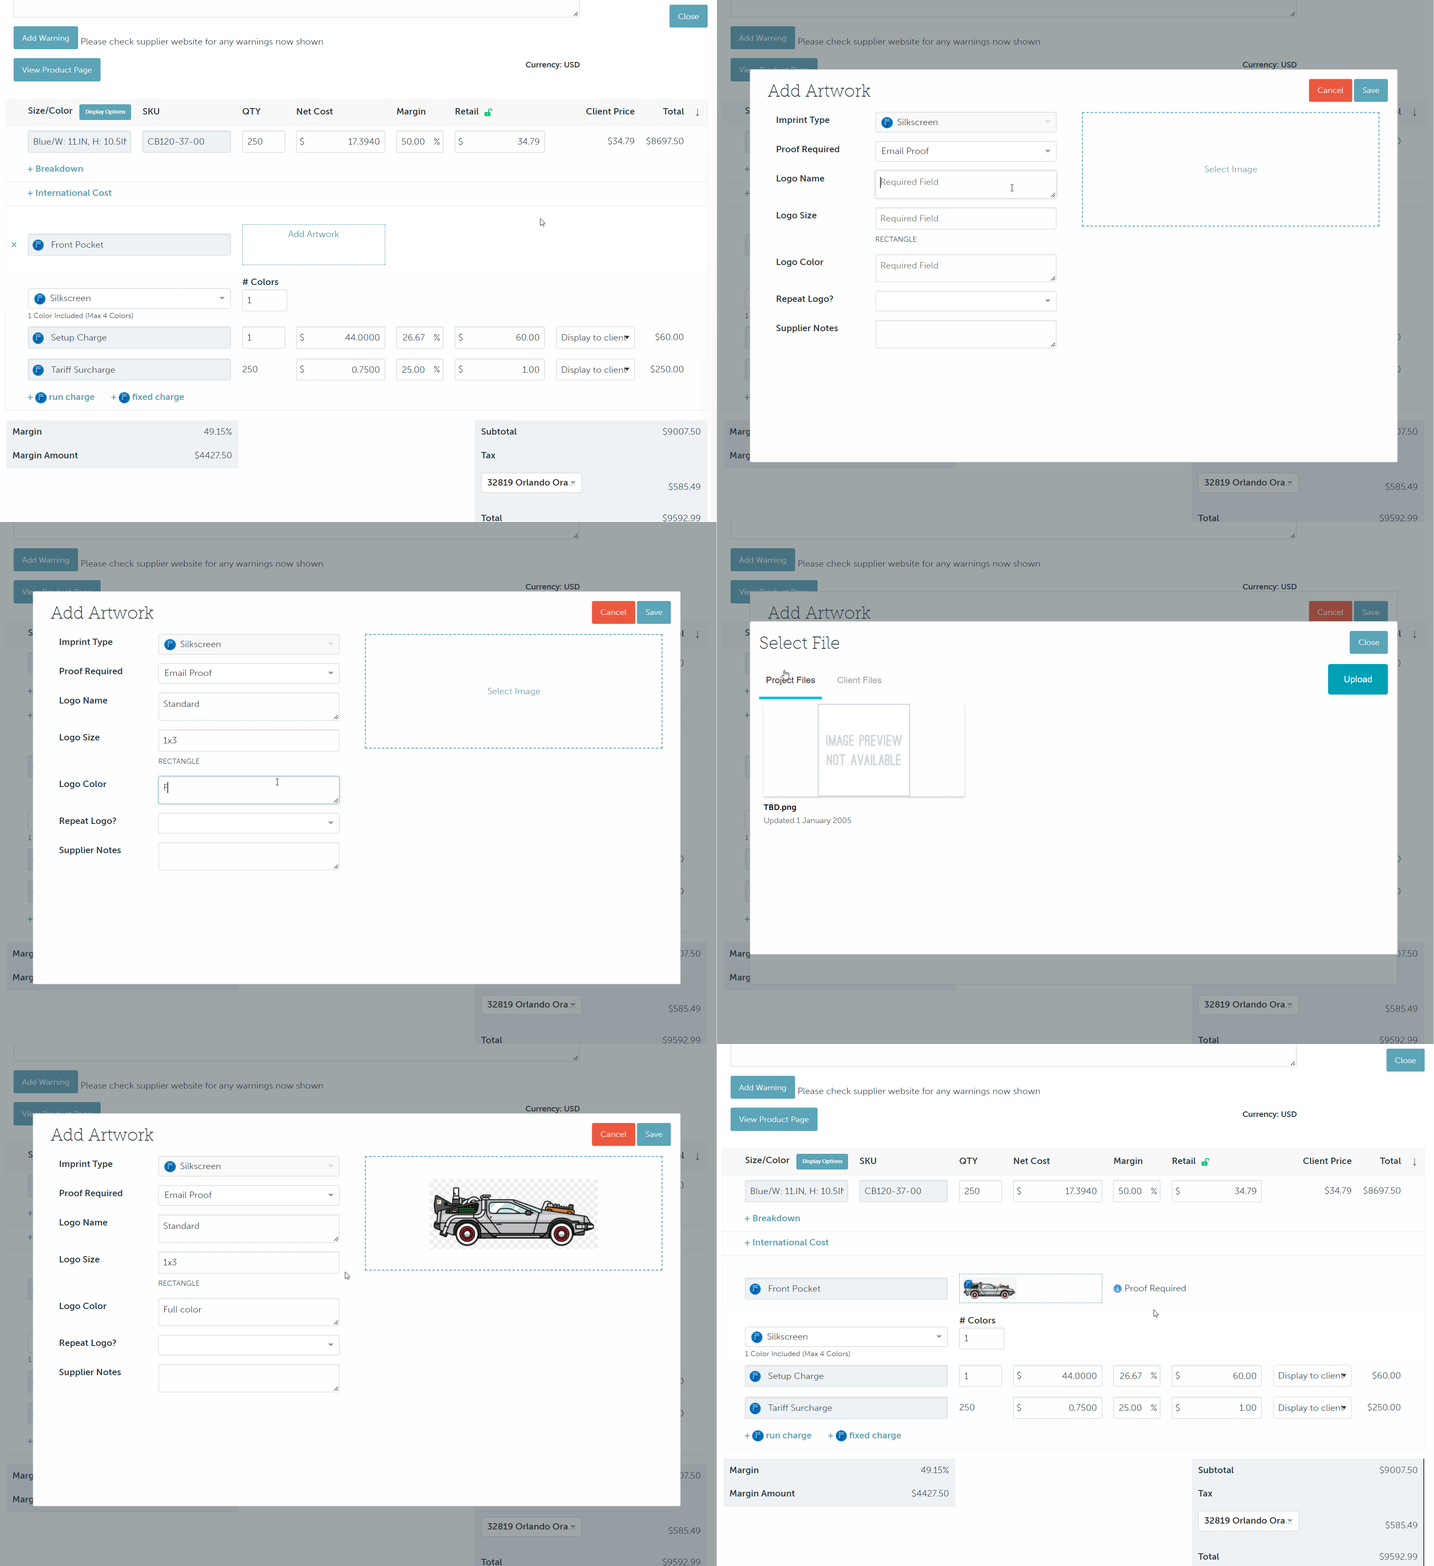
For newly uploaded files, click Add to client files to save to the client page's file for future use.
Automatic pricing updates
The SKU's net costs will automatically update if you increase or decrease the product's quantity to a new quantity break or add sizes/color with an up-charge.
Decoration pricing will not automatically update when you change the SKU quantities.
Sales Order/Invoice
Editing a PromoStandads item in a sales order/invoice is very similar to editing any other product, but there are a few differences:
- You cannot add a run or fixed charge to the product; additional charges must be added to the artwork location.
- The artwork file upload pulls specs from the supplier's database
- The SKU's net costs will automatically update if you increase or decrease the product's quantity to a new quantity break or add sizes/color that have an up-charge
For apparel items ordered from alphabroder, Cutter & Buck, and S&S Activewear, artwork specs do not pull in from the supplier's database and artwork details are filled out as normal. PromoStandards apparel products only allow for blank, undecorated ePOs.
To add an artwork location:
- Click to Edit the item
- Select +Add Decoration Location
- Choose the location from the drop-down
- Choose and imprint type from the "Select an imprint type..." drop-down
- Enter the number of colors (if applicable)
- Click +Add run charge or +Add fixed charge to include additional costs
- Make changes to the costs, margins, and retail prices as needed
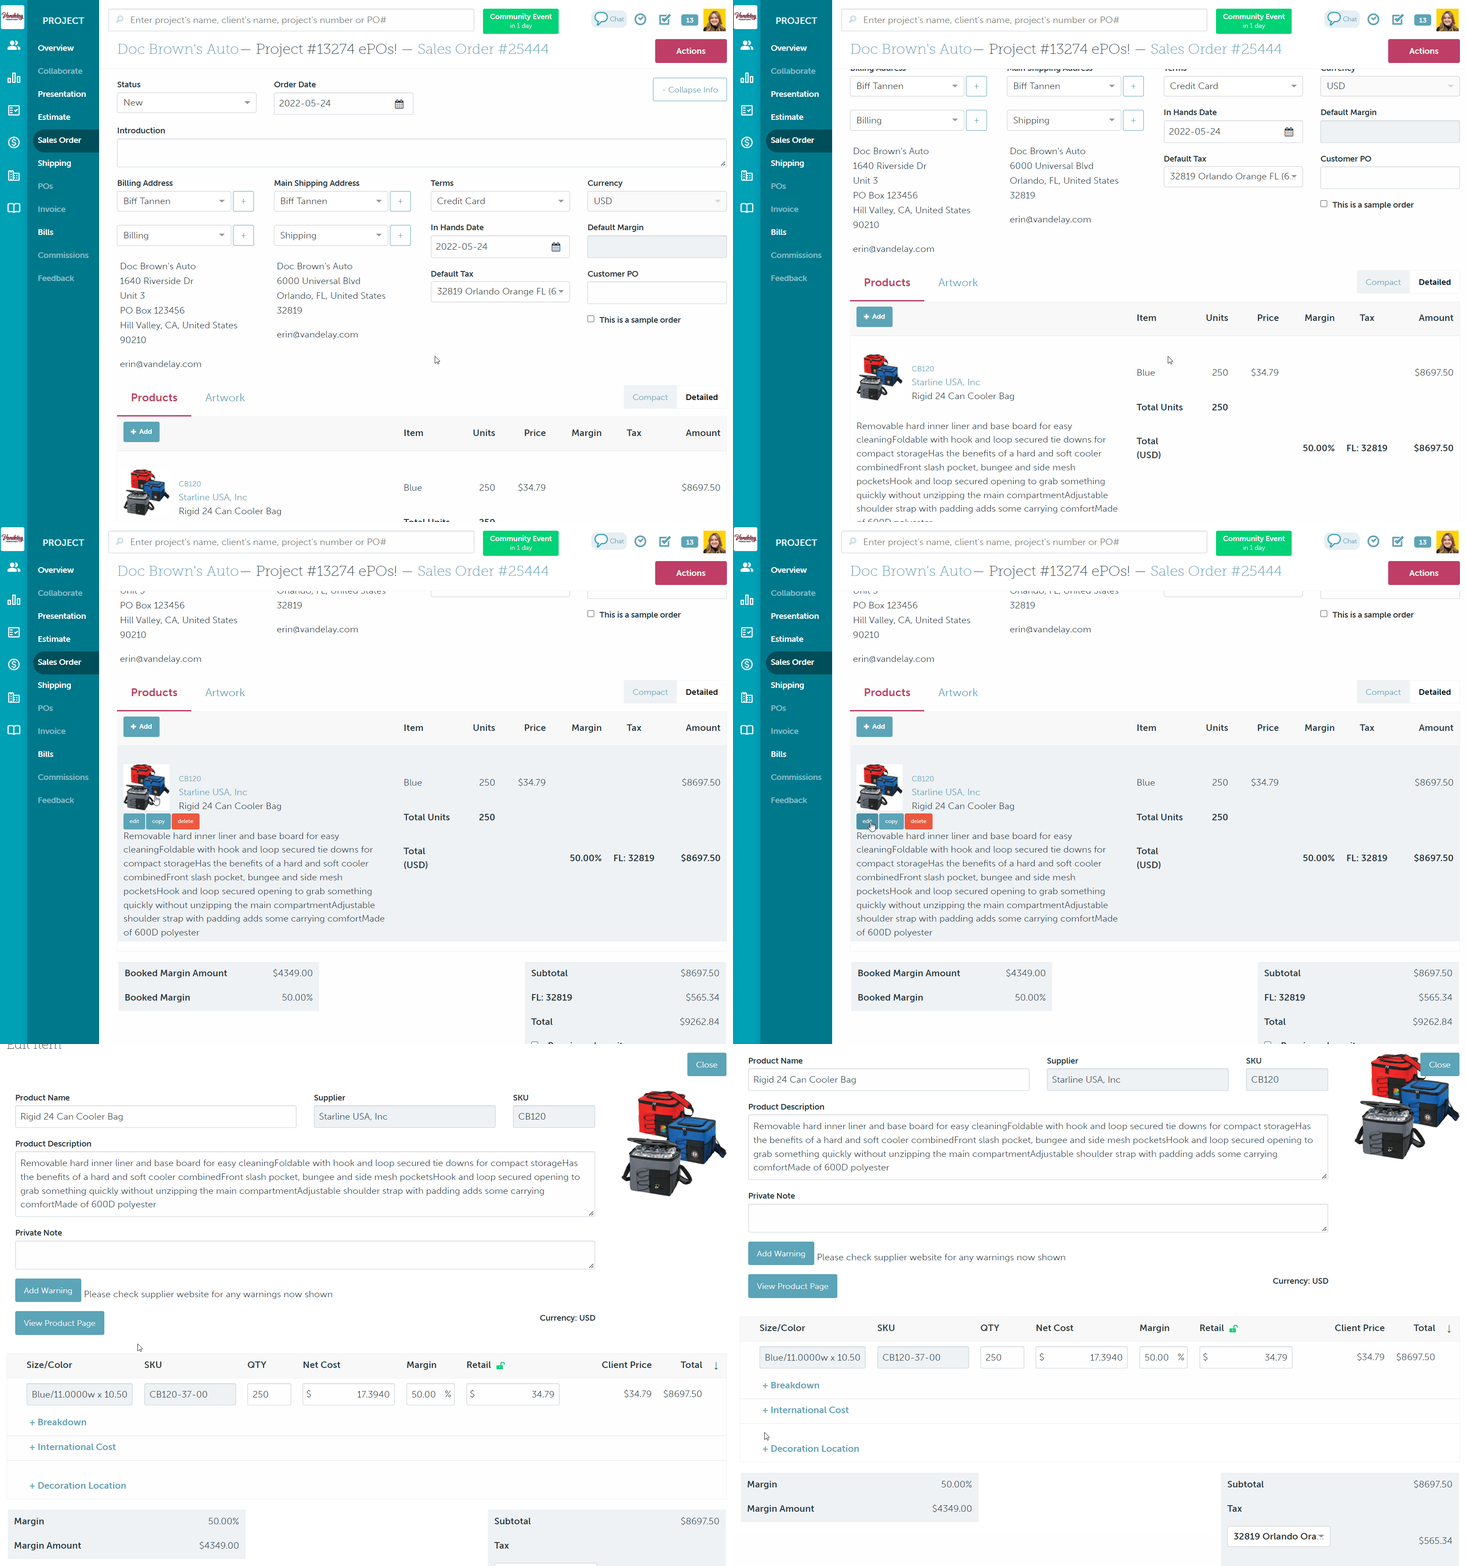
Artwork locations' imprint types and costs are pulled directly from the supplier's database. You cannot change the imprint location or imprint type, but you can make changes to the costs, margin, and retail prices as needed.
To add an artwork file:
- Click Add Artwork
- Select a proofing option
- Enter a logo name
- Enter a logo size
- Enter a logo color
- Indicate whether the artwork is a repeat logo (optional)
- Leave the decorator a note (optional)
- Click Select Image and upload the artwork by
- clicking Project Files > select the file
- clicking Client Files > filter through the folders (optional) > select the file
- clicking Upload > select the file by dragging and dropping or click within the blue lines to load from your computer > click Done > select the newly uploaded file from the Project Files > click Save
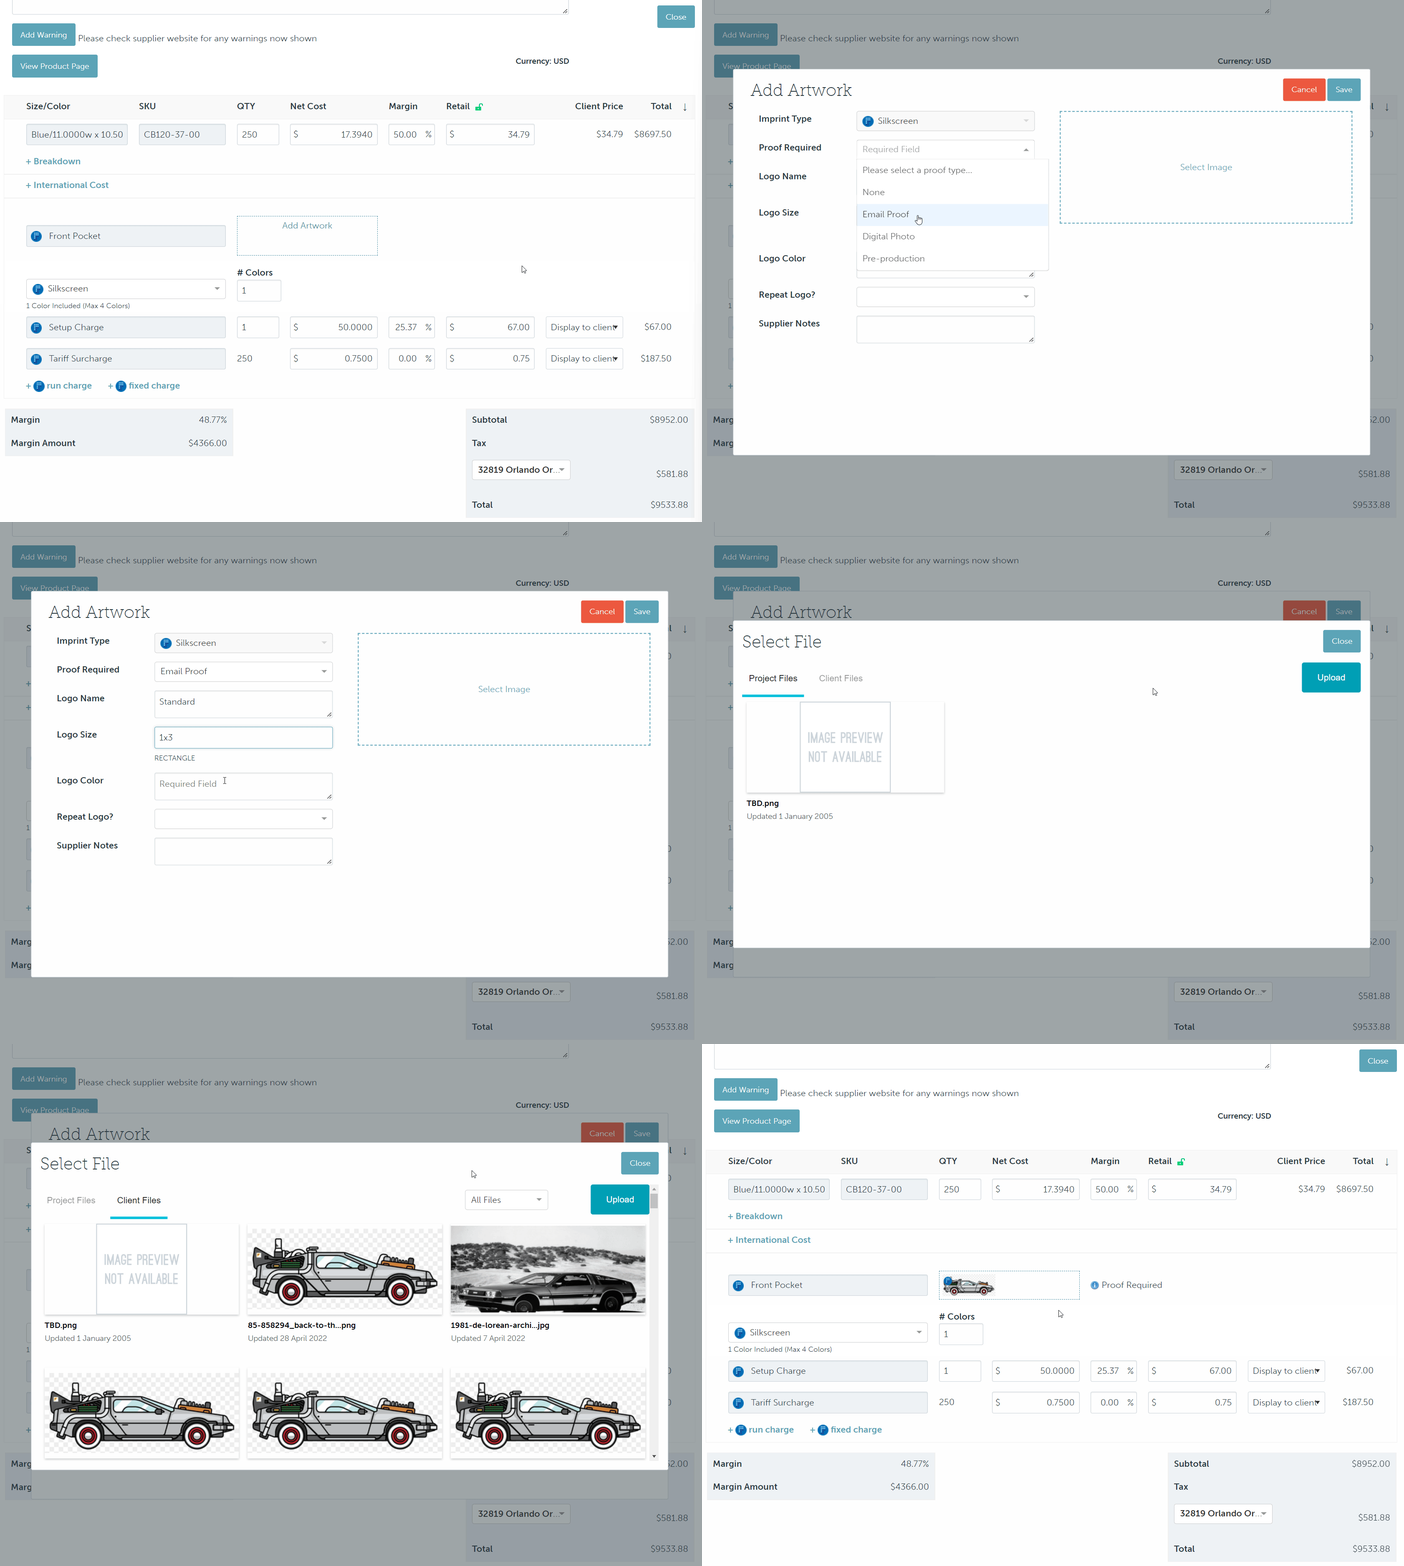
For newly uploaded files, click Add to client files to save to the client page's file for future use.
Automatic pricing updates
The SKU's net costs will automatically update if you increase or decrease the product's quantity to a new quantity break or add sizes/color with an up-charge.
Decoration pricing will not automatically update when you change the SKU quantities
FAQ
- Can I override product costs?
- Why are less than minimum (LTM) fees missing on Starline's PromoStandards items?
- How do I add artwork details to a PromoStandards apparel product?
Can I override product costs?
Yes! You can always change the item's cost on the shop, presentation, estimate, sales order, or invoice.
Why are less than minimum (LTM) fees missing on Starline's PromoStandards items?
Starline has generously waived their LTM fees on PromoStandards items!
How do I add artwork details to a PromoStandards apparel product?
Artwork can be added to apparel items as you would any non-PromoStandards product in commonsku. commonsku will build an ePO for the blank goods and a regular PO for the artwork. If the artwork is being done by the supplier providing the product, the ePO function will be deactivated, and commonsku will create a single PO for both the product and artwork.