On this page:
Option 1: Create a custom product for fulfillment
Option 2: Build fulfillment charges and details as a decoration location
If your items need to go to another supplier or a 3rd party decorator for artwork services before shipping to your fulfillment department or another fulfillment warehouse, you will want to use the Service PO method (Option 3).
Option 1: Create a custom product for fulfillment
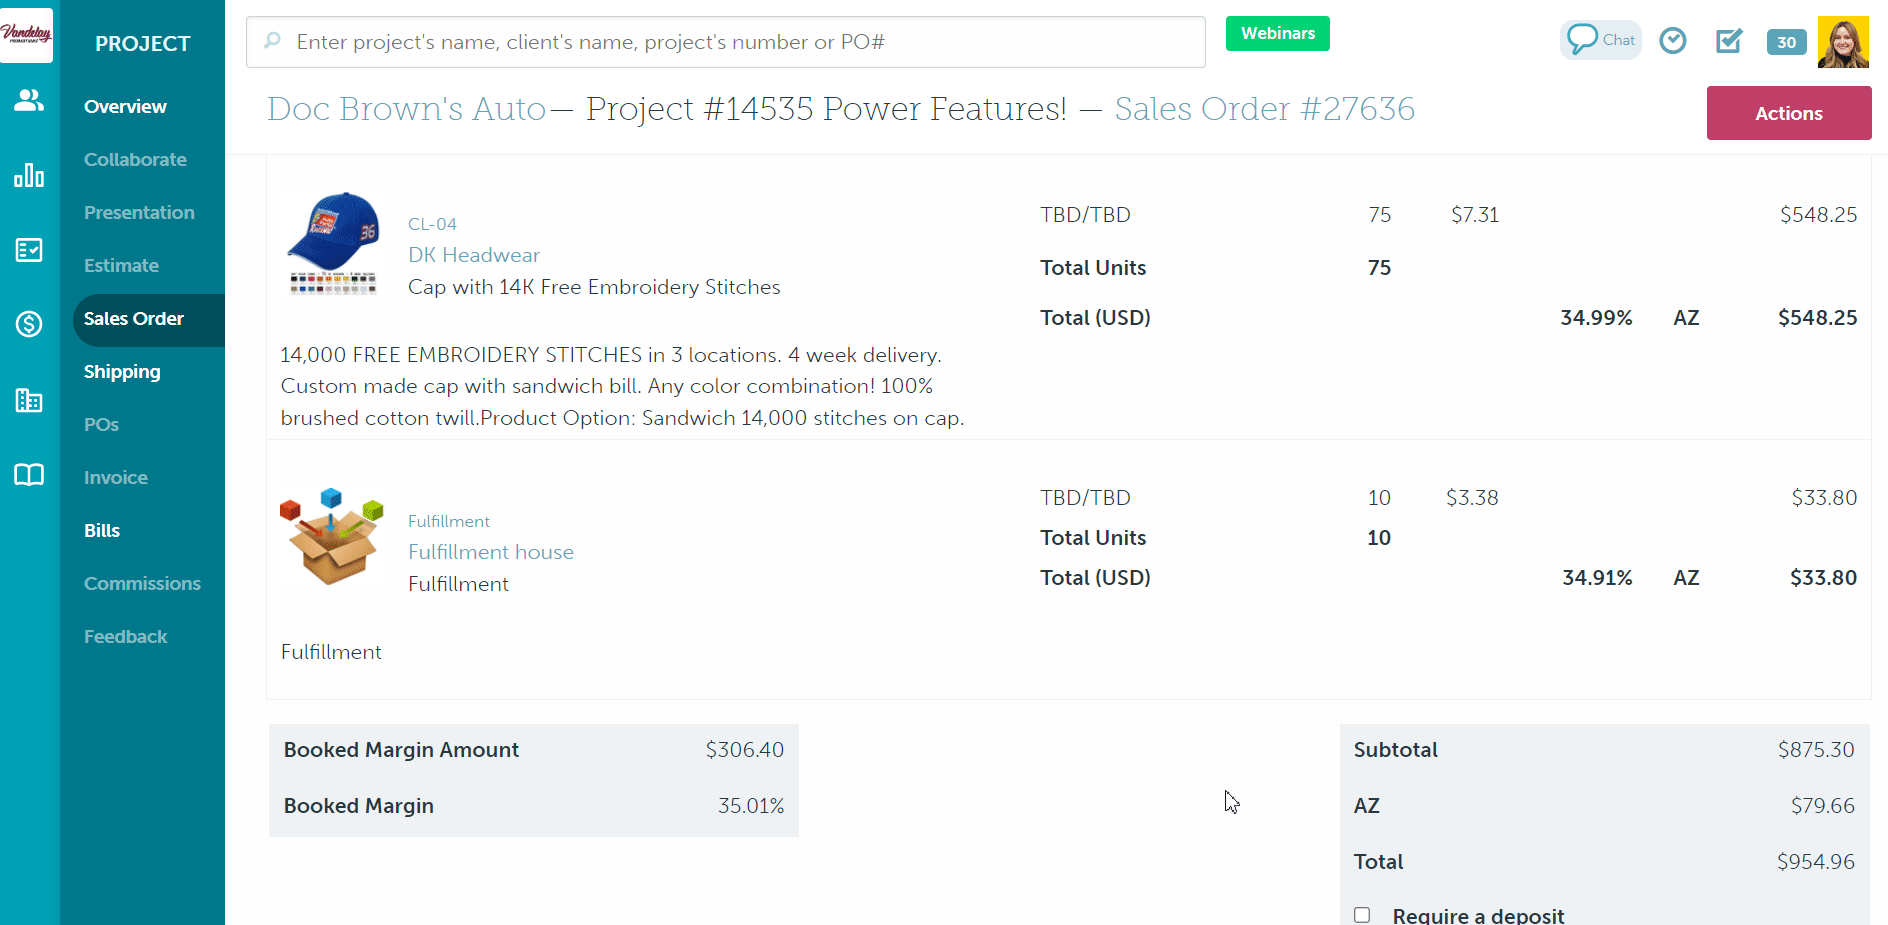
By creating a custom product in your company database to represent the necessary fulfillment services, you can create a purchase order for the product you're ordering and a purchase order for the fulfillment warehouse.
To create your custom "fulfillment" product from your estimate, sales order, or invoice:
- Click + Add > Product
- Select your company database
- Click + New Product
- Enter the required information, the supplier, product code, product name (i.e., Fulfillment, Fulfillment services, etc.), product description, and image.
- Click+ Add More Details and + Add Pricing to include additional details (optional)
- Click Save
.gif?width=688&height=325&name=chrome_rM8hmta4s8-gif%20(1).gif)
The supplier of this custom product needs to be either your company warehouse (if you have an internal fulfillment department) or the fulfillment warehouse you source from. If you use both internal and external fulfillment services, you will need to create one custom product for each supplier.
If you're using a custom product to account for fulfillment services, you can set up your shipping details to either:
To ship to an internal fulfillment department:
Step 1: Add your internal fulfillment department to commonsku as a supplier and add their company address to their supplier page
Step 2: Add and edit your fulfillment product
- Add your custom "fulfillment" product from your company database to your estimate, sales order, or invoice
- Hover over the product > click edit
- Enter the necessary quantities, net costs, and retail price for fulfillment services
- Click Close

Step 3: Fill out shipping details for the products you are ordering
- Navigate to the Shipping tab > click to edit each of your client's products
- In the "Edit shipping information" screen, check the box next to Sample Order to indicate to the supplier if this is a sample PO (optional)
- Enter the in-hands date/shipping date
- Select the box beside "Firm" to mark the in-hands/shipping date as firm (optional)
- In the "Ship To" options, select Other Supplier
- Select the "Shipping Account" drop-down and choose either Client's Account, Supplier's Account, Our Account, or Other
- Select one of your existing accounts from the drop-down below, or, for client accounts, click the "+" to add a new 3rd Party Shipping account to your client's profile (this selection will filter the available Ship Methods based on the courier assigned to the shipping account)
- Enter Shipping Quote - enter the shipping quote from your rep (Supplier's accounts only)
- Select the "Shipping Method" drop-down and choose your preferred method
- Enter supplier notes in the "Supplier Notes" field (optional)
- On the right-hand side, click the "Supplier" drop-down and select your internal fulfillment department
- Click the "Supplier Address" drop-down to choose your desired shipping address
- Click Save
Step 4: Fill out shipping details for your fulfillment product
- Navigate to the Shipping tab > click to edit your custom fulfillment product
- In the "Edit shipping information" screen, make sure you select your internal fulfillment department as the supplier
- Check the box next to Sample Order to indicate to the supplier if this is a sample PO (optional)
- Enter the in-hands date
- Select the box beside "Firm" to mark the in-hands/shipping date as firm (optional)
- In the "Ship To" options, select the Client
- Select the "Shipping Account" drop-down and choose either Client's Account, Supplier's Account, Our Account, or Other
- Select one of your existing accounts from the drop-down below, or, for client accounts, click the "+" to add a new 3rd Party Shipping account to your client's profile (this selection will filter the available Ship Methods based on the courier assigned to the shipping account)
- Enter Shipping Quote - enter the shipping quote from your rep (Supplier's accounts only)
- Select the "Shipping Method" drop-down and choose your preferred method
- Enter supplier notes in the "Supplier Notes" field (optional)
- Click Save
Step 5: Create your POs
- Click the Purchase Orders tab
- Click Actions > Create POs or Regenerate All POs, if the project has existing purchase orders (make sure you select "don't regenerate" for any existing POs so their details stay the same)
You should now have separate POs in the project: your POs shipping from the supplier to your internal fulfillment department, and one shipping from your internal fulfillment department to the client.
To ship to another supplier for fulfillment:
Step 1: Add the fulfillment warehouse to commonsku as a supplier and add their company address to their supplier page
Step 2: Add and edit your fulfillment product
- Add your custom "fulfillment" product from your company database to your estimate, sales order, or invoice
- Hover over the product > click edit
- Enter the necessary quantities, net costs, and retail price for fulfillment services
- Click Close
Step 3: Fill out shipping details for the products you are ordering
- Navigate to the Shipping tab > click to edit each of your client's products
- In the "Edit shipping information" screen, check the box next to Sample Order to indicate to the supplier if this is a sample PO (optional)
- Enter the in-hands date
- Select the box beside "Firm" to mark the in-hands/shipping date as firm (optional)
- In the "Ship To" options, select Other Supplier
- Select the "Shipping Account" drop-down and choose either Client's Account, Supplier's Account, Our Account, or Other
- Select one of your existing accounts from the drop-down below, or, for client accounts, click the "+" to add a new 3rd Party Shipping account to your client's profile (this selection will filter the available Ship Methods based on the courier assigned to the shipping account)
- Enter Shipping Quote - enter the shipping quote from your rep (Supplier's accounts only)
- Select the "Shipping Method" drop-down and choose your preferred method
- Enter supplier notes in the "Supplier Notes" field (optional)
- On the right-hand side, click the "Supplier" drop-down and select the fulfillment warehouse
- Click the "Supplier Address" drop-down to choose your desired shipping address
- Click Save
Step 4: Fill out shipping details for your fulfillment product
- Navigate to the Shipping tab > click to edit your custom fulfillment product
- In the "Edit shipping information" screen, make sure you select the fulfillment warehouse as the supplier
- Check the box next to Sample Order to indicate to the supplier if this is a sample PO (optional)
- Enter the in-hands date
- Select the box beside "Firm" to mark the in-hands/shipping date as firm (optional)
- In the "Ship To" options, select the Client
- Select the "Shipping Account" drop-down and choose either Client's Account, Supplier's Account, Our Account, or Other
- Select one of your existing accounts from the drop-down below, or, for client accounts, click the "+" to add a new 3rd Party Shipping account to your client's profile (this selection will filter the available Ship Methods based on the courier assigned to the shipping account)
- Enter Shipping Quote - enter the shipping quote from your rep (Supplier's accounts only)
- Select the "Shipping Method" drop-down and choose your preferred method
- Enter supplier notes in the "Supplier Notes" field (optional)
- Click Save
Step 5: Create your POs
- Click the Purchase Orders tab
- Click Actions > Create POs or Regenerate All POs, if the project has existing purchase orders (make sure you select "don't regenerate" for any existing POs so their details stay the same)
You should now have two POs in the project, one shipping from the supplier to the fulfillment warehouse and one shipping from your fulfillment warehouse to the client.
Option 2: Build fulfillment charges and details as a decoration location
By building fulfillment charges and details as a decoration location, you can build a purchase order for the product you're ordering and a purchase order for the fulfillment warehouse.
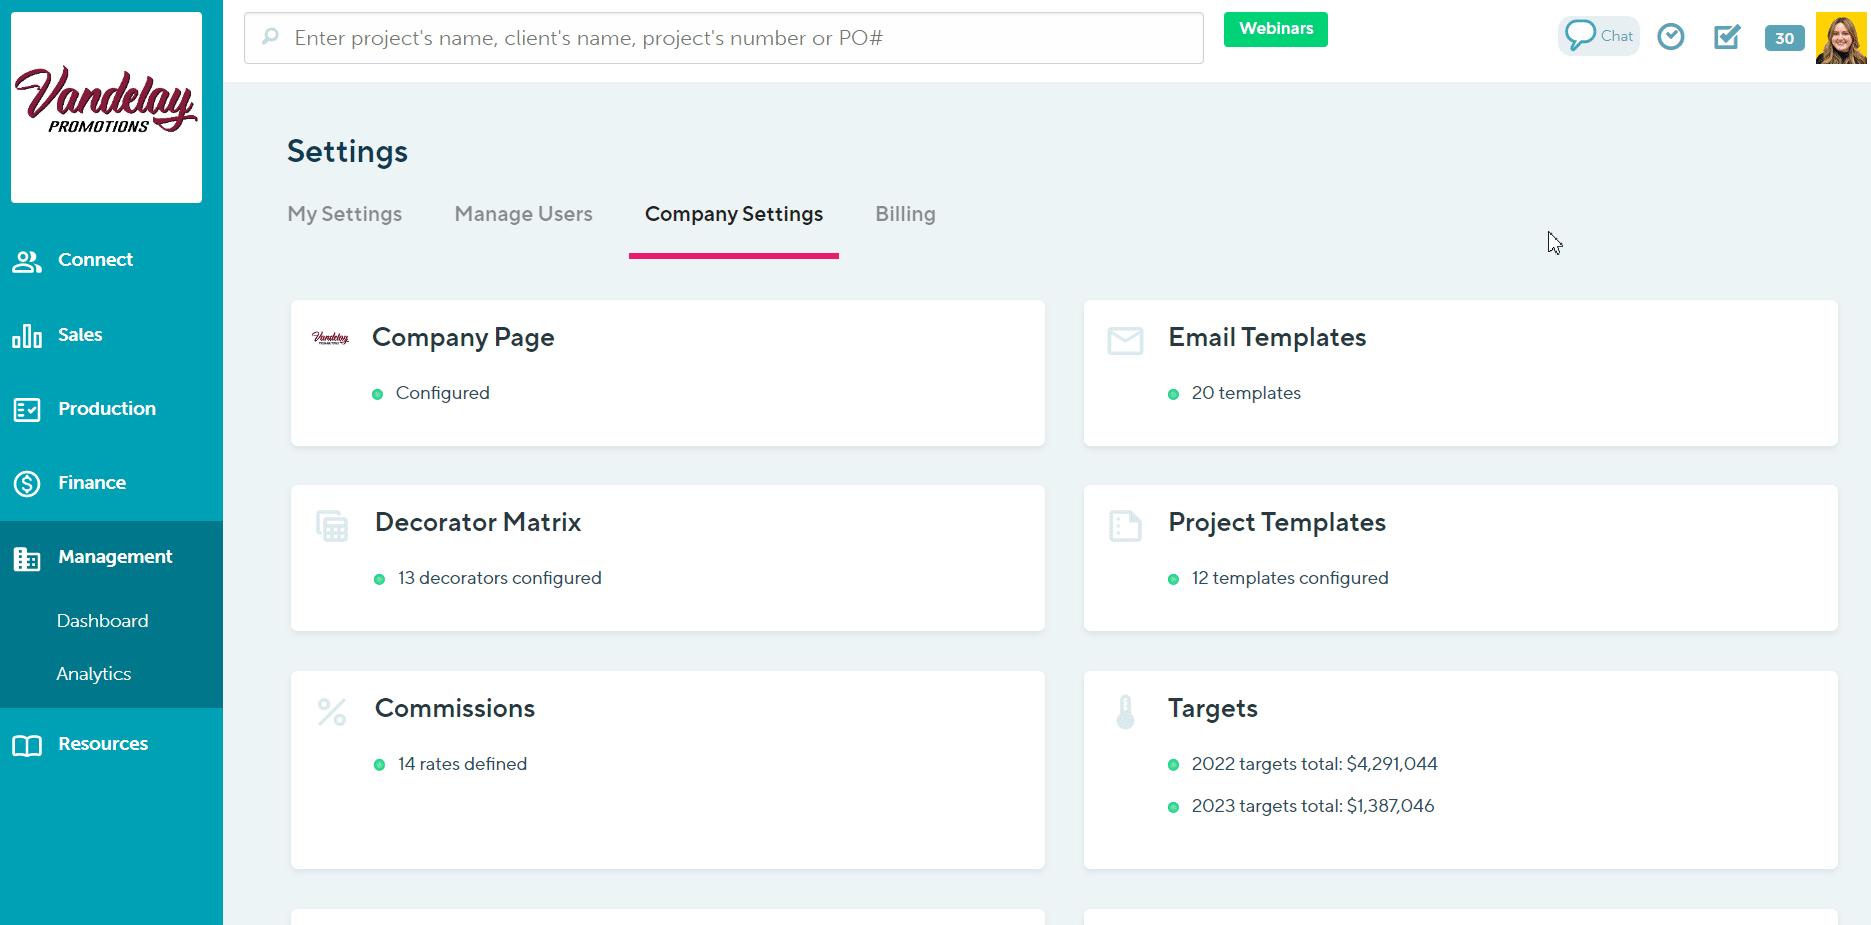
Step 1: You will need to add a new imprint method to your company settings before you can build fulfillment charges and details into your products' decoration locations.
- Click your Profile icon > Settings > Company Settings > Setup > Imprint Methods
- Click + Add New
- Add a new imprint method to represent fulfillment (i.e., "fulfillment," "kitting," etc.)
- Click Done
Step 2: Add a supplier to represent either your internal fulfillment department or the 3rd party fulfillment warehouse, and add their company address to their supplier page
Step 3: Add and edit your decoration location
- Hover your mouse over a product to click edit
- Click + Decoration Location
- Click Add new decoration location
- In the "Location" text field, enter "Fulfillment" or "Kitting"
- Click Add Artwork
- Select the new imprint type you created to represent fulfillment
- Select "None" under Proof Required
- Enter placeholder text for the logo name, size, and color (i.e., "N/A" or "None")
- Use the Supplier Notes field to provide your internal fulfillment department with the details they need for kitting (optional)
- Click Select Image and upload a placeholder image, or use the "Image Preview Not Available" stock image provided my commonsku
- Enter all run and fixed charges associated with the fulfillment service
Imprint Cost (run charge)
To add a run charge for fulfillment services:
- Click into the "Cost" field and add your cost (what you pay the fulfillment house)
- Enter a margin in the "Margin" field or a price in the "Retail" field
- Select Include in price (includes the cost in your client's price) or Display to client (displays the price as a separate line item on the sales order)
- Add more costs by clicking + add run charge for this decoration and selecting the artwork location the cost is related to (optional)
If you prefer to offer all-inclusive pricing and don't want the imprint cost to affect the product's retail price, enter $0 in the "Retail" field.
Setup Cost (fixed charge)
To add a fixed charge for fulfillment services:
- Enter the quantity of the charge into the QTY field (this is usually "1")
- Click into the "Cost" field and add your cost (what you pay the fulfillment house)
- Enter a margin in the "Margin" field or a price in the "Retail" field
- Select to Display to client (displays the price as a separate line item on the sales order) or Subtract from margin (subtracts the cost from the product's margin)
- Add more costs by clicking + add fixed charge for this decoration and selecting the artwork location the cost is related to (optional)
These charges are not mandatory and can be deleted by hovering over each line and clicking the x. You can also rename charges by clicking the text field and entering the new name for the cost.
Step 4: Fill out shipping details for the products you are ordering
If you're using a decoration location to account for fulfillment services, you can set up your shipping details to either:
To ship to an internal fulfillment department:
- Navigate to the Shipping tab > click to edit each of your client's products
- Enter the in-hands date/shipping date
- Select the box beside "Firm" to mark the in-hands/shipping date as firm (optional)
- In the "Ship To" options, select Decorator
- Select the "Shipping Account" drop-down and choose either Client's Account, Supplier's Account, Our Account, or Other
- Select one of your existing accounts from the drop-down below, or, for client accounts, click the "+" to add a new 3rd Party Shipping account to your client's profile (this selection will filter the available Ship Methods based on the courier assigned to the shipping account)
- Enter Shipping Quote - enter the shipping quote from your rep (Supplier's accounts only)
- Select the "Shipping Method" drop-down and choose your preferred method
- Enter supplier notes in the "Supplier Notes" field (optional)
- On the right-hand side, click the "Decorator" drop-down and select your internal fulfillment department
- Click the "Decorator Address" drop-down to choose your desired shipping address
- In the "Ship To" options, select the Client
- Select the "Shipping Account" drop-down and choose either Client's Account, Supplier's Account, Our Account, or Other
- Select one of your existing accounts from the drop-down below, or, for client accounts, click the "+" to add a new 3rd Party Shipping account to your client's profile (this selection will filter the available Ship Methods based on the courier assigned to the shipping account)
- Enter Shipping Quote - enter the shipping quote from your rep (Supplier's accounts only)
- Select the "Shipping Method" drop-down and choose your preferred method
- Enter fulfillment notes in the "Decorator Notes" field (optional)
- Click Save
To ship to another supplier for fulfillment:
- Navigate to the Shipping tab > click to edit each of your client's products
- Enter the in-hands date/shipping date
- Select the box beside "Firm" to mark the in-hands/shipping date as firm (optional)
- In the "Ship To" options, select Decorator
- Select the "Shipping Account" drop-down and choose either Client's Account, Supplier's Account, Our Account, or Other
- Select one of your existing accounts from the drop-down below, or, for client accounts, click the "+" to add a new 3rd Party Shipping account to your client's profile (this selection will filter the available Ship Methods based on the courier assigned to the shipping account)
- Enter Shipping Quote - enter the shipping quote from your rep (Supplier's accounts only)
- Select the "Shipping Method" drop-down and choose your preferred method
- Enter supplier notes in the "Supplier Notes" field (optional)
- On the right-hand side, click the "Decorator" drop-down and select the fulfillment warehouse
- Click the "Decorator Address" drop-down to choose your desired shipping address
- In the "Ship To" options, select the Client
- Select the "Shipping Account" drop-down and choose either Client's Account, Supplier's Account, Our Account, or Other
- Select one of your existing accounts from the drop-down below, or, for client accounts, click the "+" to add a new 3rd Party Shipping account to your client's profile (this selection will filter the available Ship Methods based on the courier assigned to the shipping account)
- Enter Shipping Quote - enter the shipping quote from your rep (Supplier's accounts only)
- Select the "Shipping Method" drop-down and choose your preferred method
- Enter fulfillment notes in the "Decorator Notes" field (optional)
- Click Save
Step 5: Create your POs
- Click the Purchase Orders tab
- Click Actions > Create POs or Regenerate All POs, if the project has existing purchase orders (make sure you select "don't regenerate" for any existing POs so their details stay the same)
You should now have two POs in the project: one shipping from the supplier to either your internal fulfillment department or your 3rd party fulfillment warehouse and one shipping from the fulfillment department/warehouse to the client.
Option 3: Use a Service PO
By using a Service PO to account for fulfillment charges and details, you can build a purchase order for the product you're ordering and a service PO for the fulfillment warehouse. This method also allows for products to be shipped from the supplier to a third-party decorator before being shipped to a fulfillment warehouse ahead of shipping to the client.
Step 1: Add a supplier to represent either your internal fulfillment department or the 3rd party fulfillment warehouse, and add their company address to their supplier page
Step 2: Fill out shipping details for the products you are ordering
If you're using a service PO to account for fulfillment services, you can set up your shipping details so that your product ships to one of two places before shipping to your client:
For products shipping to a third-party decorator before shipping to the client
- Navigate to the Shipping tab > click to edit each of your client's products
- Enter the in-hands date/shipping date
- Select the box beside "Firm" to mark the in-hands/shipping date as firm (optional)
- In the "Ship To" options, select Decorator
- Select the "Shipping Account" drop-down and choose either Client's Account, Supplier's Account, Our Account, or Other
- Select one of your existing accounts from the drop-down below, or, for client accounts, click the "+" to add a new 3rd Party Shipping account to your client's profile (this selection will filter the available Ship Methods based on the courier assigned to the shipping account)
- Enter Shipping Quote - enter the shipping quote from your rep (Supplier's accounts only)
- Select the "Shipping Method" drop-down and choose your preferred method
- Enter supplier notes in the "Supplier Notes" field (optional)
- On the right-hand side, click the "Decorator" drop-down and select your decorator from the list
- Click the "Decorator Address" drop-down to choose your desired shipping address
- In the "Ship To" options, select the Client
- Select the "Shipping Account" drop-down and choose either Client's Account, Supplier's Account, Our Account, or Other
- Select one of your existing accounts from the drop-down below, or, for client accounts, click the "+" to add a new 3rd Party Shipping account to your client's profile (this selection will filter the available Ship Methods based on the courier assigned to the shipping account)
- Enter Shipping Quote - enter the shipping quote from your rep (Supplier's accounts only)
- Select the "Shipping Method" drop-down and choose your preferred method
- Enter any notes for the decorator in the "Decorator Notes" field (optional)
- Click Save
For products shipping to another supplier before shipping to the client
- Navigate to the Shipping tab > click to edit each of your client's products
- In the "Edit shipping information" screen, check the box next to Sample Order to indicate to the supplier if this is a sample PO (optional)
- Enter the in-hands date
- Select the box beside "Firm" to mark the in-hands/shipping date as firm (optional)
- In the "Ship To" options, select Other Supplier
- Select the "Shipping Account" drop-down and choose either Client's Account, Supplier's Account, Our Account, or Other
- Select one of your existing accounts from the drop-down below, or, for client accounts, click the "+" to add a new 3rd Party Shipping account to your client's profile (this selection will filter the available Ship Methods based on the courier assigned to the shipping account)
- Enter Shipping Quote - enter the shipping quote from your rep (Supplier's accounts only)
- Select the "Shipping Method" drop-down and choose your preferred method
- Enter supplier notes in the "Supplier Notes" field (optional)
- On the right-hand side, click the "Supplier" drop-down and select your supplier
- Click the "Supplier Address" drop-down to choose your desired shipping address
- Click Save
Step 3: Add a service PO to your sales order
- In the sales order, click + Add > Service PO
- Select either your internal fulfillment department or the 3rd party fulfillment warehouse as the supplier
- Enter the in-hands/shipping date as the due date
- In the supplier instructions, include all instructions for fulfillment and shipment of the product; make sure to provide details for shipping to the client
- Enter the quantity for the PO (number of kits)
- Enter the Unit Cost (net cost)
- Enter the retail price
- Select the box beside "Hidden" to hide the PO from the client's sales order (optional)
- Update the Currency Conversion (if applicable)
- Select a tax rate from the "Taxes" drop-down
- Click Done
Step 5: Create your POs
- Click the Purchase Orders tab
- Click Actions > Create POs or Regenerate All POs, if the project has existing purchase orders (make sure you select "don't regenerate" for any existing POs so their details stay the same)
You should now have two POs in the project: one shipping from the supplier to either your internal fulfillment department or your 3rd party fulfillment warehouse and one shipping from the fulfillment department/warehouse to the client.