On this page:
General settings
The Pop-Up Shop's general settings include:
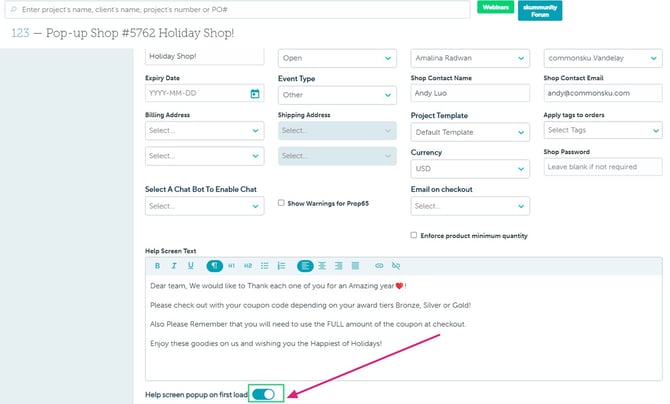
- Shop Name - appears in the browser tab when shoppers open your shop. It defaults to the name you used to create the shop, but you can update it at any time.
- Status - identifies if the shop is current (open) or expired/not in use (closed).
- Default Client Rep - defaults to the rep assigned through the client's page.
- Order Rep - the shopper's checkout receipts will appear to come from them.
- Expiry Date - prevents your clients from accessing the shop after a specific date, perfect for limited-time offerings. The shop expires at 11:59 PM (ET) on the set date.
- Event Type - used for future reporting on sales orders created through the shop.
- Shop Contact Name/Email - this is your shoppers' primary contact; their details appear on the shop's splash screen/help.
-
Billing Address - this is the billing contact/address that will appear on sales orders created through the shop.
-
Shipping Address - this is the shipping contact/address that will appear on sales orders created through the shop. The shipping address locks once a checkout is created.
-
Project Template - this will be the template assigned to orders created through the shop.
-
Apply tags to orders - customizable tags for future reporting.
-
Currency - acts as the default currency for orders placed through the shop.
-
Shop Password - a customizable field that allows you to limit access to the shop. You can change the password at any time.
-
Chatbot - enables a chatbot on your shop.
-
Show Warnings for Prop 65 - this adds warnings for California's Prop 65.
- Email on checkout - choose who receives an email notification when shoppers place an order.
- Enforce product minimum quantity - choose if you'd like to enforce minimum quantities on the shop's products.
- Splash screen/Help Screen Text - this is the first thing your shoppers will see when they open the shop. It's the perfect place to add important information you'd like your shoppers to know.
You can use the toggle to turn on or off to ensure that the help screen text pop up on the first load.
- Shop image for client portal - Add an image to represent your shop on the client's portal. If you don't have an image set, it will default to the first product's image in your shop.
Free Product settings
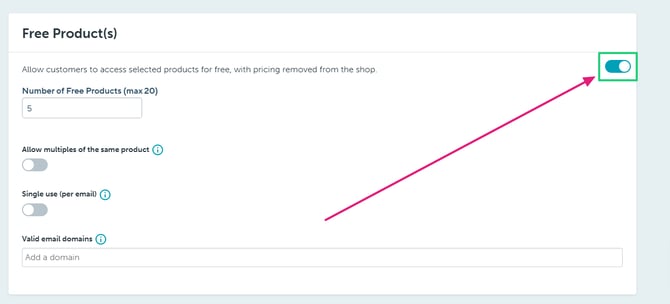
You have the option to enable the Free Product setting, which permits shoppers to redeem a specified number of products, allowing up to 20 products in total per checkout.
- How to activate the Free Product redemption
- How to specify the quantity of free product available
- How to restrict Free Products to a Single use (per email)
- How to restrict Free Products to Valid email domains
- How to redeem a free product
commonsku Tip: Shoppers cannot order/purchase additional items once the free product setting is activated. If you'd like shoppers to order/buy extra items, consider using a coupon code to honor the free product. Alternatively, you can create a separate shop for the paid products or deactivate the free product option once shoppers have ordered all of the complementary products.
How to activate and deactivate the Free Product redemption
To activate the Free Product redemption:
Switch the Toggle button to ON
To deactivate the Free Product redemption:
- Un-switch Toggle button to Off

To specify the quantity of Free Products available
Enter the desired number in the box provided below:

To enable redemption of multiple quantities of the same product:
Turn on the toggle button to allow customers to add multiple quantities of the same free product to their cart, applicable only when two or more products are available.

Each pop-up shop can feature a maximum of 20 free products.
How to restrict Free Products to a single use (per email)
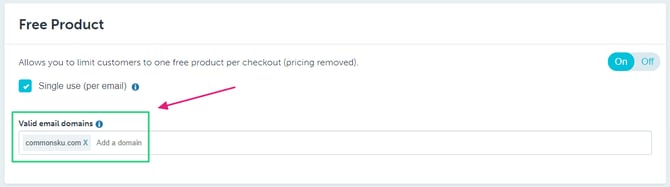
Use Single use (per email) to prevent a single email address from collecting more than one free item.
To restrict Free Products to a Single use (per email):
- Select the checkbox beside "Single use (per email)"
.png?width=670&height=190&name=Single%20use%20(per%20email).png)
How to restrict Free Products to Valid email domains
Add Valid email domains to prevent shoppers who do not have a specified domain from redeeming a free product. For example, if you're creating a Pop-Up Shop for employees to collect a gift, you can enter the company's domain and prevent anybody who is not an employee from cashing in on a free item.
To restrict Free Products to Valid email domains:
- Type a domain (i.e., commonsku.com) into the "Valid email domains" field
- Click Enter on your keyboard
- Add more domains as needed (optional)
How to redeem a free product
Shoppers select their free product the same way they would normally order an item from your shop.
Once you're shopper has chosen (clicked on) their free item, they will need to:
- Select the variant (if applicable)
- Click the Select button to open the checkout screen and complete their order or click the Change Product button to select a different item
If you want to allow employees to claim free items while also purchasing additional items, consider using a coupon or set up two separate shops, one pop-up for free items and a second one for optional paid purchases
Shipping charge settings
The shipping charge setting allows you to add shipping costs, based on the checkout's subtotal, to all of the shop's checkouts. Shipping charges appear after the subtotal on the shopper's checkout and as a service line on the final sales order.
To create shipping ranges:
- Click + add Range
- In the "Range" field, type the minimum dollar value required to include a shipping charge
- In the "Shipping Charge" field, type the chare that applies to that range
- Add more ranges as required
Each new range determines the maximum value for the previous range. For example, the first range is from $0 - $10; the second range will automatically begin at $11.
The checkout subtotal is what determines the shipping cost, not the products or the shipping location.
Checkout settings
A Pop-Up Shop's checkout settings include its:
- Collect shipping address at checkout
- Checkout tax
- Credit card checkout
- Checkout limit
- Checkout questions
- Checkout message
- Checkout comments
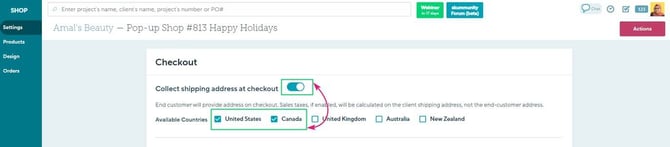
Collect Shipping addresses at checkout
This will allow shipping addresses added at checkout to be verified by Google.
To Collect shipping addresses:
1. Turn on the Toggle button
2. Check off the list of Available Countries
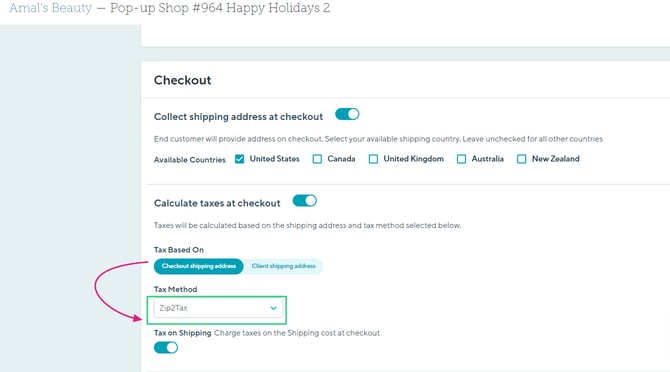
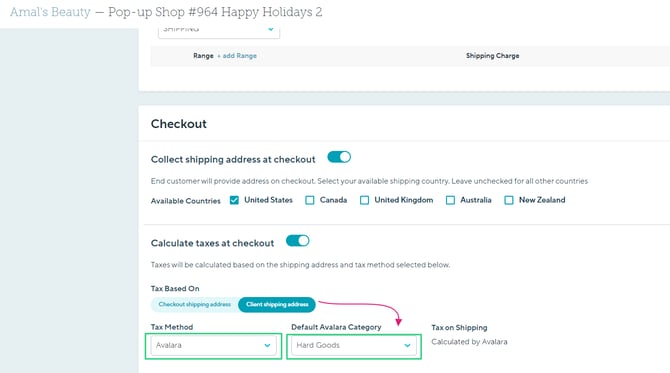
Calculate Taxes at checkout
Taxes are calculated based on the shipping address and the selected tax method.
To add a tax rate by checkout shipping addresses (multiple taxes):
In order to add a tax rate based on checkout shipping addresses, you must enable the toggle button to collect shipping addresses at checkout.
-
Select checkout shipping addresses from the toggle button.
- Select your tax method from the drop-down selection.
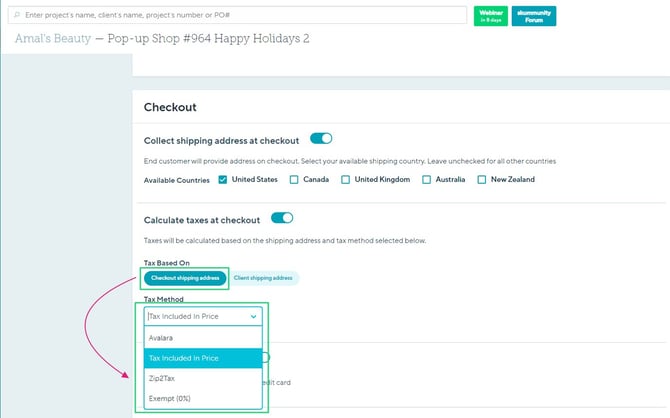
- If your team is using Zip2Tax, select Zip2Tax and the tax will be calculated base of the shipping address at checkout.
Please be advised that the Zip2Tax tool cannot identify which addresses fall within an Origin based state versus a Destination based state. It will always calculate taxes based on the shipping address of an order, whether or not that address is based in a Destination state. You can click here for more information on sales tax for Origin Vs Destination states.
If your team is using Avalara
Select a default Avalara Category - this will apply to the items in your shopper's orders
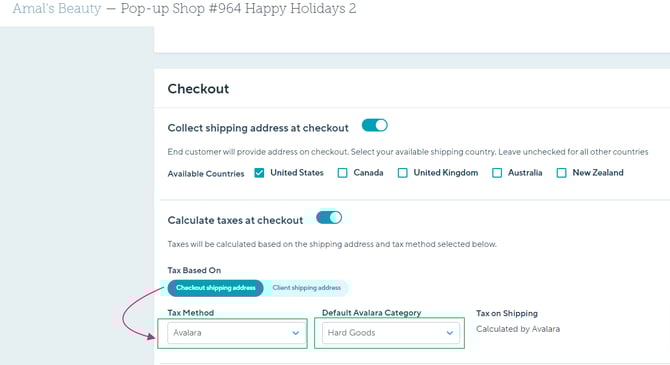
Select Tax Included in price if the tax is included in your product's retail price and does not need to be added to each checkout's subtotal.
- Select the Tax on Shipping toggle to charge taxes on the Shipping cost at checkout.
To add a tax rate by client shipping address (one tax):
-
Select client shipping addresses from the toggle button.
- Select your tax method from the drop-down selection.
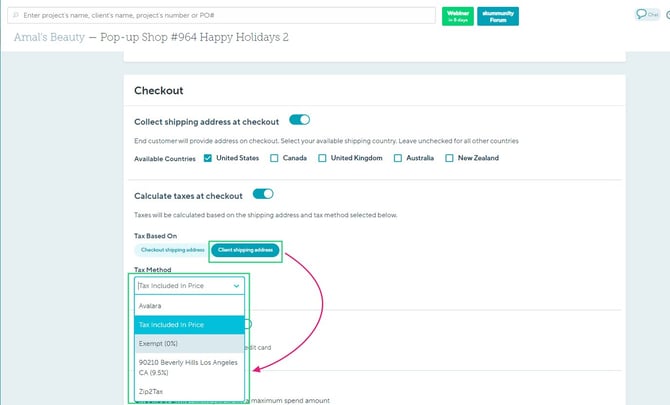
- If your team is using Zip2Tax, type the zip code of the shipping location you are collecting tax for and select the tax from the drop-down menu.
- If your team is using Avalara:
- Select Avalara from the Checkout Tax drop-down
- Select a default Avalara Category - this will apply to the items in your shopper's orders
- Select Tax Included if the tax is included in your product's retail price and does not need to be added to each checkout's subtotal.
- Select the Tax on Shipping toggle to charge taxes on the Shipping cost at checkout.
Credit card checkout
The credit card checkout allows your shoppers to checkout with a credit card.
You need to be integrated with one of our credit card processors in order to use this feature.
To add credit card checkout, select the box beside Enabled.
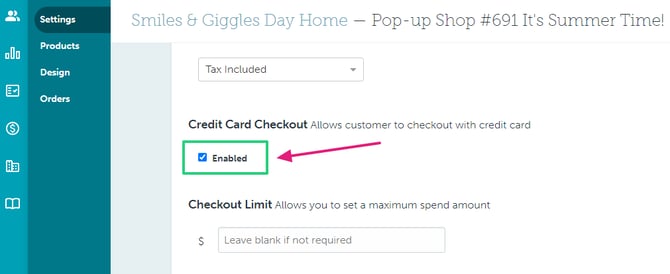
That will replace the "Submit Order" button with a "Pay by Credit Card" button on your shopper's final checkout screen. Shoppers will not be able to submit checkouts without payment once the credit card checkout is enabled.
Any transaction charge from credit card payment is separate from commonsku's 2.5% shop fee.
Checkout limit
The checkout limit allows you to set a maximum spend and prevents shoppers from ordering over that dollar value within a single checkout.
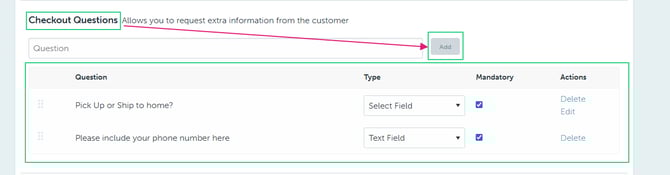
Checkout questions
Checkout questions are used to request additional information from the shopper before they place their checkout. To add a question:
- Type the question in the Question field
- Click Add
- In the Type field, select if you'd like the answer to have an open text field (click text field) or have pre-determined answers (click select field)
- Click the box under Mandatory to make the question mandatory (optional)
- If you chose a select field question, click edit > + add option > enter the options for your shoppers to select from > click Done
To edit the options within a select field question, click edit beside the question you'd like to change. To delete a question, click delete beside the question you'd like to remove.
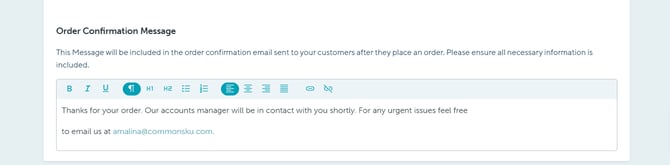
Checkout message
The checkout message is the final thing your shopper sees after they place their checkout. It's the perfect place to add import details, including any next steps you'd like to make your shopper aware of. This message will also be included in the order confirmation email that the shopper receives.
Checkout comment
Comments submitted by clients in the “Comment” section during checkout will be included on the PDF receipt for pop-up shop orders.
Distributor Name on Receipts
To include your distributor name on receipts:
1. To enable this feature, simply turn on the Toggle button located in the shop settings

Coupons
Pop-Up Shop coupons allow you to give shoppers a specified $ or % discount on their final checkout. The discount is calculated based on the checkout's subtotal, which excludes taxes and shipping.
Shoppers are not charged tax in instances where checkout's subtotal is less than or equal to the coupon's $ or % discount. For example, if the checkout subtotal is $10, and your coupon is $10, you would not be charged tax on the checkout.
Learn how to:
- Create a coupon
- Apply a coupon to a checkout
- Troubleshoot error messages that appear during a checkout
To create a coupon:
- Click New Coupon
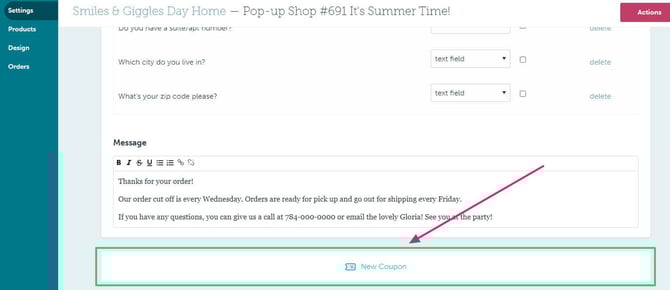
That will open different options to customize up to 10 coupons for your shoppers.
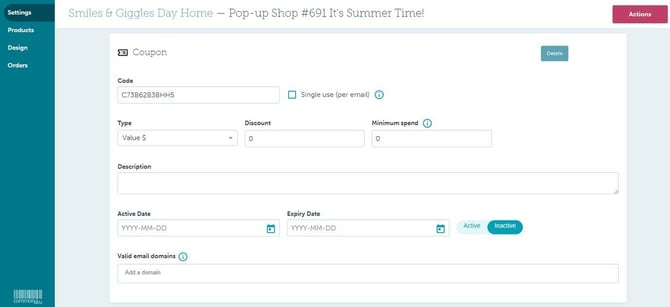
These customization options include the:
- Code - you can use the default coupon code or create a custom code with letters/numbers/symbols/spaces.
- Singe use (per email) - restricts a single email address from using a coupon code more than once.
- Type - choose between Value $ and Percent %.
- Discount - this determines the total discount applied to each checkout (must be a whole number).
- Minimum spend - allows you to set a minimum amount the shopper must spend, excluding shipping and taxes, before using the coupon.
- Description - this is for internal reference only and does not appear in the shop or on the checkout CSV file.
- Active/Expiry date - the Active Date is the first day a coupon is valid, whereas the Expiry Date is the day a coupon becomes invalid and can no longer be used.
- Active/Inactive - coupons automatically move to "Active" on their activation date and automatically move to "Inactive" on their expiry date. You can manually set coupons to Active/Inactive if you aren't using the Active and Expiry dates.
- Valid email domains - prevents shoppers who do not have a specified domain from placing an order through your shop. For example, if you're creating a company store and only employees can place orders, you can enter the company domain as a valid email domain. That will prevent anybody who is not an employee from placing an order through the shop.
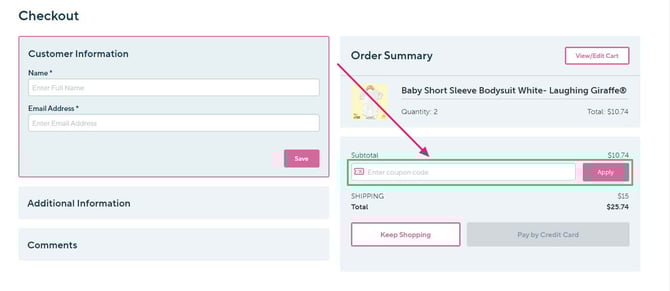
How to apply a coupon to a checkout
Shoppers can enter their coupon code on the final checkout screen. The checkout screen's right-hand side will show the shopper's checkout details, subtotal, and allow them to apply a coupon against the subtotal.
How to troubleshoot error messages
Error Message: "Invalid discount code."
This appears if a shopper:
- Enters a coupon code that is not active or has expired
- Misspells the coupon code
Error Message: "You are not eligible for this discount."
This appears if a shopper:
- Tries to create more than one checkout with a single-use (per email) coupon code
- Tries to redeem a coupon without using the valid email domain
Error Message: "Service not allowed"
This appears if a shopper:
- Tries to use a payment method that is not compatible with the payment processor (Stripe or CloverConnect)
FAQ
- Who gets notified when somebody places an order through the Pop-Up Shop?
- How do I turn on a shipping charge for my shop?
- Can a Pop-Up Shop orders ship to multiple locations?
- Can Pop-Up Shops only be open for a limited time?
- Where can I find the answers to checkout questions?
- Do I have to combine checkouts, or can I create individual sales orders?
- How many coupons can I create?
- Can I make a custom coupon code for each shopper?
- Can shoppers combine coupon codes?
- Is there any coupon reporting?
- Can coupons be applied to shipping/taxes?
- Can I add letters, numbers, and symbols to custom coupons?
- Can I limit the quantity a shopper can purchase?
- Can I limit shoppers to only placing one order?
-
Can I bypass the shop's landing page and allow my shopper to click right into the shop?
- How will taxes appear on my sales order if there are checkouts with different tax rates?
- Can I customize my thank you message in order confirmation emails?
- What happens when a customer adds the same product with different customizations?
- Can customers edit their selections from the cart?
- How are upcharges displayed in the cart and checkout?
- Will upcharges appear in receipts and exports?
-
Why don’t I see the Zip2Tax option in my Pop-Up Shop checkout tax settings?
- I’m using Avalara in my Pop-Up Shop. Why aren’t customers being charged tax even though I selected “Client shipping address” in the checkout settings?
- When does my shop actually expire?
- Will setup fees, decoration charges, or other service fees appear to shoppers at checkout?
- Can I use a Pop-Up Shop to track client-owned inventory?
Who gets notified when somebody places an order through the Pop-Up Shop?
You can set your notification preferences by adjusting the "Email on checkout" option in the shop's General Settings.
How do I turn on shipping charge for my shop?
To enable shipping charges for your shop, follow these steps:
1. Navigate to the settings of your shop.
2. Click on the "+ add Range" option.
3. In the "Range" field, enter the minimum dollar amount that must be met to trigger a shipping charge.
4. In the "Shipping Charge" field, specify the charge that corresponds to that range.
5. Feel free to add additional ranges as necessary.
Can a Pop-Up Shop orders ship to multiple locations?
Even though Pop-Up Shops have a single shipping address, you can still use the checkout questions to capture your shoppers' address details.
Can Pop-Up Shops only be open for a limited time?
Although Pop-Ups Shops are typically used for limited-time offerings, you can keep the shop open for as long as you need! There's no need to close a Pop-Up Shop after you create a single sales order. You can keep it running and generate more orders in the future.
Where can I find the answers to checkout questions?
You will be able to find the answers of your checkout questions through the view checkout button in the orders tab, your checkout report and on your checkout receipts.
Do I have to combine checkouts, or can I create individual sales orders?
You don't have to combine the shop's checkouts. You can use Pop-Up Shops for on-demand orders, where checkouts are fulfilled when the order is received. The best practice in this scenario is to monitor checkouts regularly and create a new project for each checkout.
How many coupons can I create?
You can create up to 10 coupons per Pop-Up Shop.
Can I make a custom coupon for each shopper?
Shops don't have user logins, so there's no way to assign a specific coupon to a particular person. If you have ten or fewer shoppers, they could each have a custom coupon, but it's easier to share codes between shoppers and use the Single use (per email) and Valid email domain settings to prevent them from ordering more than once.
Can shoppers combine coupon codes?
No. Shoppers can only use one coupon per checkout.
Is there any coupon reporting?
Yes, the final checkout CSV lists coupons as separate line items per checkout.
Can coupons be applied to shipping/taxes?
Coupons apply to the order's subtotal, which excludes shipping and taxes. Shoppers are not charged tax in instances where checkout's subtotal is less than or equal to the coupon's $ or % discount. For example, if the checkout subtotal is $10, and their coupon is $10, they would not be charged tax on the checkout.
Can I add letters, numbers, and symbols to custom coupons?
Definitely! Coupons can contain up the 37 characters, including letters, numbers, and special symbols.
Can I limit the quantity a shopper can purchase?
If you're offering a coupon, you can use the Single user (per email) and Valid email domains settings to restrict a shopper from placing more than one order in your shop. In that case, they would be limited to using their company email and could only redeem a coupon once. As a best practice, be sure to double-check the checkouts/checkout CSV for multiple orders before creating your sales order.
Can I bypass the shop's landing page and allow my shopper to click right into the shop?
Yes! If you don't want to use the shop's landing page, you can edit the shop URL before you send it to the client, or within the link embedded on your website so your shoppers can jump right into the shop. Just add "/shop" to the end of your shop's URL and you'll be good to go!
How will taxes appear on my sales order if there are checkouts with different tax rates?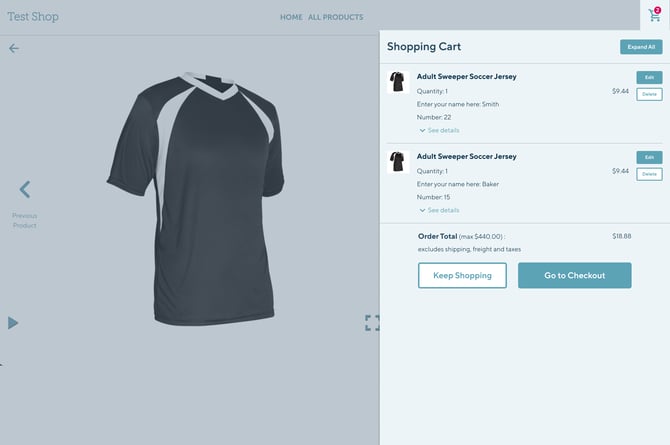
Why don’t I see the Zip2Tax option in my Pop-Up Shop checkout tax settings?
This usually happens when the Pop-Up Shop was created while your company was using Manual Taxes.
When a Pop-Up Shop is created, it keeps the tax configuration that was active at that time. So if your company later switches from Manual Taxes to Zip2Tax, existing Pop-Up Shops won't automatically update to use the new tax setup.
How do I fix it?
The easiest solution is to create a copy of the Pop-Up Shop after Zip2Tax has been enabled in your company settings.
- Make sure Zip2Tax is enabled in your company tax settings.
- Open the Pop-Up Shop that is missing the Zip2Tax option.
- Click Copy Shop.
- Open the newly copied shop.
- Go to the checkout tax settings.
You should now see the option to use Zip2Tax for checkout tax calculations.
A copied Pop-Up Shop uses your current company settings, including your current tax configuration. This allows the new shop to recognize and use Zip2Tax.
I’m using Avalara in my Pop-Up Shop. Why aren’t customers being charged tax even though I selected “Client shipping address” in the checkout settings?
If customers are not being charged tax, it may be because the client is marked as tax exempt in Avalara for that state.
For Pop-Up Shop checkouts, commonsku does not manually send a tax-exempt status to Avalara. Instead, commonsku sends the client name to Avalara. If Avalara finds that the client has a tax-exempt status for the customer’s shipping state, Avalara will return $0 tax.
This works the same way Avalara tax exemptions work on regular projects in commonsku.
If tax should be charged, review the client’s tax exemption setup in Avalara for that state.
When does my shop actually expire?
The expiry date is the last day your shop remains open.
For example, if you set the expiry date to June 5, 2026, customers can continue placing orders throughout the entire day on June 5. The shop will automatically close at the start of the next calendar day (June 6, 2026).
| Tip: If you want your shop to be closed on June 5, set the expiry date to June 4. This makes June 4 the last day customers can place orders. |
Will setup fees, decoration charges, or other service fees appear to shoppers at checkout?
No. By default, Pop-Up Shops display only the product's retail price during checkout. Additional charges—such as setup fees, decoration charges, PMS fees, and other service costs—are not automatically shown to shoppers.
If these charges apply, you have a few options:
- Include the cost in the product's retail price so it's reflected in the displayed price.
- Add a custom question with an upcharge if the fee depends on an optional service. For example, you could create a question such as "Would you like individual name personalization?" or "Add gift packaging?" and assign an upcharge to that option. When shoppers select the option, the additional cost is displayed and added to their total.
- Use product upcharges for options based on color, size, or SKU. Edit the product, scroll to Add Upcharge, and configure the additional pricing. When shoppers select an option with an upcharge, the updated price is displayed on the product page and carried through to checkout.
